
Hello! Welcome back to your JRPG development journey.
In our last lesson, we successfully created a stateful treasure chest by combining event pages with self-switches. This was a crucial step in making our game world feel interactive and alive. We now have a robust system for scripting objects that can remember their state.
Today, we will use that same event system to build connections between different areas of our world. This lesson fulfills the learning outcome: Script a map transition event (e.g., entering a building). We will create the classic JRPG experience of walking into a doorway and seamlessly appearing inside a new map, like a house or a cave. This is the final core component of our event system and the key to building a world that players can explore.
1. The Anatomy of a Map Transition Event
At its core, a map transition is just another event, like the treasure chest. The difference lies in the trigger and the command.
- Trigger: A map transition is almost always initiated when the player character walks onto a specific tile. This directly corresponds to the
player_touchtrigger we designed earlier. - Command: The action performed is to move the player to a new location. This requires a new event command that our
EventInterpreterwill need to understand:transfer_player.
This command needs a few key pieces of information to work:
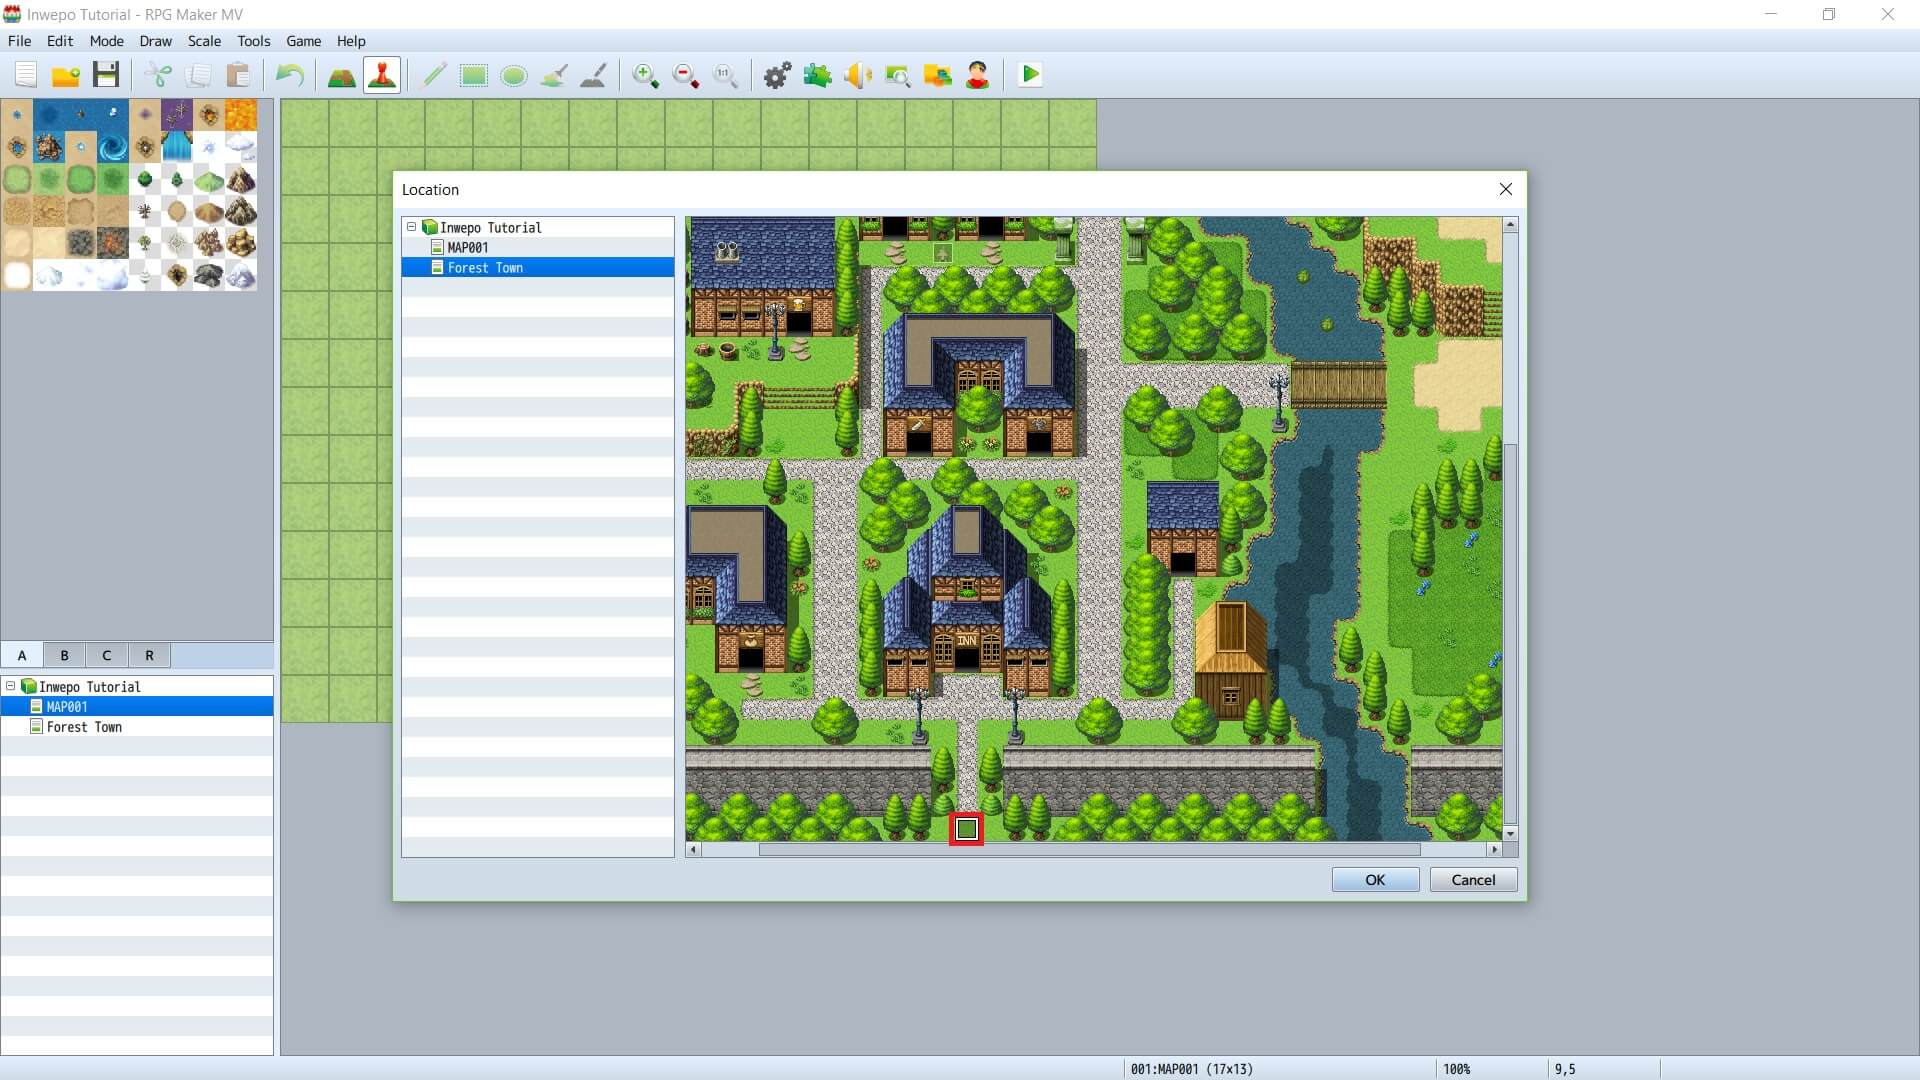
mapId: A unique string identifying the destination map (e.g.,"world_map","town_01","house_interior_01").x,y: The grid coordinates on the destination map where the player should appear.direction(Optional): The direction the player character should be facing upon arrival (e.g.,"up","down"). This prevents the player from appearing to face a wall.
This process is visualized clearly in RPG Maker's editor. Notice how the user selects a destination map and a specific tile for the player to land on.
2. Scripting a One-Way Transition
Let's script an event that takes the player from a town map into a house. We'll place this event on the doorway tile of a house on our town_01 map.
Here is what the JSON data for this event would look like:
{
  "id": "evt_town_house1_door",
  "x": 15,
  "y": 20,
  "trigger": "player_touch",
  "pages": [
    {
      "id": 1,
      "conditions": [],
      "commands": [
        {
          "command": "transfer_player",
          "mapId": "map_house_01_interior",
          "x": 5,
          "y": 9,
          "direction": "up"
        }
      ]
    }
  ]
}
Let's break this down:
trigger: "player_touch": The event runs the moment the player steps on the tile at (15, 20).commands: The interpreter finds only one command,transfer_player.- Parameters: The command instructs the engine to load the map
map_house_01_interior, place the player at coordinates (5, 9), and face them upwards.
To see this exact process demonstrated in RPG Maker, watch the following short video.
How to Move or Transition Between Maps in RPG Maker MV Tutorial
The video 'How to Move or Transition Between Maps' from Chris' Tutorials clearly shows how to set up a basic transfer event.
Watch the section 'Manual Map Transition Event Creation' from 0:57 to 2:27. You will see the event's trigger being left as the default (equivalent to our player_touch) and the 'Transfer Player' command being configured with a destination map and coordinates.
3. The Two-Way Street: Entering and Exiting
A transition is only useful if the player can come back. We need a corresponding event inside the house interior map that transfers the player back outside.
This brings up a common organizational strategy in JRPG development. Instead of creating a separate map file for every single house interior, developers often create one large "Interiors" map. Different buildings are laid out in separate, isolated black-box areas on this single map. This is efficient, as the engine only needs to load one map file to access all the houses in a town. Your front-end experience with sprite sheets is a good analogy: packing many small images into one large texture is more efficient than loading hundreds of individual files.
The video below explains this concept and then demonstrates creating the two-way link between an exterior town and an interior room.
Creating Building INTERIORS | BenderWaffles Teaches - RPG Maker Tutorial HOW TO Addendum #1 VX MV MZ
The video 'Creating Building INTERIORS' by John Aljets provides an excellent look at this professional workflow.
Watch the following three clips: 'Creating an Interior Map' (1:12 - 3:07): Notice how he creates one large, black map to house multiple interiors. 'Implementing Map Transfers (Exiting a Building)' (17:43 - 18:20): See how he places a transfer event on the doormat inside the house to go back outside. 'Implementing Map Transfers (Entering a Building)' (18:10 - 19:03): He then creates the corresponding door event on the outside map to complete the link.
So, on our map_house_01_interior, we would script the exit event like this:
{
  "id": "evt_house1_exit_door",
  "x": 5,
  "y": 10,
  "trigger": "player_touch",
  "pages": [
    {
      "id": 1,
      "conditions": [],
      "commands": [
        {
          "command": "transfer_player",
          "mapId": "town_01",
          "x": 15,
          "y": 21,
          "direction": "down"
        }
      ]
    }
  ]
}
When the player steps on the tile at (5, 10) inside the house, this event fires and sends them back to town_01 at the tile just below the doorway, facing down.
Test your understanding!
Imagine you have a forest_map and a cave_map. You want the player to enter a cave.
- The cave entrance on
forest_mapis at (30, 15). - The spot just inside the cave on
cave_mapwhere the player should appear is (5, 25).
Write the JSON for the two events required to make this a two-way transition. The player should appear just outside the cave entrance when they leave.
Show answer
Event 1: Entering the cave (on forest_map)
{
  "id": "evt_forest_cave_entrance",
  "x": 30,
  "y": 15,
  "trigger": "player_touch",
  "pages": [
    {
      "id": 1,
      "commands": [
        {
          "command": "transfer_player",
          "mapId": "cave_map",
          "x": 5,
          "y": 25,
          "direction": "up"
        }
      ]
    }
  ]
}
Event 2: Exiting the cave (on cave_map)
{
  "id": "evt_cave_exit",
  "x": 5,
  "y": 26, // Assuming the exit trigger is one tile below the entrance point
  "trigger": "player_touch",
  "pages": [
    {
      "id": 1,
      "commands": [
        {
          "command": "transfer_player",
          "mapId": "forest_map",
          "x": 30,
          "y": 16, // Place the player one tile below the entrance
          "direction": "down"
        }
      ]
    }
  ]
}
4. The Architecture Behind the Scenes
This all seems simple from a scripting perspective, but what is the transfer_player command actually asking the engine to do? It's initiating a significant change in the game's state. Executing this command involves a sequence of operations:
- Fade the screen to black.
- Unload the current map's assets (tilemap, events, NPCs).
- Load the destination map's assets.
- Instantiate the new map, its events, and its NPCs.
- Move the player object to the new map and set its position.
- Fade the screen in.
This entire process of managing which part of the game is currently active (a map, a battle, a menu) is handled by a high-level architectural component often called a Scene Manager or a State Machine.
Given your preference for understanding architecture, the following article provides an excellent, code-oriented overview of this concept. It explains how a state machine can manage the different "modes" of a JRPG, like being on a local map, the world map, or in a battle. A map transition is a prime example of where this pattern becomes essential.
How to Build a JRPG: A Primer for Game Developers - Code
The article 'How to Build a JRPG: A Primer for Game Developers' discusses the architectural foundation for managing game states. This will connect our event system to the bigger picture of engine design.
Please read two sections: Start at 'Managing Game State' and read until the start of 'Making Game Logic Easier With a State Stack'. Focus on the pseudocode for the StateMachine and how it handles different game states like LocalMapState and WorldMapState. Then, jump to the section 'Maps' and read until the start of 'Combat'. Pay close attention to the paragraph that introduces 'triggers,' as it explicitly describes using them to 'teleport the character to an indoor map.' This directly links the tilemap concept to the event we're scripting today.
Our transfer_player command is essentially a message from our low-level EventInterpreter to this high-level SceneManager, requesting a change of scene. We've scripted the request; in the next module, we'll design the manager that fulfills that request.
Conclusion
In this lesson, we've bridged the gap between separate locations in our game world. By scripting a simple event with a new transfer_player command, we can create the seamless transitions that are fundamental to JRPG exploration.
Key Takeaways:
- Map transitions are scripted as events, typically using the
player_touchtrigger. - The
transfer_playerevent command is the core of this mechanic, requiring a destinationmapIdandx/ycoordinates. - Good world design involves creating two-way transitions so the player can travel back and forth.
- Architecturally, a map transition is a request to change the game's primary state or "scene." This is handled by a higher-level system like a Scene Manager.
Preview of the next lesson:
This lesson marks the end of our module on Game Flow and Scripted Events. We have built a remarkably flexible, data-driven system for creating interactive content. The next module, "Scene Manager and Game States," will zoom out from individual maps and events to the overall structure of the game. In our very next lesson, "Design a scene manager architecture to handle transitions between game states (e.g., map, menu, battle)," we will design the very system we discussed today, formalizing how our engine will move between the major modes of gameplay.
Can't find a good explanation? Sign up and we'll make it for you
Sign up