Welcome back! In our last lesson, you mastered a professional deployment workflow using hardhat-deploy, allowing you to reliably deploy your SecurityToken contract to any network with a single command. However, if you inspect your newly deployed contract on a block explorer like Etherscan, you'll notice it's just opaque bytecode—a "black box" that offers no transparency to potential users or investors.
This lesson addresses that critical final step in the deployment process: source code verification. Verifying your contract is essential for building trust and enabling broader ecosystem integration. We will explore what verification is, why it's non-negotiable for any serious project, and how you can automate it directly within your Hardhat environment. By the end of this lesson, you will be able to deploy and automatically publish your contract's source code, transforming it from an opaque address into a transparent, auditable, and interactive on-chain entity.
1. The "Why" and "How" of Contract Verification
Before we get into the practical steps, it's crucial to understand what's happening under the hood. When you deploy a contract, only its compiled version—the bytecode—is stored on the blockchain. This is efficient for the Ethereum Virtual Machine (EVM) but unreadable for humans. Verification is the process of publicly proving that a specific, human-readable Solidity source code compiles to the exact bytecode that's on-chain.
Why is this so important?
A verified contract unlocks a level of trust and functionality that is otherwise impossible.
How to Verify Your Smart Contract on Etherscan
This article section details the immediate benefits you gain after a successful verification on Etherscan.
Read the section titled "What Happens After Verification". Pay close attention to the two new tabs that appear (Read Contract and Write Contract) and the downstream effects on other tools like wallets and DEXs.
As you've just read, verification isn't merely cosmetic. For tokenized securities or stablecoins, it's a baseline requirement for transparency. It allows regulators, auditors, and investors to inspect the code that governs their assets. The "Read Contract" and "Write Contract" tabs on Etherscan become a direct, decentralized interface to your contract's functions, which is invaluable for power users and for system administration.

How does it work?
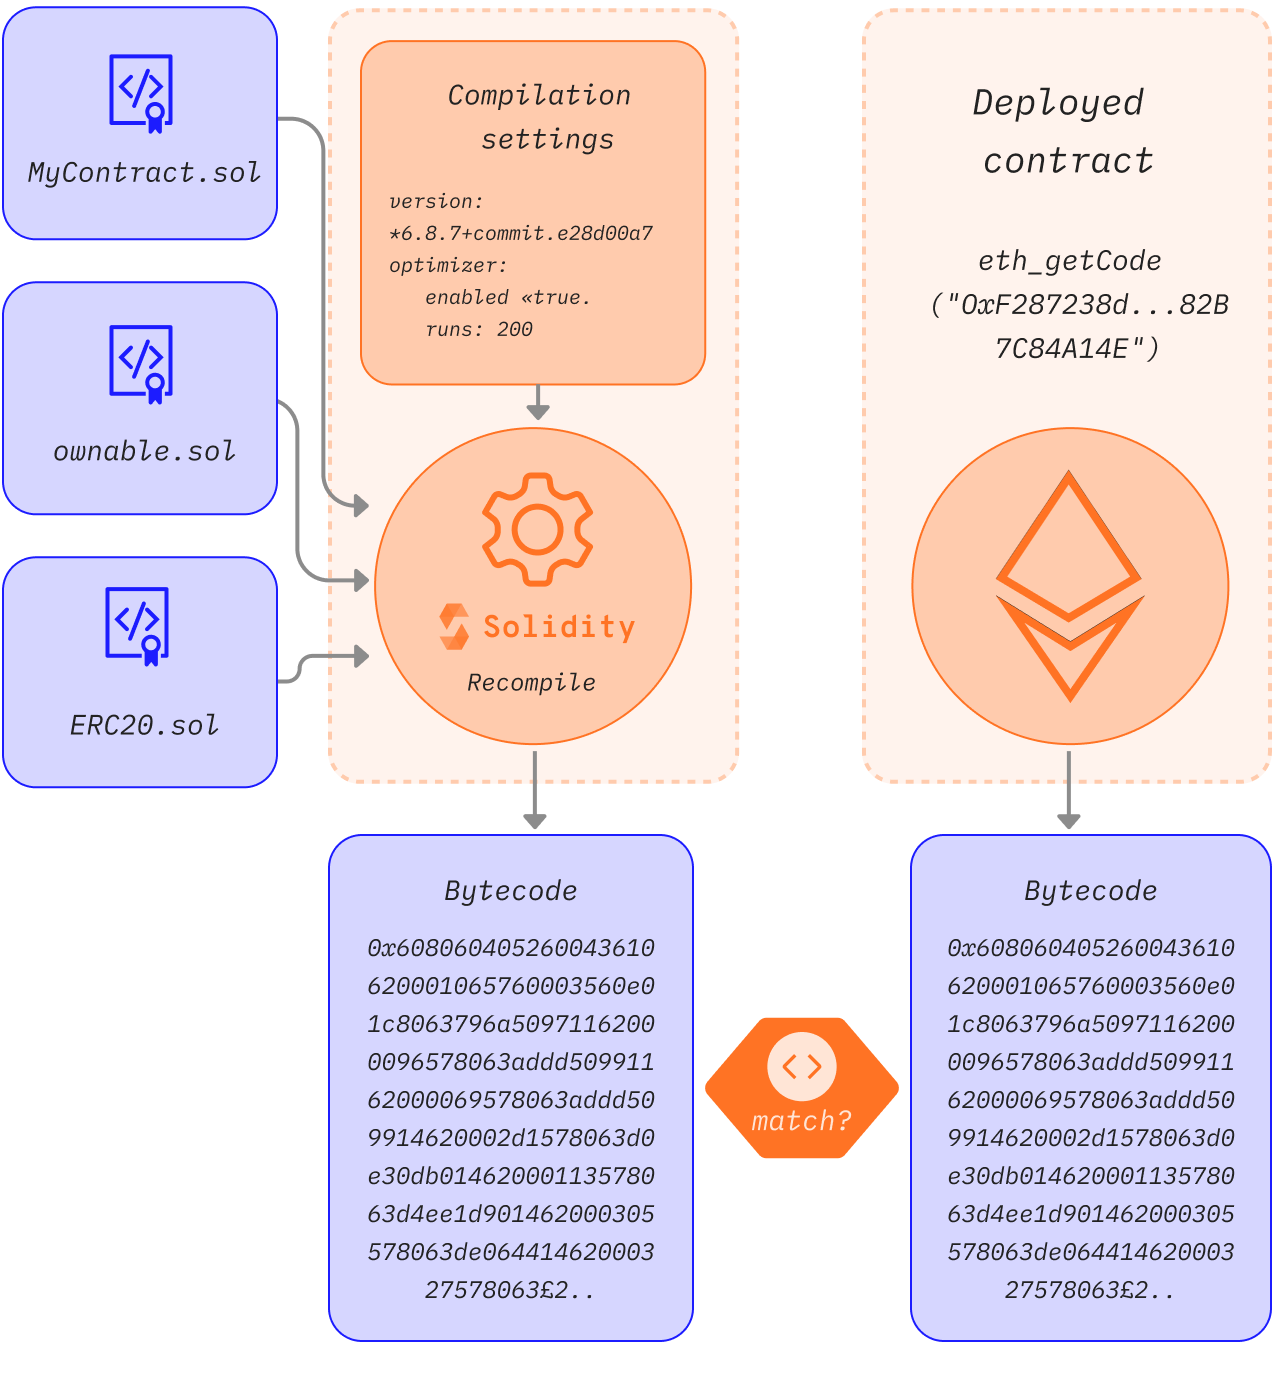
The process relies on a concept called deterministic compilation. The Solidity compiler will always produce the exact same bytecode if it's given the exact same inputs: the same source code files, the same compiler version, and the same optimization settings.
Etherscan uses this principle to verify your contract. You provide your source code and the compilation settings you used. Etherscan then re-compiles your code on its servers and compares the resulting bytecode to the bytecode already stored on the blockchain at your contract's address. If there is a perfect match, the contract is marked as verified.
This process is conceptually similar to using a checksum or a hash to verify data integrity in the data warehousing world. You're running the same process on the same input data to confirm the output is identical.
2. Automating Verification with hardhat-verify
While you can manually verify contracts through the Etherscan UI, this is tedious and error-prone, especially for projects with dependencies like OpenZeppelin. A much more professional and reliable method is to use Hardhat's built-in verification plugin.
Let's integrate this into your project.
Step 1: Install and Configure the Plugin
First, you'll need an Etherscan API key. This is free and allows your Hardhat project to communicate with the Etherscan verification service.
- Create an account on Etherscan.io.
- Navigate to your user profile and select "API Keys".
- Create a new API key.
Now, add this key to your .env file, just as you did for your RPC URL and private key.
SEPOLIA_RPC_URL="YOUR_SEPOLIA_RPC_URL"
PRIVATE_KEY="YOUR_METAMASK_PRIVATE_KEY"
ETHERSCAN_API_KEY="YOUR_NEWLY_CREATED_API_KEY"
Next, we'll install the verification plugin and configure hardhat.config.js to use it. The following video walks through this exact process.
How to Verify Smart Contracts with Hardhat
This video from the Moralis YouTube channel provides a clear, step-by-step guide to installing the Hardhat verification plugin and configuring the hardhat.config.js file.
Watch the segment from configuring Hardhat for verification. The key actions are: Installing the @nomicfoundation/hardhat-verify package (note the video uses the old name @nomiclabs/hardhat-etherscan). The new name is @nomicfoundation/hardhat-verify. Importing the plugin in hardhat.config.js. Adding the etherscan object to your Hardhat configuration, which reads the API key from your environment variables.
After following the video's guidance, your project will be ready for automated verification. First, install the plugin:
npm install --save-dev @nomicfoundation/hardhat-verify
Then, update your hardhat.config.js file. It should now look similar to this, with the new require statement and the etherscan block:
require("@nomicfoundation/hardhat-toolbox");
require("hardhat-deploy");
require("dotenv").config();
require("@nomicfoundation/hardhat-verify"); // <-- Add this line

const SEPOLIA_RPC_URL = process.env.SEPOLIA_RPC_URL || "";
const PRIVATE_KEY = process.env.PRIVATE_KEY || "0xkey";
const ETHERSCAN_API_KEY = process.env.ETHERSCAN_API_KEY || "";

module.exports = {
  solidity: "0.8.20",
  defaultNetwork: "hardhat",
  networks: {
    // ... your network configs
    sepolia: {
      url: SEPOLIA_RPC_URL,
      accounts: [PRIVATE_KEY],
      chainId: 11155111,
      blockConfirmations: 6,
    },
  },
  etherscan: {
    apiKey: ETHERSCAN_API_KEY, // <-- Add this block
  },
  namedAccounts: {
    // ... your namedAccounts config
    deployer: {
      default: 0,
    },
  },
};
Step 2: The verify Task
With the configuration in place, you can now verify any deployed contract from your command line. The syntax is straightforward.
The official Hardhat documentation provides the exact syntax for the verify task, including how to handle constructor arguments.
Read the section "Verifying a contract". Focus on the structure of the command and how constructor arguments are passed as additional parameters.
Based on the documentation and the SecurityToken contract from our previous lessons, the command to verify it after deployment would look like this:
npx hardhat verify --network sepolia DEPLOYED_CONTRACT_ADDRESS "My Security Token" "MST" "DEPLOYER_ADDRESS"
This command tells Hardhat to:
- Connect to the
sepolianetwork. - Find the contract at the specified
DEPLOYED_CONTRACT_ADDRESS. - Pass the three constructor arguments (
name,symbol,admin) to Etherscan's verification service.
Hardhat automatically handles flattening the code (combining all imports into one file) and sending it to the Etherscan API.
3. Integrating Verification into Your Deployment Script
Running a separate command for verification works, but we can do even better. The ultimate professional workflow is to make verification an automatic part of the deployment script itself.
We can modify the 01-deploy-security-token.js script you created in the last lesson to automatically trigger the verify task after a successful deployment to a testnet or mainnet.
Update your deploy/01-deploy-security-token.js file with the following changes. We'll add a check to see if we are on a live network (not Hardhat's local network) and if an Etherscan API key is present.
// deploy/01-deploy-security-token.js

const { network } = require("hardhat");

module.exports = async ({ getNamedAccounts, deployments }) => {
  const { deploy, log } = deployments;
  const { deployer } = await getNamedAccounts();
  const chainId = network.config.chainId;

  log("----------------------------------------------------");
  log("Deploying SecurityToken...");

  const args = ["My Security Token", "MST", deployer];

  const securityToken = await deploy("SecurityToken", {
    from: deployer,
    args: args,
    log: true,
    waitConfirmations: network.config.blockConfirmations || 1,
  });

  log(`SecurityToken deployed at: ${securityToken.address}`);

  // ---- NEW VERIFICATION BLOCK ----
  // Only verify on a "live" network and if we have an API key
  if (chainId !== 31337 && process.env.ETHERSCAN_API_KEY) {
    log("Verifying on Etherscan...");
    await hre.run("verify:verify", {
        address: securityToken.address,
        constructorArguments: args,
    });
    log("Verification complete.");
  }
  // --------------------------------

  log("----------------------------------------------------");
};

module.exports.tags = ["all", "SecurityToken"];
With this addition, your deployment script is now "verification-aware." When you run it on Sepolia, it will deploy the contract, wait for a few blocks, and then immediately call the verify task with the correct address and constructor arguments.
Now, run the deployment command again:
npx hardhat deploy --network sepolia
Watch the terminal output. After the deployment information, you should see messages indicating that the contract is being submitted for verification, followed by a success message and a link to the verified contract on Etherscan.
Conclusion
You have successfully bridged the gap between deploying a contract and making it a transparent, trusted part of the public blockchain ecosystem. This is a crucial skill that separates hobbyist projects from professional, investment-grade applications like the tokenized assets you aim to build.
Key Takeaways:
- Verification Builds Trust: Unverified contracts are untrustworthy. Verification proves your deployed bytecode matches your public source code, enabling auditability and user confidence.
- Deterministic Compilation is the Key: Verification works because the Solidity compiler produces identical bytecode from identical inputs (code, compiler version, settings).
- Automation is the Professional Standard: The
hardhat-verifyplugin allows you to automate verification, avoiding manual errors and integrating seamlessly into your deployment workflow. - Integrate Verification into Deployment Scripts: By adding a verification step to your
hardhat-deployscript, you can achieve a "one-command" deploy-and-verify process for maximum efficiency and reliability.
In deploying and verifying your contract, you assigned the powerful deployer account as the administrator. This creates a single point of failure. If that private key is ever compromised, the entire system is at risk. In our next lesson, we will address this critical security concern by exploring how to use multisignature wallets to manage administrative keys, a standard practice for production-ready smart contracts.