
Managing Message Types
Welcome back! In our last lesson, we focused on making your bot respond to commands with arguments, using ctx.match to parse user input much like a command-line interface. This gave your bot the ability to perform specific, user-directed actions like /roll 2d6+3.
Now, we'll broaden our scope significantly. While commands are essential, most user interactions in a chat are not commands. Users will send plain text, photos, documents, and stickers. This lesson is about teaching your bot to listen and react to all of these. We will dive into grammY's powerful filtering system, which allows you to selectively handle different types of messages with precision and excellent type safety—a feature you'll appreciate given your extensive TypeScript background.
From Commands to General Message Handling
So far, we've used bot.command("cmd", ...) to listen for commands. This is actually a convenient helper method. The more fundamental and versatile method in grammY is bot.on(). It allows you to listen for virtually any type of update from Telegram by using special strings called filter queries.
Instead of writing complex if statements to check the type of a message, grammY lets you declare what you're interested in directly. For example, bot.on("message:photo", ...) will only run its handler if a user sends a photo.
One of the most powerful aspects of this system is its integration with TypeScript. When you use a filter query, grammY automatically narrows the types on the context object (ctx). In a bot.on("message:photo", ...) handler, ctx.msg.photo is guaranteed to exist and be correctly typed. This eliminates a whole class of runtime errors and makes development much faster, as you can rely on your editor's autocompletion.
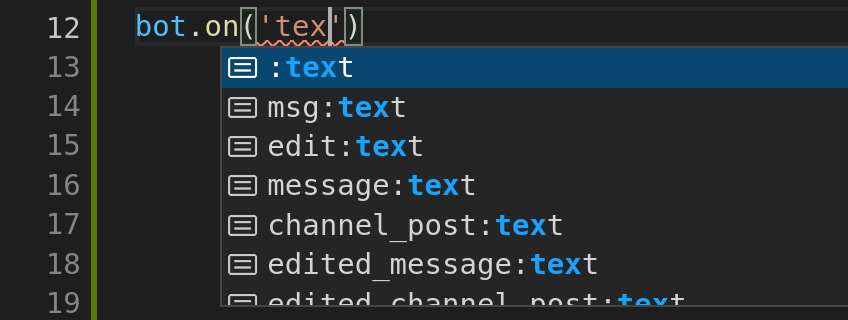
Let's explore how this works in practice.
Filter Queries and bot.on() | grammY
This document introduces the core concept of filter queries and why they are a superior approach to manual if-else branching.
Please read the Introduction to understand the philosophy behind this feature. Then, review the Regular Queries section for the most common use cases.
Filtering for Different Message Types
Let's apply these concepts. We'll set up handlers for plain text, photos, and documents.
Handling Plain Text Messages
You might want your bot to react to any text message, not just commands. For this, you can use the "message:text" filter.
// Listen for any text message.
bot.on("message:text", (ctx) => {
  // `ctx.message.text` is guaranteed to be a string here.
  const userText = ctx.message.text;

  // Let's do something simple, like reversing the text.
  const reversedText = userText.split("").reverse().join("");
  ctx.reply(`You wrote: "${userText}". Backwards, that's: "${reversedText}"`);
});

// This will NOT trigger for commands like /start.
// grammY processes command handlers first.
Add this to your index.ts file. Now, if you send any regular text message to your bot, it will reply with the reversed version. Notice that bot.command() handlers still take precedence for messages that are commands.
Handling Photos and Other Media
What if a user sends a photo? We can create a specific handler for that. When we filter for a message with a file, the context object provides all the metadata associated with it.
// Listen for photo messages.
bot.on("message:photo", (ctx) => {
  // `ctx.msg.photo` is an array of PhotoSize objects.
  // The last one is the highest resolution.
  const photo = ctx.msg.photo[ctx.msg.photo.length - 1];

  ctx.reply(
    `I received a photo! Dimensions: ${photo.width}x${photo.height}. ` +
    `File ID: ${photo.file_id}`
  );
});

// Listen for documents.
bot.on("message:document", (ctx) => {
  // `ctx.msg.document` contains file metadata.
  const doc = ctx.msg.document;
  ctx.reply(
    `I received a document named "${doc.file_name}". ` +
    `MIME type: ${doc.mime_type}. File ID: ${doc.file_id}`
  );
});
The file_id you see in the replies is very important. It's a unique identifier for that file on Telegram's servers. You can use this ID to send the exact same file later without needing to re-upload it. We'll return to this concept shortly.
Advanced Filtering with Shortcuts and Combinators
grammY's filter query language is more than just simple type checks. It includes powerful shortcuts and ways to combine queries for more complex logic.
Filter Queries and bot.on() | grammY
This part of the documentation covers shortcuts that group related filters, and the syntax for combining filters with OR and AND logic. This is where the true power of the query language becomes apparent.
Focus on the following sections: Under "Example Queries", read about the shortcuts Omit Values and msg. Continue reading about the shortcuts :media and :file. These are extremely useful. Finally, read the entire section on Combining Multiple Queries to learn about OR ([]) and AND (.on()) combinations.
Let's use some of these advanced features.
-
The
:fileshortcut: This is incredibly useful. It matches any message containing any type of file (photo, document, audio, video, etc.).// Listen for ANY message that contains a file. bot.on(":file", (ctx) => { // Thanks to the filter, `ctx.message.caption` might exist. const caption = ctx.message.caption || "no caption"; ctx.reply(`Got a file! Its caption is: "${caption}"`); }); -
Combining with OR: What if you want to run the same logic for both photos and stickers?
bot.on(["message:photo", "message:sticker"], (ctx) => { ctx.reply("That's a nice picture!"); }); -
Combining with AND (Chaining): How would you handle only photos that are forwarded from another chat?
bot.on("message:photo") // First, it must be a photo
   .on(":forward_origin", (ctx) => { // AND it must be forwarded
      const fwd = ctx.message.forward_origin;
      ctx.reply(`This photo was forwarded from a ${fwd.type}.`);
   });
The composability of bot.on() handlers is similar to how middleware is chained in many web frameworks, providing a clean and declarative way to define complex event processing pipelines.
Responding with Files
Now that your bot can receive and understand file messages, the next logical step is to send files back. The Telegram Bot API offers three primary ways to send a file, and grammY makes them all straightforward.
This guide explains the fundamentals of how Telegram handles files and how you can use grammY to receive, download, and send them.
First, read the introductory section How Files Work to understand the concept of file_id. Then, quickly review the Receiving Files section, which we've already put into practice. Finally, read the section Sending Files carefully, as it details the three methods for sending files.
Let's implement each sending method.
1. Sending by file_id
This is the most efficient method. If your bot has seen a file before (either by receiving it or by sending it), it can use the file_id to send it again instantly.
Let's create a command that allows us to send the last photo the bot received. For this, we'll need to store the file_id from our photo handler.
let lastPhotoFileId: string | undefined;

// In your 'message:photo' handler, store the file_id
bot.on("message:photo", (ctx) => {
  const photo = ctx.msg.photo[ctx.msg.photo.length - 1];
  lastPhotoFileId = photo.file_id; // Store the ID

  ctx.reply(
    `I received a photo and saved its file_id. ` +
    `Use /getphoto to have me send it back.`
  );
});

// A new command to send the photo using the stored file_id
bot.command("getphoto", (ctx) => {
  if (lastPhotoFileId) {
    ctx.replyWithPhoto(lastPhotoFileId);
  } else {
    ctx.reply("I haven't received any photos yet. Send me one first!");
  }
});
Note: This simple variable will reset when the bot restarts. In a later lesson, we will cover "sessions" to persist data like this.
2. Sending by URL
If a file is publicly accessible on the internet, you can simply provide its URL. Telegram will download and send it on your behalf.
bot.command("grammy", (ctx) => {
  // grammY will automatically use the URL method.
  ctx.replyWithPhoto("https://grammy.dev/images/grammY.png", {
    caption: "Here is the grammY logo!"
  });
});
3. Uploading a File
For files on your local machine, grammY provides the InputFile class. This is especially relevant for a bun-based project, as Bun's runtime makes file I/O extremely fast.
First, create a simple text file named example.txt in your project's root directory with some content. Then, add a command to upload it.
// At the top of your index.ts, import InputFile
import { Bot, Context, InputFile } from "grammy";

// ... your other bot code

// Command to upload a local file
bot.command("doc", (ctx) => {
  // Create an InputFile instance pointing to your local file.
  // Bun can resolve the relative path from the project root.
  ctx.replyWithDocument(new InputFile("./example.txt"));
});
After adding the new commands (getphoto, grammy, doc) to setMyCommands, restart your bot and try them out!
Conclusion
In this lesson, you've moved beyond simple commands and learned how to build a bot that can interact with a much wider range of content. You are now equipped to handle almost any type of message a user might send.
Key Takeaways:
bot.on()is the primary method for handling updates ingrammY, using filter queries to specify what to listen for.- Filter queries provide strong type safety, narrowing the types on the
Contextobject so you can code with more confidence. - Shortcuts like
:text,:photo,:file, and:mediasimplify common filtering tasks. - Queries can be combined using arrays for OR logic (
["a", "b"]) and chaining for AND logic (.on("a").on("b")). - The
file_idis a crucial concept, allowing for efficient re-sending of files already on Telegram's servers. - You can send files by
file_id, public URL, or by uploading a local file using theInputFileclass.
We've covered how to receive different messages and how to reply with different content types. In the next lesson, we will focus on presentation: how to format your text replies with Markdown and HTML to make them clearer, more engaging, and more visually appealing.
Can't find a good explanation? Sign up and we'll make it for you
Sign up