Hello! Welcome to the sixth module of our course on high-load distributed systems.
In our last two lessons, we focused on MongoDB's consistency model and the practical setup of replica sets to achieve high availability. You learned how a replica set uses an election protocol to automatically failover, ensuring the system remains operational even when a node goes down.
Today, we address a different challenge: horizontal scalability. While a replica set provides redundancy, it is still limited by the storage capacity and write throughput of a single primary node. To overcome this, we use sharding. This lesson will guide you through setting up the fundamental architecture of a MongoDB sharded cluster. We will assemble the core components: config servers, shard replica sets, and the mongos query router.
By the end of this ~60-minute lesson, you will be able to set up a complete, multi-component MongoDB sharded cluster architecture from scratch.
1. The Architecture of a Sharded Cluster
A sharded cluster distributes data across multiple replica sets, called shards. This allows the database to scale horizontally, handling massive datasets and high throughput workloads that would overwhelm a single replica set.
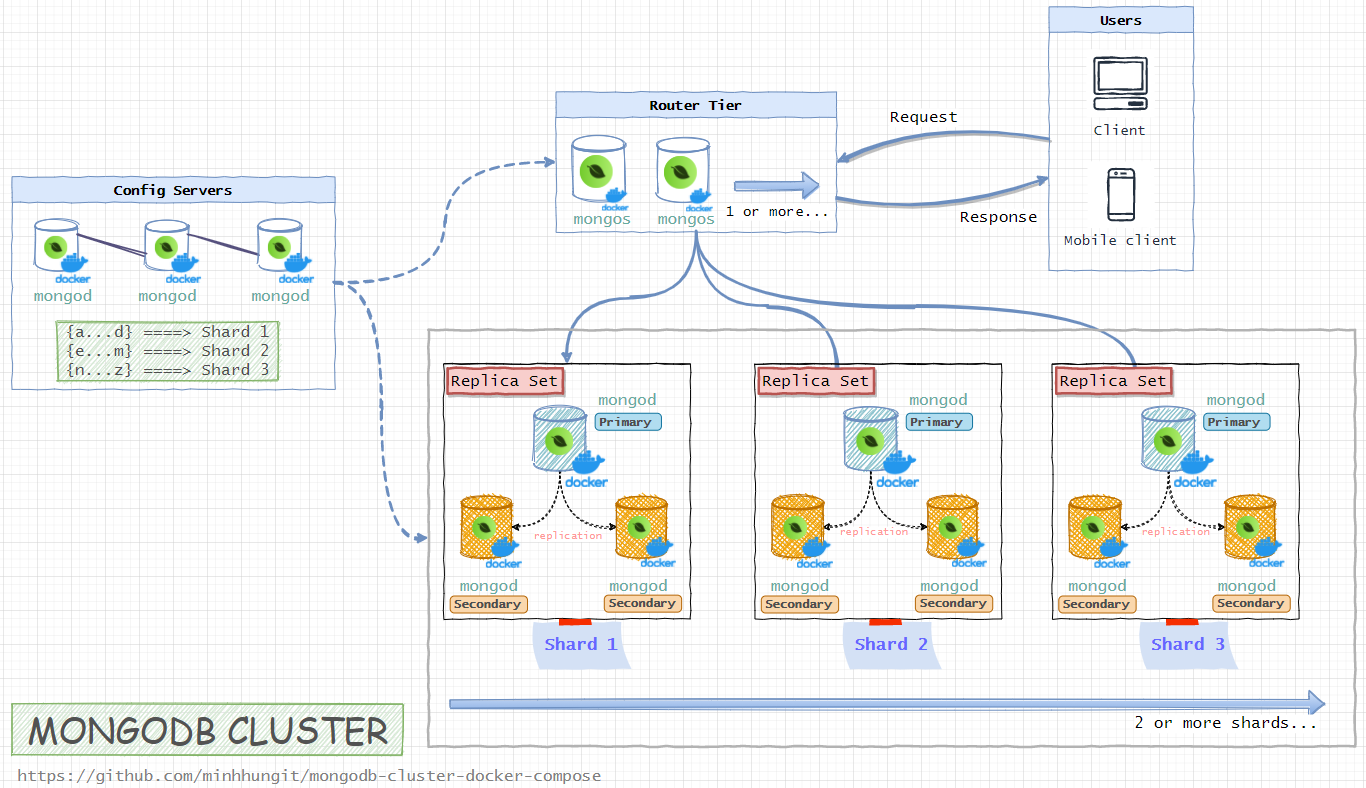
The architecture consists of three primary components:
- Shard Replica Sets: These are the workhorses of the cluster. Each shard is a full replica set that stores a subset of the total data. By using replica sets for each shard, you get both horizontal scaling (from sharding) and high availability (from replication) combined.
- Config Server Replica Set (CSRS): This is the cluster's metadata authority. It stores the mapping of data ranges (called "chunks") to their corresponding shards. Since this metadata is critical for the cluster's operation, the config servers are themselves deployed as a replica set to ensure they are highly available. If the CSRS is down, the cluster can still serve reads and writes for established connections, but no new connections can be made, and no chunk migrations can occur.
- Query Routers (
mongos): These are lightweight, stateless proxies that act as the interface for your application. The application connects to amongosinstance, not directly to the shards. Themongosprocess consults the config servers to determine which shard(s) hold the requested data, routes the query accordingly, and aggregates the results if the query spans multiple shards. You typically run multiplemongosinstances for load balancing and to avoid a single point of failure at the routing layer.
This diagram illustrates how these components interact:
To solidify your understanding of these components, please read the following introductory section from a Percona blog post.
A Tutorial on MongoDB Sharding Best Practices & When ...
This section provides a concise overview of the key components in a MongoDB sharded cluster, defining the role of each piece before we dive into the setup.
Please read the section titled 'What is sharding in MongoDB?' up to the image. Focus on the definitions of Shard Servers, Config Servers, Query Routers (mongos), Shard Key, Chunk, and Balancer.
2. Practical Guide: Setting Up a Sharded Cluster
Now, let's build a sharded cluster on your local machine. We will simulate a production topology by running each process on a different port. The overall process is:
- Deploy the Config Server Replica Set.
- Deploy the Shard Replica Sets.
- Start the
mongosQuery Router. - Add the shards to the cluster.
For this entire process, we will follow the official MongoDB documentation. It's detailed and serves as an excellent reference for production deployments.
Deploy a Self-Managed Sharded Cluster - Database Manual
This official MongoDB tutorial is the primary guide for our hands-on setup. We will walk through its steps together, but it's essential to have it open as your main reference.
Keep this document open for reference as we proceed through the steps below. You don't need to read it all at once; we will refer to specific parts as we go.
Step 1: Prepare the Environment
First, create the data directories for all the mongod instances we'll be starting. We'll set up one config server replica set (3 members) and two shard replica sets (3 members each).
Open your terminal and run:
# Directories for the Config Server Replica Set (CSRS)
mkdir -p /data/csrs1 /data/csrs2 /data/csrs3

# Directories for Shard 1 Replica Set (rs-shard-A)
mkdir -p /data/shardA1 /data/shardA2 /data/shardA3

# Directories for Shard 2 Replica Set (rs-shard-B)
mkdir -p /data/shardB1 /data/shardB2 /data/shardB3
Step 2: Deploy the Config Server Replica Set (CSRS)
The CSRS stores the cluster's configuration. It's a mongod process started with the --configsvr flag.
Open three separate terminal tabs and start one mongod process in each.
Terminal 1 (CSRS 1):
mongod --configsvr --replSet csrs --dbpath /data/csrs1 --port 27019
Terminal 2 (CSRS 2):
mongod --configsvr --replSet csrs --dbpath /data/csrs2 --port 27020
Terminal 3 (CSRS 3):
mongod --configsvr --replSet csrs --dbpath /data/csrs3 --port 27021
Now, connect to one of these instances to initiate the replica set.
mongosh --port 27019
Inside mongosh, define the configuration and initiate. Note the configsvr: true property, which is mandatory.
config = {
    _id: "csrs",
    configsvr: true,
    members: [
        { _id: 0, host: "localhost:27019" },
        { _id: 1, host: "localhost:27020" },
        { _id: 2, host: "localhost:27021" }
    ]
};
rs.initiate(config);
Your CSRS is now running.
Step 3: Deploy the Shard Replica Sets
Next, we'll deploy two shard replica sets. These are standard replica sets, but the mongod instances are started with the --shardsvr flag.
For Shard A (rs-shard-A):
Open three new terminal tabs.
Terminal 4 (Shard A1):
mongod --shardsvr --replSet rs-shard-A --dbpath /data/shardA1 --port 27022
Terminal 5 (Shard A2):
mongod --shardsvr --replSet rs-shard-A --dbpath /data/shardA2 --port 27023
Terminal 6 (Shard A3):
mongod --shardsvr --replSet rs-shard-A --dbpath /data/shardA3 --port 27024
Connect to one member and initiate it:
mongosh --port 27022
config = {
    _id: "rs-shard-A",
    members: [
        { _id: 0, host: "localhost:27022" },
        { _id: 1, host: "localhost:27023" },
        { _id: 2, host: "localhost:27024" }
    ]
};
rs.initiate(config);
For Shard B (rs-shard-B):
Repeat the process for the second shard in three more terminal tabs.
Terminal 7 (Shard B1):
mongod --shardsvr --replSet rs-shard-B --dbpath /data/shardB1 --port 27025
Terminal 8 (Shard B2):
mongod --shardsvr --replSet rs-shard-B --dbpath /data/shardB2 --port 27026
Terminal 9 (Shard B3):
mongod --shardsvr --replSet rs-shard-B --dbpath /data/shardB3 --port 27027
Connect and initiate:
mongosh --port 27025
config = {
    _id: "rs-shard-B",
    members: [
        { _id: 0, host: "localhost:27025" },
        { _id: 1, host: "localhost:27026" },
        { _id: 2, host: "localhost:27027" }
    ]
};
rs.initiate(config);
At this point, you have three independent replica sets running. Now we need to tie them together.
Step 4: Start the mongos Query Router
The mongos process is the gateway to the cluster. It needs to know the location of the config servers.
Open a new terminal tab and start the mongos instance. Note that mongos is a different binary from mongod.
Terminal 10 (mongos):
mongos --configdb csrs/localhost:27019,localhost:27020,localhost:27021 --bind_ip_all --port 27017
The --configdb argument tells mongos where to find the CSRS. The format is <replica_set_name>/<host1:port1>,<host2:port2>,.... We run it on the default MongoDB port 27017 for convenience.
Step 5: Add Shards to the Cluster
All components are running, but the mongos router doesn't know about the shards yet. We need to add them.
Connect to the mongos instance using mongosh. This is the entry point for all administrative commands and application traffic from now on.
mongosh --port 27017
Your prompt should now look like mongos>.
Use the sh.addShard() command to add each shard replica set to the cluster.
// Add the first shard
sh.addShard("rs-shard-A/localhost:27022,localhost:27023,localhost:27024");

// Add the second shard
sh.addShard("rs-shard-B/localhost:27025,localhost:27026,localhost:27027");
Step 6: Verify the Cluster Status
Your sharded cluster is now fully assembled. You can verify its status using sh.status().
mongos> sh.status()
The output will be verbose, but look for these key sections:
sharding version: Information about the cluster's metadata.shards: A list of the shards added to the cluster, confirming they are recognized.databases: Will be empty for now, but will later show which databases are sharded and the distribution of their data.
You have successfully built the infrastructure for a MongoDB sharded cluster.
3. Enabling Sharding for a Collection
The final step, which we will only touch on briefly today, is to enable sharding for a specific database and collection. This involves choosing a shard key.
Deploy a Self-Managed Sharded Cluster - Database Manual
This final part of the MongoDB documentation shows the commands to enable sharding on a database and a collection. It also introduces the two main sharding strategies.
Read the section 'Shard a Collection'. Pay attention to the sh.shardCollection() command and the distinction between Hashed and Range-based sharding.
To shard a collection, you would run the following commands in the mongos shell:
-
Enable sharding on a database:
sh.enableSharding("myAppDB") -
Shard a collection within that database:
// This requires an index on the shard key field if the collection has data
db.getSiblingDB("myAppDB").myCollection.createIndex({ userId: 1 })

// Shard the collection based on the 'userId' field
sh.shardCollection("myAppDB.myCollection", { userId: 1 })
The choice of the shard key (userId in this example) is arguably the most critical decision in designing a sharded cluster. It determines how data is distributed and directly impacts query performance, write scalability, and the efficiency of the cluster's balancer.
Conclusion
In this lesson, we constructed a complete MongoDB sharded cluster from its constituent parts. You now have a practical understanding of how the different components are deployed and connected.
Key Takeaways:
- A sharded cluster is composed of three main components: Shard Replica Sets (to store data), a Config Server Replica Set (to store metadata), and one or more
mongosQuery Routers (to route client requests). - Each component plays a distinct role, and all are designed for high availability using replica sets.
- The setup process is sequential: deploy config servers, deploy shards, start
mongos, and finally add the shards to the cluster viash.addShard(). - All application traffic and administrative tasks for the cluster should be directed through a
mongosinstance.
Next Lesson Preview:
We have built the house, but now we need to decide how to organize the rooms. In our next lesson, "Select an appropriate shard key for a given data model and query pattern," we will dive deep into the art and science of choosing an effective shard key. We'll analyze the trade-offs between different strategies, such as ranged vs. hashed sharding, and explore how the choice of key impacts the performance and scalability of your entire system.