
Namaste! Is course mein hum manual GIS workflows ko gradually reusable Google Earth Engine (GEE) scripts mein convert karenge. Pehla module JavaScript aur Code Editor ke practical basics par hai—abhi focus coding concepts se pehle workspace confidently operate karna hai.
Aaj ke end tak aap GEE Code Editor mein ek script create/run/save/rename kar paayenge aur Console mein output dekh kar confirm kar paayenge ki script actually kya kar rahi hai. Yeh chhota workflow later NDVI, flood mapping, classification, aur automated exports ke har analysis mein repeat hoga.
Agar aapka Earth Engine access aur Cloud Project pehle se configured hai, code.earthengine.google.com open kijiye aur login ke baad selected project ko upper-right menu mein verify kar lijiye.
Code Editor ko GIS workspace ki tarah samajhna
GEE Code Editor ek browser-based development environment hai. Desktop GIS mein aap layers, tools, aur geoprocessing outputs ke saath kaam karte hain; yahan equivalent workspace mein code, map, aur messages/results ek saath milte hain. Difference yeh hai ki aap apne analysis steps ko buttons se manually repeat karne ke bajay script mein likhenge.
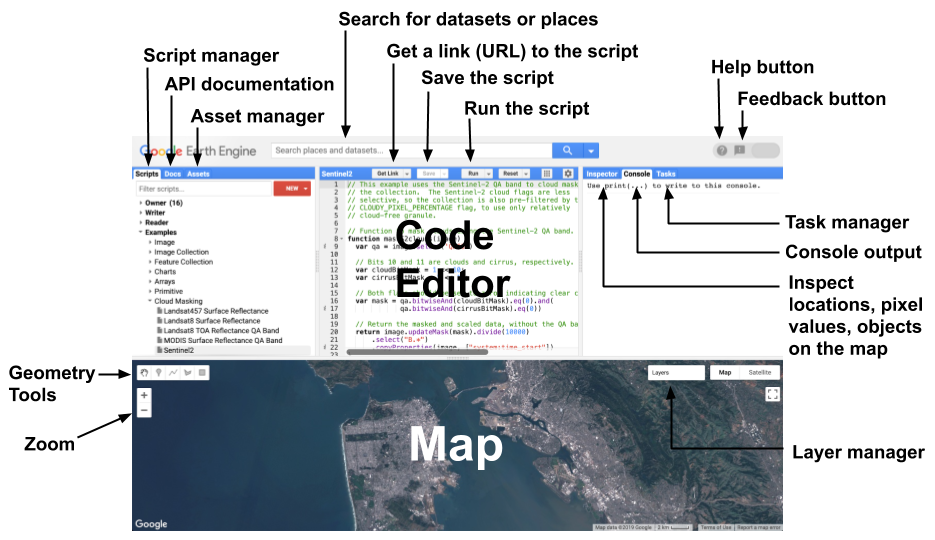
Is diagram mein abhi sirf in parts par dhyan dijiye:
| Area | Abhi iska kaam |
|---|---|
| Scripts tab | Scripts create, open, save, rename, aur organize karna |
| Code Editor | JavaScript/GEE code likhna aur edit karna |
| Run | Editor mein jo script hai use execute karna |
| Save | Script ke current code ko permanent cloud storage mein preserve karna |
| Console | print() se bheja gaya text, object information, charts, aur errors dekhna |
| Map | Spatial layers aur results visualize karna; agle modules mein central role hoga |
| Inspector | Map par click karke location/pixel/layer values inspect karna |
| Tasks | Long-running exports manage karna; iski zarurat exports module mein hogi |
Do important distinctions yaad rakhiye:
- Code Editor woh jagah hai jahan aap code likhte hain; Console woh jagah hai jahan code ka diagnostic output dekhte hain. Console mein normal workflow ke liye code type nahin kiya jata.
- Run script chalata hai, lekin automatically aapka work archive nahin karta. Save script ko aapke Scripts workspace mein store karta hai.
Interface ke exact icons ya panel widths browser aur future updates ke according thode different dikh sakte hain, lekin in components ka role same rehta hai.
Google Earth Engine Tutorial - GEE interface overview
“Google Earth Engine Tutorial - GEE interface overview” by GIS with Raja Usama dekhiye. Is short walkthrough mein repository/file structure, Save control, aur Console output practical screen par dikhaya gaya hai.
Pehle script storage dekhiye: yahan repository create karke usmein file rakhne ka basic structure samjhein. Phir save and run dekhiye aur Save versus Run ka operational difference note kijiye. Finally, console output dekhiye; focus is baat par rakhiye ki print ka result Console panel mein dikhta hai.
Pehli script ko run karna
Ab ek deliberately simple script se workspace test karte hain. Is line ka purpose spatial analysis nahin hai; bas yeh verify karna hai ki Code Editor, Run button, aur Console ke beech connection working hai.
Code Editor ke blank area mein yeh likhiye:
print('Workspace status: ready');
print('My first saved GEE script');
Ab:
- Editor ke upar Run button click kijiye. Keyboard shortcut ke roop mein
Ctrl + Enterbhi use kar sakte hain. - Right-side panel mein Console tab open kijiye.
- Aapko dono text messages dikhne chahiye:
Workspace status: readyMy first saved GEE script
print() ek instruction hai jo GEE Code Editor ko kehta hai: “is value ko Console mein dikhao.” Quotation marks ke andar jo text hai, woh message hai. JavaScript strings, variables, aur functions ko hum agle lessons mein systematically cover karenge; filhaal print() ko apne script ka status check samajhiye.
Ek quick operational check kijiye: doosri line mein first ko test se replace kijiye, phir Run kijiye. Console mein updated message aana chahiye. Isse clear hota hai ki Run current editor content execute kar raha hai.
Agar Console mein result ke bajay red error message aaye, ghabrane ki zarurat nahin. Abhi error solve karna lesson ka main target nahin hai, lekin yeh confirm kijiye ki:
- error Console mein report hota hai;
- error message usually code ki line/location ki taraf point karta hai;
- editor mein malformed code ke neeche warning underline bhi aa sakti hai.
Console ko early stage se use karne ki habit banaiye. Complex geospatial workflow mein “map blank kyun hai?” ka answer aksar Console mein collection size, image metadata, geometry, ya error message print karke milta hai.
Script save aur rename karne ka reliable workflow
Scripts ko organised rakhna professional GEE practice ka part hai. Aap agriculture, flood, forest loss, aur LULC ke multiple projects par kaam karenge; vague names jaise test, new, ya final_final2 kuch weeks baad confusing ban jaate hain.
GEE mein scripts repositories ke andar store hote hain. Abhi repository ko simply ek project container samajhiye—Git-related advanced workflow ki zarurat is stage par nahin hai.
Initial organization
Scripts tab mein:
- Agar aapke paas practice repository nahin hai, New select karke ek repository create kijiye. Iska naam
gee-learningyagee-trainingrakh sakte hain. - Phir New se ek new file/script create kijiye aur repository ke liye
gee-learningselect kijiye. - Temporary name
draftde sakte hain. - Upar likha hua two-line
print()script us file mein paste kijiye. - Save click kijiye. Aap
Ctrl + Sshortcut bhi use kar sakte hain.
Ab file name ko meaningful banaiye. Scripts list mein script ke paas available edit/pencil icon select karke rename kijiye:
01_code_editor_basics
Rename ke baad Save ek baar phir click kijiye. Naming style mein number ka benefit yeh hai ki lessons aur workflow order clean dikhega. Future projects ke liye ek useful convention hoga:
01_inputs
02_preprocessing
03_analysis
04_export
Aaj ke liye sirf 01_code_editor_basics enough hai.
Save successful hua hai ya nahin verify karne ka safe method:
- Script ke current code ko note kijiye.
- Scripts panel mein koi dusri script open kijiye, ya browser reload kijiye.
- Apni renamed script dobara open kijiye.
- Dono
print()lines present honi chahiye. - Run karke Console output phir verify kijiye.
Yeh distinction yaad rakhiye:
| Action | Kya hota hai? |
|---|---|
| Run | Current editor code execute hota hai; results Console aur later Map mein dikhte hain |
| Save | Current code script file/repository mein stored hota hai |
| Rename | Script ka label/path change hota hai; code ki analysis logic change nahin hoti |
| Get Link | Script ke current editor state ka shareable URL create hota hai; yeh careful saving ka replacement nahin hai |
“Get Link” useful hoga jab aap colleague, supervisor, ya portfolio reviewer ke saath code share karenge. Lekin collaboration se pehle hamesha Save karna better discipline hai.
Earth Engine Code Editor - Google for Developers
Google for Developers ka “Earth Engine Code Editor” guide official reference hai. Isse interface ke roles, Script Manager ke save/rename behavior, aur Console inspection ka authoritative overview milega.
Page ke opening interface overview mein, Figure 1 ke aas-paas wale text se workspace overview padhiye. Phir “Script Manager (Scripts tab)” section mein Scripts tab ke filter bar se shuru karke drag-and-drop paragraph ke end tak script organization padhiye. Rename ke edit icon, folders, Owner/Writer/Reader access levels ko observe kijiye, lekin Git setup abhi skip kijiye. Finally, “Console Tab” section mein Console behavior padhiye. Note kijiye ki future mein printed objects ko expand karke unki details dekhi ja sakti hain.
Console ko analysis log ki tarah inspect karna
Aaj printed text simple hai, isliye Console output bhi simple messages jaisa dikhega. Lekin same Console later aapko yeh inspect karne dega:
- selected satellite image ka metadata;
- image bands ke names;
- filtered ImageCollection mein images ki count;
- geometry or field boundaries;
- classification accuracy tables;
- chart outputs;
- error messages.
Console mein aane wale output ko blindly dekhne ke bajay har baar teen checks kariye:
-
Label kya keh raha hai?
Isliye descriptive messages helpful hote hain.print('NDVI composite', composite)future meinprint(composite)se clearer hoga. -
Output expected type ka hai?
Text message expected tha, to text aana chahiye. Later image expected hogi, to image summary dikhni chahiye—not an error. -
Kya value/object expand ho sakta hai?
Future GEE objects Console mein compact form mein aayenge. Unke paas expand control use karke bands, properties, aur nested information inspect ki ja sakti hai.
Ab aapka small working script yeh hona chahiye:
print('Workspace status: ready');
print('My first saved GEE script');
Is version ko save rakhiye. Yeh aapke GEE learning repository ka first verified file hai. Map currently blank rehna bilkul normal hai, kyunki script sirf Console text print kar rahi hai—abhi humne koi spatial layer add nahin ki hai.
Agar Console cluttered ho jaye, editor ke top controls mein reset option output Map aur Console ko clear karne ke liye available hota hai. Reset display clear karta hai; phir bhi important code changes ko Save karna zaroori hai.
Key takeaways
- GEE Code Editor mein Scripts code files manage karta hai, Code Editor code likhne ke liye hai, Console diagnostic output ke liye hai, aur Map spatial visualization ke liye hai.
- Run aur Save different actions hain: Run execution ke liye, Save persistent storage ke liye.
- Meaningful script names aur repository organization early stage se maintain karna scalable workflow banata hai.
print()output inspect karna basic debugging aur result verification ki core habit hai.- Console ke expandable objects later imagery metadata, collections, features, aur analysis results examine karne mein kaam aayenge.
Next lesson mein hum JavaScript ki first building blocks dekhenge: const aur let se values define karna, let value update karna, aur existing GEE scripts mein commonly milne wale var syntax ko recognize karna.
Can't find a good explanation? Sign up and we'll make it for you
Sign up