
Hello! Welcome to the first lesson in our module on Observability & Monitoring.
In the previous modules, we've covered the core pillars of microservices: design, communication, data management, and security. We concluded by discussing mTLS, a critical pattern for securing communication in transit. A key takeaway was how modern platforms, like service meshes, abstract away complexity. This theme of managing complexity in a distributed environment is central to our new module.
Before we can effectively monitor our services (the "observe" part of observability), we need to solve a more fundamental problem: how do we manage their configurations? In a system with dozens or even hundreds of services, managing properties in individual application.properties files for each service is unscalable, error-prone, and a significant operational burden.
This lesson tackles that problem head-on. Our goal is to set up a Spring Cloud Config Server to serve centralized configuration from a Git repository. This is a foundational pattern for building production-ready, cloud-native applications and a common topic in system design interviews.
1. The Challenge of Distributed Configuration
Imagine you have 20 microservices. They all need to connect to the same message broker (like Kafka) and a tracing system (like Zipkin).
- If the Kafka broker's address changes, you would need to update, rebuild, and redeploy all 20 services.
- Each service might have slightly different configurations for development, staging, and production environments, leading to a high risk of misconfiguration.
- Storing sensitive information, like database passwords, directly in a service's source code repository is a major security risk.
Centralized configuration management solves these problems by externalizing the configuration from the application itself.
The diagram below illustrates the high-level architecture. Multiple client applications fetch their configuration from a single, central Spring Cloud Config Server. The Config Server, in turn, reads the configuration data from a backend source, which in our case will be a Git repository.
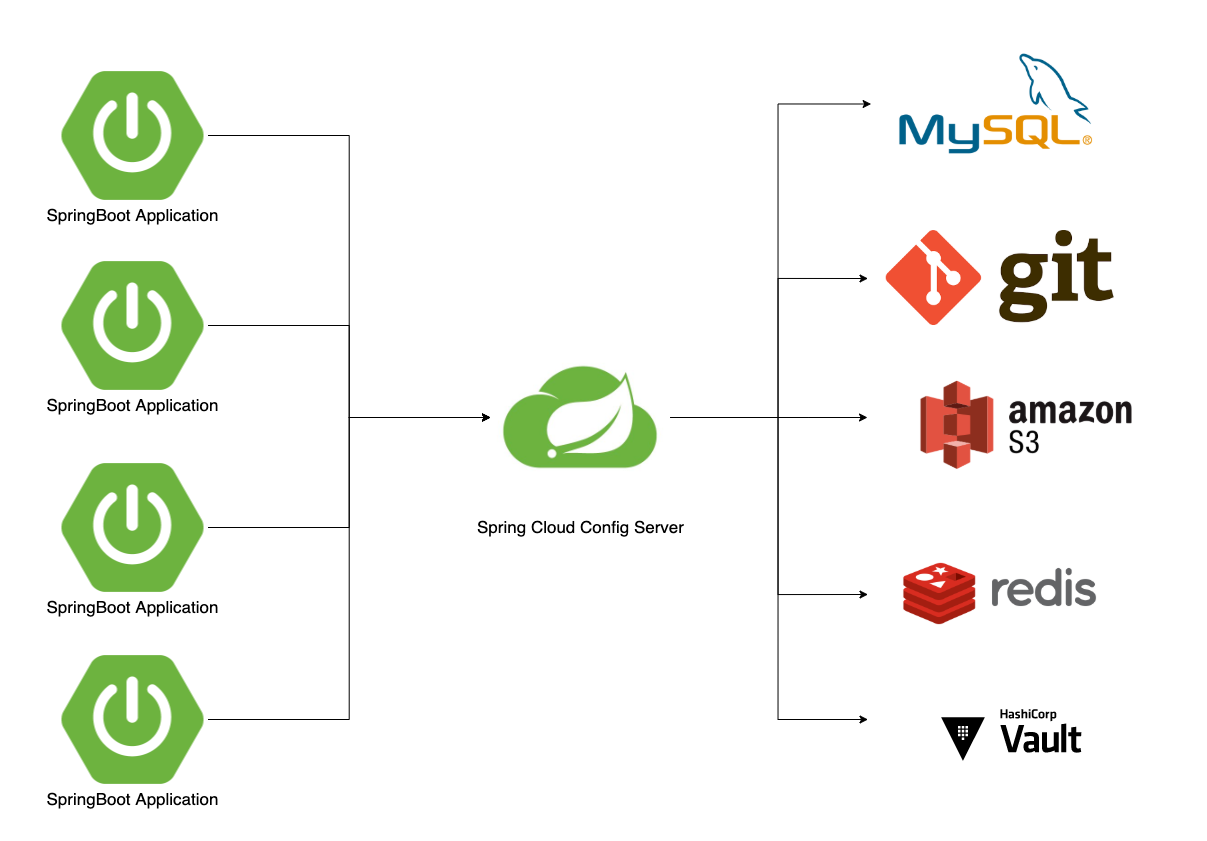
2. Setting Up the Config Server
Let's build the server part of this architecture. It's a standalone Spring Boot application with a special role. The official Spring guide provides a perfect, hands-on walkthrough.
Getting Started | Centralized Configuration
The official Spring guide, 'Centralized Configuration', will walk us through creating the Config Server. We will focus on setting up the server first.
Please read the sections 'Starting with Spring Initializr' and 'Stand up a Config Server'. Focus on these key steps: Dependencies: Note the single Config Server dependency needed for the server application. @EnableConfigServer: This annotation is what transforms a regular Spring Boot app into a Config Server. Configuration Backend: Pay close attention to how the spring.cloud.config.server.git.uri property is used to point the server to a Git repository.
Let's break down the process:
Step 1: Create the Spring Boot Project
As the guide shows, you start with a new Spring Boot project. The crucial dependency is Spring Cloud Config Server.
Step 2: Enable the Config Server
In your main application class, you add the @EnableConfigServer annotation.
@EnableConfigServer
@SpringBootApplication
public class ConfigurationServiceApplication {
    public static void main(String[] args) {
        SpringApplication.run(ConfigurationServiceApplication.class, args);
    }
}
This single annotation enables all the necessary auto-configuration to get the server running.
Step 3: Create the Configuration Repository
The Config Server needs a source for its configurations. We'll use a Git repository because it provides versioning, history, and branching, which are excellent for managing configuration changes over time.
For this lesson, a local Git repository is sufficient.
- Create a new directory on your machine (e.g.,
~/Desktop/config-repo). - Navigate into it and run
git init. - Create a property file. The naming is important. Let's create a file named
my-client-app.propertieswith the following content:
greeting.message: Hello from the config held in Git! - Commit the file:
git add .andgit commit -m "Initial configuration".
Step 4: Configure the Server
Now, point your Config Server application to this new Git repository. In the server's src/main/resources/application.properties, add the following:
# The port for the config server to run on
server.port=8888

# The location of the Git repository
# Make sure to replace the path with the actual path to your local repo
spring.cloud.config.server.git.uri=file://${HOME}/Desktop/config-repo
Your Config Server is now ready! If you run it, it will start on port 8888 and begin serving configurations from your local Git repository.
3. Setting Up the Client Application
Now let's create a microservice that consumes configuration from our new server.
Getting Started | Centralized Configuration
Let's return to the Spring guide to build the client application that will consume the configuration we just set up.
Please read the section 'Reading Configuration from the Config Server by Using the Config Client'. Focus on: Client Dependencies: Note the Config Client (or spring-cloud-starter-config), Web, and Actuator dependencies. spring.config.import: This is the modern way (since Spring Boot 2.4) to tell a client application where to find the Config Server. The old bootstrap.properties method is now legacy. @Value: See how the client code is unaware of the Config Server; it simply injects a property using the standard @Value annotation.
Here's the client-side breakdown:
Step 1: Create the Client Project
Create another Spring Boot project. This time, include the following dependencies:
- Spring Cloud Config Client
- Spring Web (to create a REST endpoint for testing)
Step 2: Configure the Client to Connect to the Server
In the client's src/main/resources/application.properties, you need to tell it its name and where to find the config server.
# This name must match the file name in the Git repo (my-client-app.properties)
spring.application.name=my-client-app

# Tells Spring Boot to import configuration from the Config Server
# The 'optional:' prefix means the app won't fail to start if the config server is down
spring.config.import=optional:configserver:http://localhost:8888
This is a key piece of configuration. The spring.application.name tells the Config Server which set of properties to send.
Step 3: Use the Configuration
Create a simple REST controller to verify that the configuration has been loaded.
@RestController
class MessageRestController {

    @Value("${greeting.message:Hello default}")
    private String message;

    @RequestMapping("/message")
    String getMessage() {
        return this.message;
    }
}
Notice that this code is completely standard. It has no knowledge of Git or the Config Server. It simply requests a property named greeting.message. Spring Cloud handles the magic of fetching this value from the server at startup.
4. Test the Full Setup
Now, let's see it in action.
- Make sure your Config Server application is running.
- Run your client application.
- Open a browser or use
curlto accesshttp://localhost:8080/message.
You should see the response: Hello from the config held in Git!
If you stop the Config Server and restart the client, the endpoint will return Hello default, demonstrating both the optional: import and the default value in the @Value annotation.
You can also directly inspect what the Config Server is providing. Navigate to http://localhost:8888/my-client-app/default. You'll see a JSON response containing the properties for that application and profile. This is an invaluable debugging technique.
Test your understanding!
You are tasked with adding environment-specific database configurations for a service named payment-service.
- For the
devprofile, the database URL should bejdbc:h2:mem:db. - For the
prodprofile, the URL should bejdbc:postgresql://prod-db/payments. - There's also a shared property,
db.driver=org.postgresql.Driver, that should apply to both.
What file(s) would you create or modify in the Git configuration repository, and what would their contents be?
Show answer
You would create/modify three files in the Git repository:
-
payment-service.properties(for shared properties)db.driver=org.postgresql.Driver -
payment-service-dev.properties(for the 'dev' profile)db.url=jdbc:h2:mem:db -
payment-service-prod.properties(for the 'prod' profile)db.url=jdbc:postgresql://prod-db/payments
When a client with spring.application.name=payment-service starts with the prod profile active (-Dspring.profiles.active=prod), the Config Server will combine properties from payment-service-prod.properties and payment-service.properties. Profile-specific properties (db.url) override the general ones if there's a conflict.
5. Interview-Readiness: Trade-offs & Considerations
Knowing how to set this up is step one. For a mid-senior interview, you need to discuss the why and the trade-offs.
- Why Git? Git is the most common backend because it provides a versioned, auditable, and human-readable history of all configuration changes. Its branching model maps naturally to different environments (e.g., a
developbranch for dev,mainfor prod). - Availability (Single Point of Failure): The Config Server can be a single point of failure. If it's down when a service starts, the service may not get its configuration.
- Mitigation:
- Use
spring.config.import=optional:configserver:...so services can start with default or cached configurations. - Run multiple instances of the Config Server behind a load balancer for high availability.
- Clients automatically cache the fetched configuration locally, so they only need to reach the server on startup.
- Use
- Mitigation:
- Handling Secrets: Storing plain-text secrets (passwords, API keys) in a Git repository is a major anti-pattern, even if the repository is private. Spring Cloud Config provides mechanisms for encrypting properties within the repo, which we can explore later. For an interview, acknowledging that secrets need special handling (e.g., encryption or using a backend like HashiCorp Vault) is crucial.
Conclusion
You have successfully set up a complete centralized configuration system using Spring Cloud Config and a Git backend. This is a massive step towards managing a distributed system effectively.
Key Takeaways:
- Centralized configuration externalizes properties from microservices, making them easier to manage, change, and audit.
- Spring Cloud Config Server is a Spring Boot application enabled by
@EnableConfigServerthat serves configurations from a backend. - Git is a powerful backend for configuration due to its versioning and branching capabilities.
- Clients connect to the server using the
spring.application.nameandspring.config.importproperties. - Property resolution follows a specific order of precedence, with profile-specific files overriding application-specific and global files.
Next Up
There's one glaring issue with our current setup: if you change a property in the Git repository, the client application won't see the change until it restarts. This negates many of the benefits of centralizing configuration.
In our next lesson, we will solve this by implementing dynamic configuration refresh using Spring Cloud Bus, allowing our services to update their configuration on-the-fly without a single restart.
Can't find a good explanation? Sign up and we'll make it for you
Sign up