
In our previous lessons, we've built a solid conceptual model of the Telegram Bot API. You now understand the API's architecture, its core data structures like Update and Message, and the two mechanisms—long polling and webhooks—for receiving information from Telegram's servers.
This lesson transitions from theory to practice. We will perform our first active operation: sending a message. You will learn to directly call the sendMessage API method using a raw HTTP POST request. This fundamental skill is the bedrock upon which all bot interactions are built. We'll start with a simple curl command for quick verification and then translate that logic into a TypeScript script using Bun's native fetch API, directly leveraging your extensive front-end development experience.
The Anatomy of an API Method Call
All interactions with the Telegram Bot API happen over HTTPS. A request to execute a specific method follows a simple and consistent URL structure:
https://api.telegram.org/bot<TOKEN>/<METHOD_NAME>
<TOKEN>is the unique authorization token you received from BotFather.<METHOD_NAME>is the name of the API method you wish to call, such assendMessage.
For the sendMessage method, you must provide parameters specifying what to send and where to send it. The two most important parameters are:
chat_id: The unique identifier for the target chat.text: The UTF-8 encoded text of the message.
Our first challenge is to find the chat_id for the conversation between you and your bot.
Prerequisite: Finding Your chat_id
The bot needs to know the destination for its message. To get your personal chat_id with the bot, you first need to initiate the conversation.
-
Start the Conversation: Open Telegram, find the bot you created, and send it a message (e.g., "hello"). This creates an
Updateevent on Telegram's servers associated with your chat. -
Fetch the Update: We can now use the
getUpdatesmethod to retrieve thatUpdateobject. The response will be a JSON array containing recent updates. Inside themessageobject of the latest update, you will find achatobject which contains your uniqueid.
The following images show the structure of the JSON response from the API. The chat.id is the value you need to retrieve.
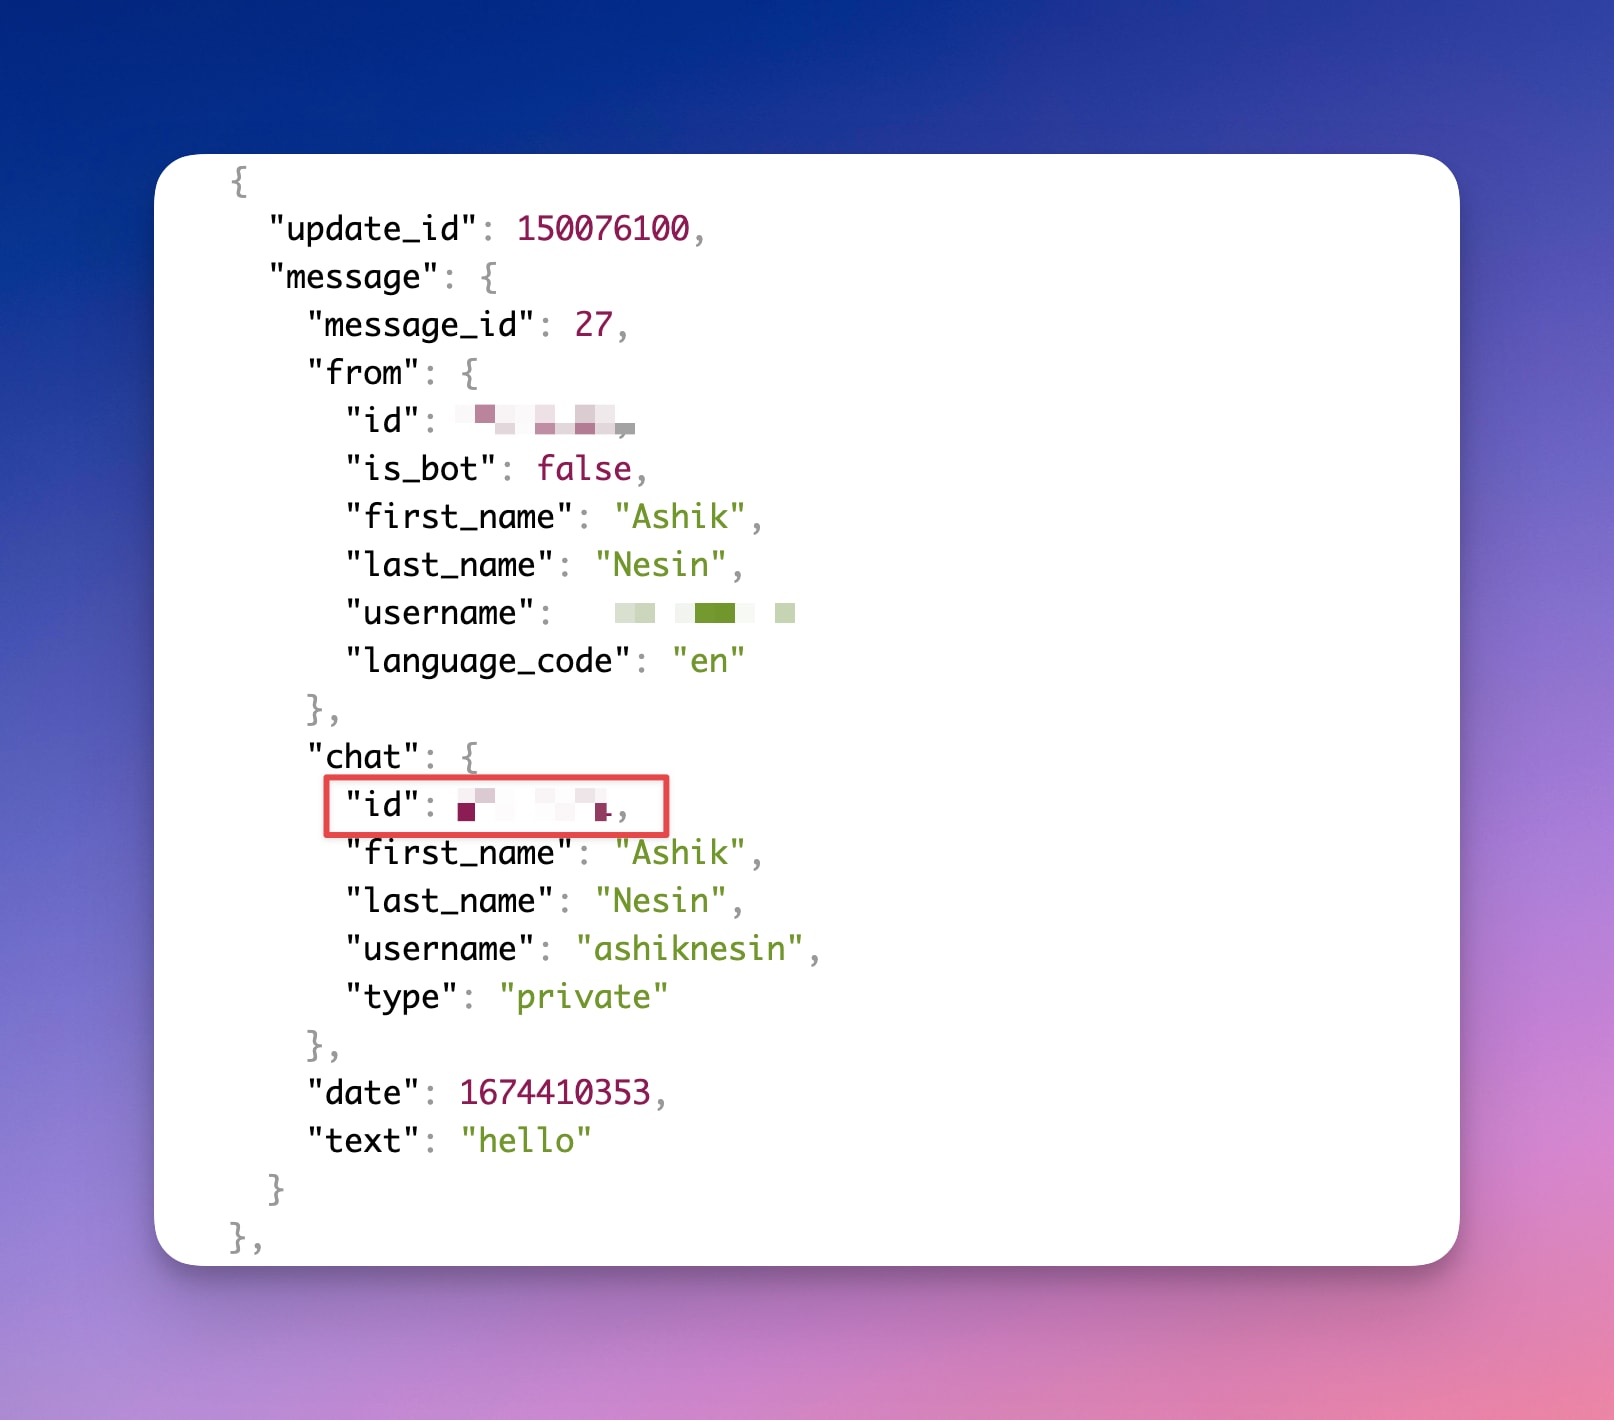

You can retrieve this ID directly from your terminal. The following article provides a clear, hands-on guide. We will use its method for finding the chat ID and then for sending a message.
Setting Up a Telegram Bot for System Notifications
This article by Hwee-Boon Yar demonstrates a practical, script-oriented approach to using the Telegram API. We'll follow its guidance for the initial setup steps.
Focus on the section Get Your Chat ID. Make sure you have sent a message to your bot first. Then, execute the curl command provided in your terminal, replacing <YOUR_TOKEN> with your actual bot token. You'll need jq installed for the command to work as written; if you don't have it, you can run the curl command without it and manually find the chat.id in the JSON output.
Store your bot token and the chat_id you just retrieved. We will use them as environment variables, following best practices.
Sending a Message with curl
Before writing any TypeScript, it's often useful to test an API endpoint with a simple curl command. This confirms that your token and chat_id are correct and that you understand the request structure, without any language-specific boilerplate.
The sendMessage method accepts a POST request. The parameters can be sent as either application/json or application/x-www-form-urlencoded. The curl command below uses the latter, which is slightly more direct for simple key-value data.
Setting Up a Telegram Bot for System Notifications
Now we'll use the same article to construct our curl request.
Read the section titled Sending Messages via curl. Execute the first curl command, substituting your token and chat ID. The -X POST flag specifies the HTTP method, and each -d flag adds a field to the form-urlencoded request body. If successful, your bot will send you the message "Deploy finished ✅".
As an alternative, you can also send the data as a JSON payload. This approach is more verbose in curl but is closer to what we will do in our TypeScript code. The Gist below shows an example.
Sending a notification message to Telegram using its HTTP API via ...
This Gist provides a quick reference for sending a message using a JSON payload.
Review the curl command under step 5. Notice the use of -H 'Content-Type: application/json' to specify the payload type and how the entire dataset is a single JSON string passed to the -d flag.
Sending a Message with Bun and TypeScript
Now, let's translate this raw HTTP request into a reusable TypeScript function. Given your background, this will feel very familiar. We'll use Bun's built-in, web-standard fetch API, which you've likely used extensively in front-end projects.
We will create a simple script, sendMessage.ts, that reads the bot token and chat ID from environment variables and sends a message.
The same article we've been using provides a perfect, ready-to-use TypeScript example that uses Bun.
Setting Up a Telegram Bot for System Notifications
This section provides a complete TypeScript function that encapsulates the logic for sending a message.
Read the section Sending Messages via TypeScript. Create a new file named sendMessage.ts in your project directory and copy this code into it. Let's break down the sendTelegramMessage function: It constructs a body object with the required chat_id and text parameters. It uses fetch to make a POST request to the correct API endpoint. It correctly sets the Content-Type header to application/json. It uses JSON.stringify(body) to serialize the JavaScript object into the request body. It includes basic error handling by checking res.ok and throwing an error if the request fails.
To run this script, open your terminal in the project directory and execute the command provided at the end of the article section, replacing xxx with your bot token and yyy with your chat ID:
TELEGRAM_BOT_TOKEN=xxx TELEGRAM_CHAT_ID=yyy bun run sendMessage.ts
If everything is configured correctly, your bot will send you the message "Build passed ✅", with the word "passed" rendered in bold because the parse_mode was set to HTML.
Conclusion
In this lesson, you have successfully bridged the gap between API theory and practical execution. By making a raw HTTP request to the sendMessage method, you've directly communicated with your bot and commanded it to perform an action. This low-level understanding is invaluable, even when you start using a framework that abstracts these details away.
Key Takeaways:
- Telegram API methods are called via HTTPS POST requests to a URL in the format
https://api.telegram.org/bot<TOKEN>/<METHOD_NAME>. - The
chat_idis a necessary parameter to target a specific conversation and can be found by inspecting theUpdateobjects returned by thegetUpdatesmethod. - You can test API endpoints directly from the command line using
curl. - You can translate
curlcommands into TypeScript using Bun's built-infetchAPI, structuring the request with appropriate headers (Content-Type: application/json) and a JSON-serialized body.
We have now successfully sent a message from our code to Telegram. The next logical step is to have our bot react to messages it receives. In the next lesson, we will implement a basic long polling loop using getUpdates to create our first simple, interactive echo bot.
Can't find a good explanation? Sign up and we'll make it for you
Sign up