
Good to see you again. In the previous lesson, you resolved a merge conflict locally by inspecting both versions, creating the intended combined result, validating it, staging the resolution, and committing the merge. That skill matters here because remote synchronization can reveal the same kind of divergence—only now one side of the history may have been created by another clone on GitHub.
This lesson connects your local Git workflow to a shared repository. You will distinguish the remote repository from Git’s local record of it, then use clone, fetch, pull, and push deliberately rather than treating them as interchangeable “sync” commands. By the end, you will use two local clones to simulate a teammate and synchronize changes safely.
The remote is shared; origin/main is your local record of it
Until now, your commits have lived entirely in the local repository in ~/devops-labs/service-check. A remote repository is another Git repository, usually hosted on GitHub, GitLab, or a company platform. It gives a team a shared place to exchange commits.
After connecting or cloning a repository, Git normally gives the remote the short name origin. Thus:
mainis your current local branch.originnames a remote repository.origin/mainis a remote-tracking branch in your local Git repository.
The last point is the important one. origin/main is not a live view of GitHub. It is Git’s locally stored record of where main was the last time your Git client communicated with origin. Treat it as a cached observation, not a fresh query against the server.

When all is synchronized, both names identify the same commit. Once you commit locally, main moves ahead but origin/main stays where it was. Once someone else pushes and you fetch, origin/main moves ahead while your local main remains unchanged until you integrate those commits.
Use these commands to inspect that relationship:
git status
git branch -vv
git log --oneline --decorate --graph --all -n 12
git remote -v
git branch -vv shows the upstream branch that a local branch tracks, and whether Git knows it to be ahead or behind. git status gives a concise version of the same information. But remember: neither command contacts GitHub by itself.
Four commands, four distinct jobs
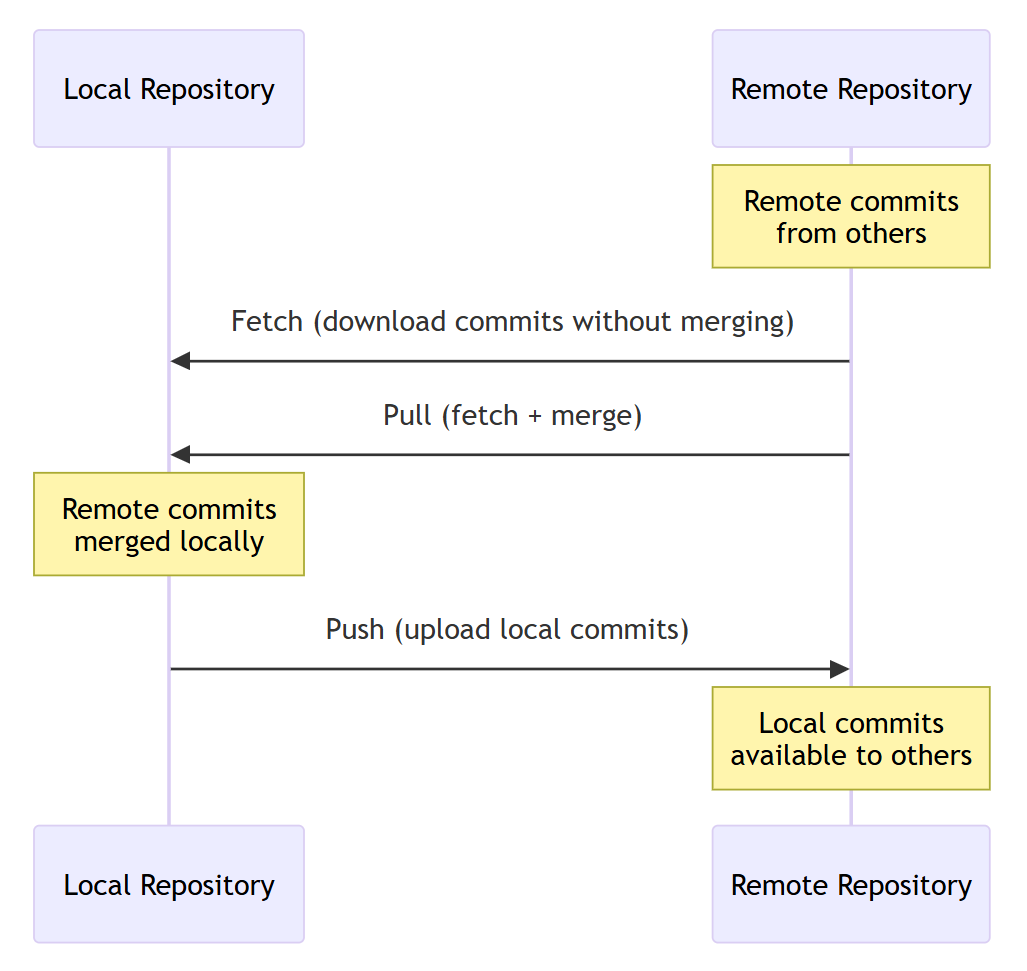
Git’s synchronization commands make most sense when you focus on what each one changes.
| Command | Main job | Does it update your working files? |
|---|---|---|
git clone <url> | Creates a new local repository from a remote repository | Yes, it checks out the default branch |
git fetch origin | Downloads remote commits and updates remote-tracking branches | No |
git pull | Fetches, then integrates the configured upstream branch | Usually yes |
git push | Sends local commits to a remote branch | No local file changes |
Clone: start with a complete local repository
Use clone when the remote repository already exists and you want a working copy on a machine:
git clone https://github.com/YOUR-ACCOUNT/service-check.git
cd service-check
Cloning downloads the repository history, creates the origin remote, creates remote-tracking references such as origin/main, and checks out a local branch that normally tracks the remote’s default branch.
Check the connection immediately:
git remote -v
git branch -vv
The output should show separate fetch and push URLs for origin, and a local main branch that tracks origin/main.
Fetch: learn what changed, without changing your work
git fetch origin contacts the remote and downloads commits and updated branch references. It updates remote-tracking branches such as origin/main, but it does not alter your checked-out branch, staged changes, or working files.
git fetch origin
git status
git log --oneline main..origin/main
git diff --stat main..origin/main
After fetching, the range main..origin/main shows commits that exist on the remote-tracking branch but not your local main. This makes fetch a useful low-risk first action when you want to inspect incoming work before accepting it.
Pull: fetch and integrate
git pull first fetches its configured upstream, then integrates those changes into your checked-out branch.
For a main branch where you expect only remote commits and want Git to refuse unexpected divergence, use:
git pull --ff-only
A fast-forward update simply advances your local main to a newer commit already represented by origin/main. It does not create a merge commit.
The common shorthand “pull means fetch plus merge” is broadly useful, and it is what the supplied diagram illustrates. Strictly, the integration behavior can be configured to merge or rebase. git pull --ff-only makes the conservative behavior explicit: update only if Git can do so without a merge or rebase.
Push: publish commits that are already local
git push sends commits from your local branch to a remote branch:
git push origin main
The general form names the remote first and the branch second. Once an upstream relationship is configured, the shorter form often works:
git push
When publishing a branch for the first time, use -u:
git push -u origin main
The -u option records origin/main as the upstream of local main, allowing later git pull and git push commands to infer the counterpart branch.
For the labs in this course, pushing to main is acceptable when you are working alone or simulating collaboration. In a team repository, direct pushes to main are commonly blocked; you will push a feature branch and propose its integration through a pull request in a later lesson.
Git & GitHub Crash Course for Beginners [2026]
Watch Git & GitHub Crash Course for Beginners [2026] from freeCodeCamp.org for a visual demonstration of the distinction between local work, a remote repository, cloning, and the four synchronization operations.
First watch the cloning demo, where a GitHub repository is copied to a new local directory. Then watch synchronization commands, covering push, fetch, and pull. Focus especially on the fact that fetch does not update the working files until integration occurs.
Lab: synchronize through GitHub with two working copies
This lab uses your existing service-check repository as the primary working copy and creates a second clone that acts as a teammate’s workstation. You will first connect your existing local repository to GitHub, then practice each synchronization command.
1. Publish the existing repository
On GitHub, create a new repository called service-check. Make it empty: do not initialize it with a README, .gitignore, or license. Those files already belong under local Git control, and an empty remote gives you a clean first push.
In your existing repository:
cd ~/devops-labs/service-check
git switch main
git status
Ensure the working tree is clean. Then copy the repository’s HTTPS URL from GitHub and add it as origin:
git remote add origin https://github.com/YOUR-ACCOUNT/service-check.git
git remote -v
git push -u origin main
GitHub will require authentication. If you use HTTPS, authenticate through its browser or credential-manager flow, or use a personal access token when prompted. A GitHub account password is not accepted for Git operations over HTTPS.
If git remote add origin says that origin already exists, inspect the configured URL:
git remote -v
If it is incorrect, replace it deliberately:
git remote set-url origin https://github.com/YOUR-ACCOUNT/service-check.git
After the initial push, refresh GitHub in the browser and confirm that your commits and files appear there.
2. Clone a teammate workspace
Move to the directory that holds your labs and clone the remote repository into a separate folder:
cd ~/devops-labs
git clone https://github.com/YOUR-ACCOUNT/service-check.git service-check-collaborator
cd service-check-collaborator
Inspect the clone:
git remote -v
git branch -vv
git status
git log --oneline --decorate -n 5
You should see:
originpointing to your GitHub repository;maintrackingorigin/main;- a clean working tree;
- the same recent history as the original local repository.
This second clone is independent. Edits and commits created here do not appear in the first clone until they are pushed and the first clone synchronizes.
3. Simulate a teammate push
In the collaborator clone, add a non-conflicting line to the operations notes from the previous lesson:
printf '\nRemote synchronization test: this line was added from a second clone.\n' >> docs/operations-notes.md

git add docs/operations-notes.md
git commit -m "docs: add remote synchronization note"
git push
The push sends this new commit to GitHub. Now return to your original workspace:
cd ~/devops-labs/service-check
git status
Before contacting the remote, Git may still say that your branch is up to date. That statement only reflects the local origin/main reference, which has not yet been refreshed.
Fetch explicitly:
git fetch origin
git status
git log --oneline main..origin/main
git diff --stat main..origin/main
Now Git should report that local main is behind origin/main by one commit. Your working copy still does not contain the added line, because fetch did not integrate it.
Review the incoming commit, then fast-forward your branch:
git merge --ff-only origin/main
git status
tail -n 5 docs/operations-notes.md
This separates the two decisions that pull can otherwise combine:
- Download and inspect the remote change.
- Integrate the approved change into your local branch.
4. Use pull for a known, straightforward update
Make one more change in the collaborator clone:
cd ~/devops-labs/service-check-collaborator

printf 'Pull test: this line should arrive through a fast-forward update.\n' >> docs/operations-notes.md

git add docs/operations-notes.md
git commit -m "docs: add pull synchronization note"
git push
Back in your primary clone, update directly:
cd ~/devops-labs/service-check
git pull --ff-only
git status
tail -n 6 docs/operations-notes.md
This time, pull fetched the new commit and advanced main in one command. --ff-only is a useful habit for an integration branch when you do not expect your local history to have diverged.
5. Commit locally, check the remote, and push
Still in the primary clone, make a local change:
printf 'Push test: this line was committed from the primary workspace.\n' >> docs/operations-notes.md

git add docs/operations-notes.md
git commit -m "docs: add push synchronization note"
At this point, the commit is safe in your local Git history, but it is unavailable to collaborators. Confirm the state:
git status
git log --oneline --decorate -n 5
Before publishing, fetch once more. This is a sensible habit before a push when other people might be working on the same branch:
git fetch origin
git status
git push
git status
The first status should report that local main is ahead of origin/main by one commit. Assuming no new remote commits arrived, push succeeds. The final status should say the branch is up to date with origin/main.
As a final confirmation, update the collaborator clone:
cd ~/devops-labs/service-check-collaborator
git pull --ff-only
tail -n 8 docs/operations-notes.md
The line created in your primary workspace should now be present.
When push is rejected: do not force the shared branch
A common real-world sequence is:
- You make one or more local commits.
- Someone else pushes to the same remote branch.
- Your push is rejected because accepting it would discard their newer remote history.
Git calls this a non-fast-forward rejection. It is a safety control, not a failure to work around.
Do not use git push --force on a shared branch such as main. Force-pushing rewrites the remote branch reference and can make a teammate’s commits disappear from the visible branch history.
Instead, synchronize deliberately:
git fetch origin
git status
git log --left-right --graph --oneline HEAD...origin/main
Then choose integration based on the situation:
- If you have no local commits, use
git pull --ff-only. - If both you and the remote have commits, integrate the remote work with
git merge origin/main, validate the result, resolve any conflict as you practiced in the previous lesson, and then push. - If your team has a documented rebase workflow, follow that policy rather than improvising on a shared branch. For now, merging makes the combined history explicit and uses skills you have already practiced.
A clean working tree is especially important before pull or a manual merge. Commit your valid work first, or otherwise safely set it aside, so that uncommitted changes do not become tangled with incoming commits.
A compact operating routine
For routine work on a shared repository, use this sequence:
-
Start by checking branch and work-tree state:
git status git branch --show-current -
Refresh your knowledge of remote state:
git fetch origin -
Inspect incoming commits when the change matters:
git log --oneline HEAD..origin/main -
Integrate with the appropriate command, often:
git pull --ff-onlyIf you already fetched and reviewed the change, use
git merge --ff-only origin/maininstead. -
Commit your own tested work locally, then fetch once more before publishing.
-
Push the intended branch:
git push
For a newly created feature branch, establish its upstream on the first push:
git push -u origin feat/descriptive-change
That branch-level pattern will become important when you begin using GitHub pull requests.
Key takeaways
A remote repository is a shared Git repository; origin is its usual local nickname. origin/main is not the server itself—it is your local remote-tracking reference, updated when Git communicates with the remote.
Use clone to create a new local working repository connected to a remote. Use fetch when you want to download and inspect remote commits without changing your working files. Use pull when you want Git to fetch and integrate the upstream branch; git pull --ff-only is a conservative choice for straightforward updates. Use push to publish commits that already exist locally.
If Git rejects a push because the remote has advanced, fetch and integrate the remote work rather than force-pushing a shared branch. The merge-conflict workflow from the previous lesson applies if integration cannot be automatic.
Next, you will mark releasable points in this shared history with Git tags and semantic versioning.
Can't find a good explanation? Sign up and we'll make it for you
Sign up