
Good to see you again. Last time, you created the local service-check repository, added an intentional .gitignore, and made small, meaningful commits on main. You also used git status, git diff, and git diff --staged to distinguish the working tree, staging area, and committed history.
Now you will use that clean main history as a stable baseline. The goal is to make a change on an isolated branch, verify that main remains unchanged, and then merge the completed work back into main. This is the local Git workflow that later supports pull requests, CI checks, and controlled releases.
A branch is a named line of work
A Git branch is best understood as a lightweight, movable name for a commit. At the moment you create a branch, both main and the new branch name point to the same commit. Once you make a commit on the new branch, only that branch name moves forward; main stays at its previous known-good snapshot.
HEAD identifies the branch currently checked out in your working directory. New commits are added to that current branch.
For an operations project, branches let you work on a discrete change such as:
- adding a health-check option;
- improving Terraform documentation;
- updating an Ansible role;
- fixing a pipeline configuration;
- correcting an urgent deployment script problem.
The important benefit is isolation. Work in progress can be committed, tested, and reviewed without changing the baseline represented by main.
A useful discipline is:
- Start from an up-to-date, clean
main. - Create one branch for one coherent task.
- Commit and verify the change on that branch.
- Merge only the completed, reviewed change into
main. - Delete the branch once it is no longer useful.
A branch is not a separate copy of every project file. Git stores commits efficiently and branches are inexpensive references into that commit history. This is why short-lived, task-focused branches are practical in day-to-day DevOps work.
Git and GitHub Beginner Tutorial 5 - Branching and Merging
Watch “Git and GitHub Beginner Tutorial 5 - Branching and Merging” from Automation Step by Step for a compact visual explanation of why work should be isolated before it reaches the primary branch.
Watch the rationale for using a separate branch instead of editing the primary branch directly. Then watch the merge workflow; focus on the key rule that you first check out the destination branch, then merge the completed branch into it. The video calls the primary branch master; in this course and your repository, use main.
Creating and switching branches safely
Older Git tutorials commonly use git checkout for both creating and switching branches. Modern Git offers clearer commands:
| Task | Preferred command | Compatible older form |
|---|---|---|
| Show local branches | git branch | git branch |
| Show current branch | git branch --show-current | git branch --show-current |
| Create and switch to a branch | git switch -c branch-name | git checkout -b branch-name |
| Switch to an existing branch | git switch branch-name | git checkout branch-name |
| Merge another branch into the current branch | git merge branch-name | git merge branch-name |
The git switch commands make intent easier to read, so use them in this lab. If your Git installation reports that switch is unknown, use the equivalent checkout command shown in the table.
Before switching branches, make git status a habit. Git usually prevents a branch switch when uncommitted edits would be overwritten, but a clean working tree is much easier to reason about. Commit a complete logical change before switching, or deliberately set it aside using techniques you will learn later.
Git - Basic Branching and Merging
Read the official Pro Git chapter “Basic Branching and Merging.” It explains the same local workflow you will perform, including how Git keeps unfinished work separate and what occurs when branches are merged.
Read the full “Basic Branching” section, beginning with the website-work scenario and continuing through the hotfix example. In particular, locate the branch commands and notice that the book uses git checkout -b; this is equivalent to the git switch -c command used here. Then read all of “Basic Merging.” Follow the two merge forms, contrasting a fast-forward merge with a merge commit. The book uses the historical default name master; translate it mentally to your repository’s main.
Lab: isolate a documentation change
Continue in the repository you created previously. This lab uses a documentation change because the Git workflow matters more than the complexity of the file being changed. The same sequence applies when the branch contains Bash, Docker, Terraform, or application code.
1. Confirm that main is clean
cd ~/devops-labs/service-check

git status
git branch --show-current
git log --oneline --decorate -n 5
You should be on main, with no uncommitted changes. If git status reports modifications from the previous lesson, inspect them with git diff and either commit the intended work or discard only changes you are certain you do not need.
2. Create a task-focused branch
Create a branch called docs/add-local-usage and switch to it:
git switch -c docs/add-local-usage
If needed, use the older equivalent:
git checkout -b docs/add-local-usage
Confirm your location and inspect all branch references:
git branch
git branch --show-current
git log --oneline --decorate --graph --all -n 8
The asterisk in git branch output marks the checked-out branch. At this point, main and docs/add-local-usage point to the same latest commit. Nothing has diverged yet.
Branch names should describe the work rather than the person doing it. A pattern such as docs/add-local-usage, feat/health-check-timeout, or fix/incorrect-exit-code gives reviewers immediate context. Teams have different naming conventions, but clarity and consistency matter more than a specific format.
3. Make and test the isolated change
Add a short local-usage section to README.md:
cat >> README.md <<'EOF'

## Run locally

Run the current placeholder script from the repository root:

```bash
./scripts/check-service.sh
The command currently prints a placeholder message. Its behavior will be expanded into a real health check in a later module.
EOF
Inspect the change before staging:

```bash
git status
git diff
Run the command that the documentation describes:
./scripts/check-service.sh
The current output should be:
Service check placeholder
Now stage only the documentation change, inspect the exact snapshot, and commit it:
git add README.md

git diff --staged
git commit -m "docs: add local usage instructions"

git status
At this point, your feature branch contains one additional commit. main does not.
4. Prove that main is still unchanged
Switch back to the primary branch:
git switch main
Check whether the new heading exists:
grep -n "Run locally" README.md || echo "Not present on main, as expected."
The heading should not be present. Git adjusted your working tree to match the commit currently named by main; it did not delete your work. The documentation commit remains safely stored on docs/add-local-usage.
See the history:
git log --oneline --decorate --graph --all -n 10
You should see the branch name docs/add-local-usage on a commit ahead of main. This is the isolation property in concrete form: a completed commit can exist on a task branch without altering the primary branch.
Review before merging
Before merging locally, review the branch as though you were checking another contributor’s change. A reliable review is not only “does it look correct?” It also asks whether the change is focused and whether its claims have been verified.
From main, inspect the commits and content that the branch would introduce:
git log --oneline main..docs/add-local-usage
git diff --stat main...docs/add-local-usage
git diff main...docs/add-local-usage
The git log command lists commits reachable from docs/add-local-usage but not from main. The diff commands compare the task branch’s change with the common starting point. For this lab, the output should show only the new README section.
For a real DevOps change, a pre-merge review commonly includes:
- reading the diff for scope and accidental edits;
- running relevant local checks;
- confirming that documentation matches actual behavior;
- checking that no secret, generated file, or local environment file is included;
- later, using CI results and peer review in a pull request.
A local merge does not deploy an application or alter AWS. It changes your local Git history. CI/CD systems will later use commits and tags from Git as traceable inputs to builds and deployments.
Merge the completed branch into main
You are already on the destination branch, main. Merge the completed work:
git merge docs/add-local-usage
Git will likely report a fast-forward update. This occurs because main has not changed since the feature branch was created. Git can safely move main forward to the existing branch commit; it does not need to create a separate merge commit.
Verify the result:
git branch --show-current
git log --oneline --decorate --graph --all -n 10
grep -n "Run locally" README.md
./scripts/check-service.sh
The README heading should now be present on main, and the script should still run successfully. This final verification matters: the merge is an integration event, so test the result on the destination branch, not only on the feature branch.
The branch is now merged and no longer needed locally. Delete it:
git branch -d docs/add-local-usage
git branch
git status
Use -d, not -D, in normal cleanup. Git refuses -d when it believes the branch contains unmerged commits, providing a useful safety check. The commits themselves are not lost after deletion because main now reaches them.
Do not expect this deletion to affect GitHub or another remote repository. Local and remote branch synchronization is a separate workflow, covered later in the module.
Fast-forward merges and merge commits
The lab produced a fast-forward merge, which is the simplest case. It is still a real merge: the feature change is now part of main.
Sometimes main also receives a commit after you create your feature branch. For example, another contributor may merge an urgent fix while you are completing your work. When both branch lines contain new commits after their common starting point, Git performs a three-way merge:
- Git compares the common ancestor snapshot.
- Git compares the latest snapshot on
main. - Git compares the latest snapshot on the branch being merged.
- If the edits are compatible, Git combines them and creates a new merge commit.
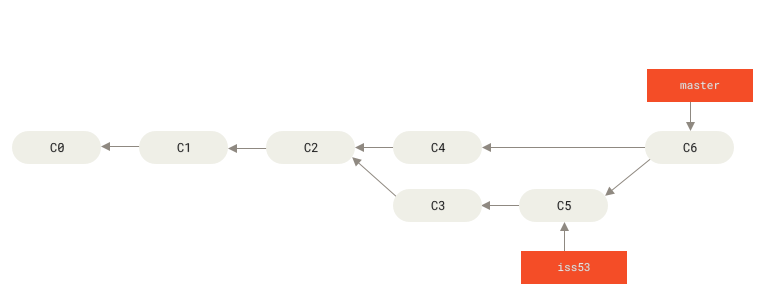
A merge commit records that two lines of work were deliberately integrated. In the image, C6 is such a commit. This differs from the fast-forward merge in your lab, where main simply moved to the branch’s existing commit because no separate main work had appeared.
Git can automatically combine independent edits, such as one branch adding documentation while another modifies a script. If both branches change the same lines in incompatible ways, Git pauses and asks a person to decide the intended final content. That situation is a merge conflict, and it is the focus of the next lesson.
Key takeaways
A branch is a lightweight, named line of commits. Create one from a clean main branch to isolate a focused change, then commit and verify the change without altering the primary baseline.
The key merge rule is simple: check out the branch that should receive the change, then run git merge with the completed branch name. In this lesson, main received docs/add-local-usage.
A fast-forward merge moves main to an existing branch commit when main has not changed independently. When histories have diverged, Git may create a merge commit that joins both lines of work.
You have now completed the normal clean-path workflow: branch, change, validate, review, merge, verify, and clean up. Next, you will handle the non-clean path by resolving a Git merge conflict while preserving both contributors’ intended changes.
Can't find a good explanation? Sign up and we'll make it for you
Sign up