
Hello! Welcome to the first lesson in our module on Production-Ready Authentication Patterns.
In the previous module, you successfully implemented the core OAuth 2.0 flow, from initiating the request to handling the callback and retrieving user information. Now, we'll build on that foundation to handle a common and important real-world scenario.
This lesson addresses a crucial aspect of user experience and data integrity: what happens when a user signs in with an OAuth provider (like Google) but already has a local account (e.g., created with an email and password) using the same email address?
Our goal is to implement a strategy to seamlessly link this new OAuth identity to the existing user account. This prevents creating duplicate users, avoids confusion, and ensures a single, unified profile for each person using your application.
The Concept of Account Linking
Account linking, or identity linking, is the process of connecting multiple authentication methods to a single user account. The most common and effective strategy for this is automatic linking based on a verified email address.
The core idea is simple: if a user signs in via an OAuth provider and that provider confirms their email address is verified, your application can check if an account with that same email already exists. If it does, you link the new social login to that existing account instead of creating a new one.
Let's explore this concept with some documentation from popular authentication services. While these are not TanStack Start, they explain the universal principles perfectly.
Identity Linking | Supabase Docs
First, let's read the 'Identity Linking' documentation from Supabase. It provides a clear definition of the two main strategies: Automatic Linking and Manual Linking.
Please read the introduction and the section titled 'Automatic linking'. Focus on how Supabase uses the email address as the key for linking and the security measures it takes regarding unverified emails.
Authentication flows: Account linking for OAuth
Next, review the 'Account linking for OAuth' guide from Clerk. This resource reinforces the concept and provides a helpful flowchart.
Read the introduction and the 'How it works' section, including the first sub-point, 'Email address is verified in both OAuth and Clerk'. This will solidify your understanding of the ideal automatic linking scenario.
As you can see, the consensus is to use a verified email as the "source of truth" to merge identities. Now, let's break down how this flow works in practice.
The Automatic Linking Flow
The logic for account linking lives entirely on the server, specifically within your OAuth callback handler that you created in the previous module. When the user is redirected back from the OAuth provider with an authorization code, your server will perform the following steps:
- Exchange the Code: Exchange the authorization code for an access token and, if using OpenID Connect (OIDC), an ID token.
- Fetch User Profile: Use the access token to request the user's profile from the provider's user info endpoint. This response will contain their name, email, and—critically—the verification status of that email.
- Check for an Existing User: Query your database to see if a user with that email address already exists.
- Implement the Linking Logic:
- If a user exists: You've found a match! You'll associate the new OAuth provider's ID (e.g., Google's
subclaim) with this existing user record. The user is then logged in to their original account. - If no user exists: This is a brand new user. Proceed as usual by creating a new user record in your database using the information from their social profile.
- If a user exists: You've found a match! You'll associate the new OAuth provider's ID (e.g., Google's
This diagram from Microsoft Azure's documentation illustrates a similar "funnel" for merging accounts in a distributed system. The key logic is in the center: when an ID is not found but an email is, a "MERGE" operation is performed.
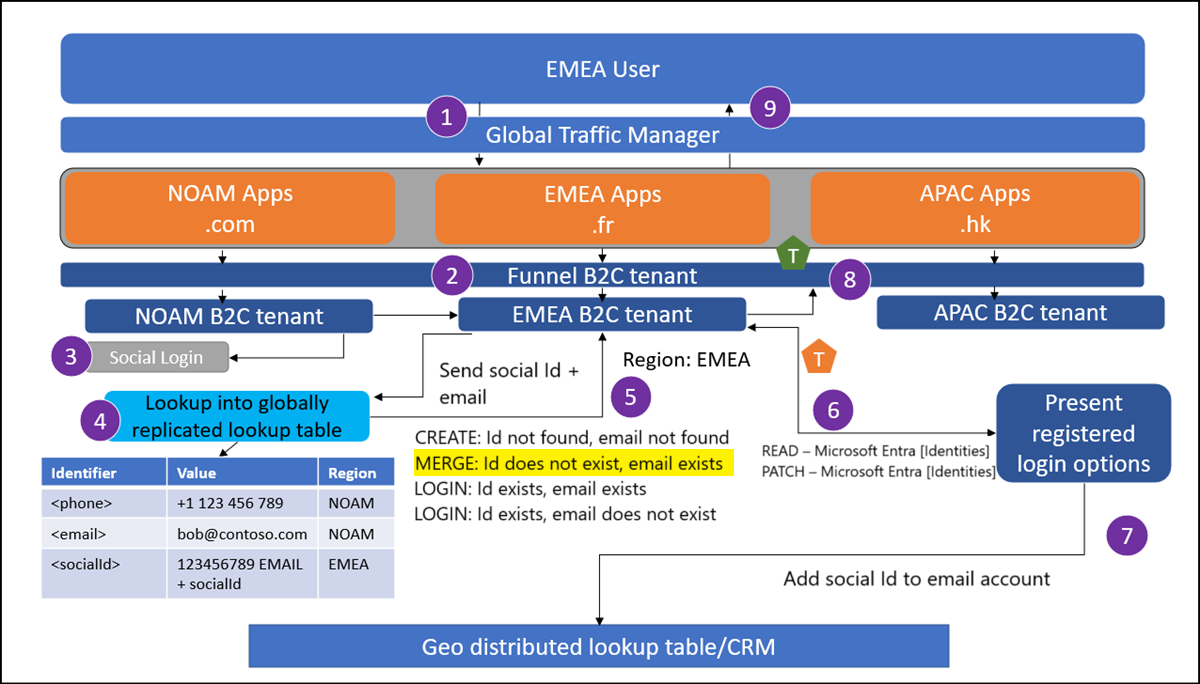
To see this in a more concrete, code-adjacent context, let's watch a section of a video that demonstrates this with the django-allauth library. Although the framework is different, the configuration options and the resulting behavior perfectly demonstrate the automatic linking strategy.
OAuth - Social Logins with Django and Allauth - Google, Github, X and Facebook
This video by Andreas Jud shows how to configure a popular authentication library to handle linking social accounts automatically. Pay close attention to the configuration options being set and the 'before and after' demonstration.
Watch the segment from 20:53 to 27:14. Notice how the default behavior is to show a signup form (because the email exists), and how changing a configuration (SOCIALACCOUNT_AUTO_SIGNUP = true) enables the automatic linking and sign-in.
Test your understanding!
A user, jane@example.com, signed up for your service a month ago using her email and a password. Today, she returns to your site and clicks "Sign in with Google." Her Google account email is also jane@example.com.
Based on the automatic linking strategy, what should be the final outcome after she completes the Google sign-in flow?
Show answer
The system should not create a new account. Instead, it should log her into her original account from a month ago. In the background, her user record in the database should now be associated with both her password and her Google identity, allowing her to sign in with either method in the future.
Security Considerations and Edge Cases
A production-ready implementation must account for security. The biggest risk in automatic linking is an account takeover.
Imagine this scenario:
- A malicious user signs up for your service with the email
victim@example.com, but since they don't own the email, they can't complete the verification step. Your database now has anunverifieduser. - Later, the legitimate owner of
victim@example.comsigns up using their Google account. - If your system blindly links the verified Google login to the unverified local account, you might grant the legitimate user access to a profile pre-filled with malicious data, or vice-versa.
The Golden Rule: Only perform automatic linking if both the email from the OAuth provider is verified AND the existing user account in your database is also verified.
Let's see how the Clerk documentation explains handling cases where one or both emails are unverified.
Authentication flows: Account linking for OAuth
This part of the Clerk documentation covers the edge cases we just discussed. It's crucial for building a secure system.
Read the sections 'Email address is verified in Clerk but not in OAuth' and 'Email address is unverified in Clerk'. Note the security measures they describe to prevent account takeovers.
If the OAuth provider doesn't confirm the email is verified, you cannot trust it for automatic linking. In that case, you should treat it as a new signup and trigger your own email verification flow.
Strategy for TanStack Start
Now, let's translate this theory into a concrete plan for your TanStack Start application. This logic will be implemented within the server function that handles your OAuth callback (e.g., /api/auth/google/callback).
Here is a high-level pseudocode implementation:
// In your server-side OAuth callback handler

import { db } from '~/db'; // Your database client
import { createSession } from '~/lib/session'; // Your session creation logic
import { redirect } from '@tanstack/react-router';

export async function handleGoogleCallback(request: Request) {
  // 1. Get the authorization code from the request URL
  const code = new URL(request.url).searchParams.get('code');

  // 2. Exchange code for tokens and fetch Google user profile
  const googleProfile = await getGoogleProfileFromCode(code);

  // 3. SECURITY CHECK: Ensure email is verified by Google
  if (!googleProfile.email_verified || !googleProfile.email) {
    // Redirect with an error or show a specific page
    throw new Error('Cannot link account: Email from provider is not verified.');
  }

  // 4. Look for an existing user in your database
  const existingUser = await db.user.findUnique({
    where: { email: googleProfile.email },
  });

  let userId: string;

  if (existingUser) {
    // 5a. USER EXISTS: Use the existing user's ID
    console.log(`User ${existingUser.email} exists. Linking Google account.`);
    userId = existingUser.id;

    // You should also formally link the identity in your database.
    // This creates a record that this user ID is associated with a specific Google ID.
    await db.socialConnection.upsert({
      where: {
        provider_userId: { provider: 'google', userId: existingUser.id }
      },
      update: { providerId: googleProfile.sub },
      create: {
        userId: existingUser.id,
        provider: 'google',
        providerId: googleProfile.sub, // The unique ID from Google
      },
    });

  } else {
    // 5b. NEW USER: Create a new user record
    console.log(`Creating new user for ${googleProfile.email}.`);
    const newUser = await db.user.create({
      data: {
        email: googleProfile.email,
        name: googleProfile.name,
        // The user's email is considered verified because Google verified it.
        emailVerified: new Date(),
      },
    });
    userId = newUser.id;

    // Create the social connection for the new user
    await db.socialConnection.create({
      data: {
        userId: newUser.id,
        provider: 'google',
        providerId: googleProfile.sub,
      },
    });
  }

  // 6. Create a session for the resolved user (new or existing)
  const sessionCookie = await createSession(userId);

  // 7. Redirect the user to their dashboard, setting the session cookie
  return redirect({
    to: '/dashboard',
    headers: { 'Set-Cookie': sessionCookie },
  });
}
This pseudocode provides a clear, secure, and robust template for implementing account linking in your application. It combines the data fetching from your OAuth module with database logic and session management.
Conclusion
In this lesson, we've designed a production-ready strategy for linking OAuth identities to existing local accounts.
Key Takeaways:
- Automatic Account Linking provides a seamless user experience by preventing the creation of duplicate accounts.
- The strategy relies on using a verified email address as the common identifier between a local account and a new OAuth login.
- Security is paramount. Your logic must verify that the email from the OAuth provider is trusted before linking it to an existing account to prevent takeover vulnerabilities.
- This logic is implemented on the server-side within your OAuth callback handler, where you have access to both the provider's data and your application's database.
Excellent work on tackling this crucial authentication pattern. In our next lesson, we will build upon our unified user identity to implement Role-Based Access Control (RBAC), allowing you to control what different users can see and do within your application.
Can't find a good explanation? Sign up and we'll make it for you
Sign up