Welcome back! In the previous lesson, we built a solid testing foundation for our MyToken contract by verifying its core transfer function. We confirmed that balances update correctly, events are emitted, and transactions fail when they should.
This lesson takes us a step further into the ERC-20 standard by exploring the crucial "allowance" mechanism, which is powered by the approve and transferFrom functions. This two-step flow allows one account—or, more commonly, another smart contract—to spend tokens on your behalf. This is the magic behind decentralized exchanges, lending protocols, and many other DeFi applications. Your goal is to write tests that ensure this delegated transfer functionality is secure and works as intended.
We will write tests to cover:
- Successfully creating an allowance with
approveand emitting theApprovalevent. - A spender successfully using
transferFromto move tokens within their approved limit. - Ensuring the transaction reverts when a spender tries to exceed their allowance.
- Confirming that the allowance is correctly reduced after a
transferFromcall.
1. The Delegated Transfer Mechanism: approve and transferFrom
While the transfer function is great for direct peer-to-peer payments, the real power of ERC-20 tokens in a decentralized ecosystem comes from their ability to interact with smart contracts. How do you "deposit" tokens into a Uniswap liquidity pool or use them as collateral on Aave? You don't actually send the tokens to the contract; instead, you approve the contract to take them from your wallet.
This is a two-step process:
- Approval (
approve): You, the token owner, call theapprovefunction on the token contract. You specify aspenderaddress (e.g., the Uniswap router contract) and anamountof tokens you authorize it to spend. This creates an "allowance." - Delegated Transfer (
transferFrom): Thespender(the Uniswap router) can then calltransferFromon the token contract to move up to theamountyou approved from your wallet to another address.
From your experience in investment management, you can think of this as analogous to granting a limited power of attorney or setting up a direct debit mandate. A client authorizes an asset manager to execute trades on their behalf, but only up to specific limits or under certain conditions. The approve function sets that limit, and transferFrom is the execution of a trade under that mandate.
This mechanism is powerful but also carries risk. Approving a contract gives it power over your funds. Malicious or buggy contracts can drain approved tokens. For this reason, it's considered good practice to only approve the exact amount needed for a transaction or to periodically revoke old approvals using tools available on block explorers like Etherscan.
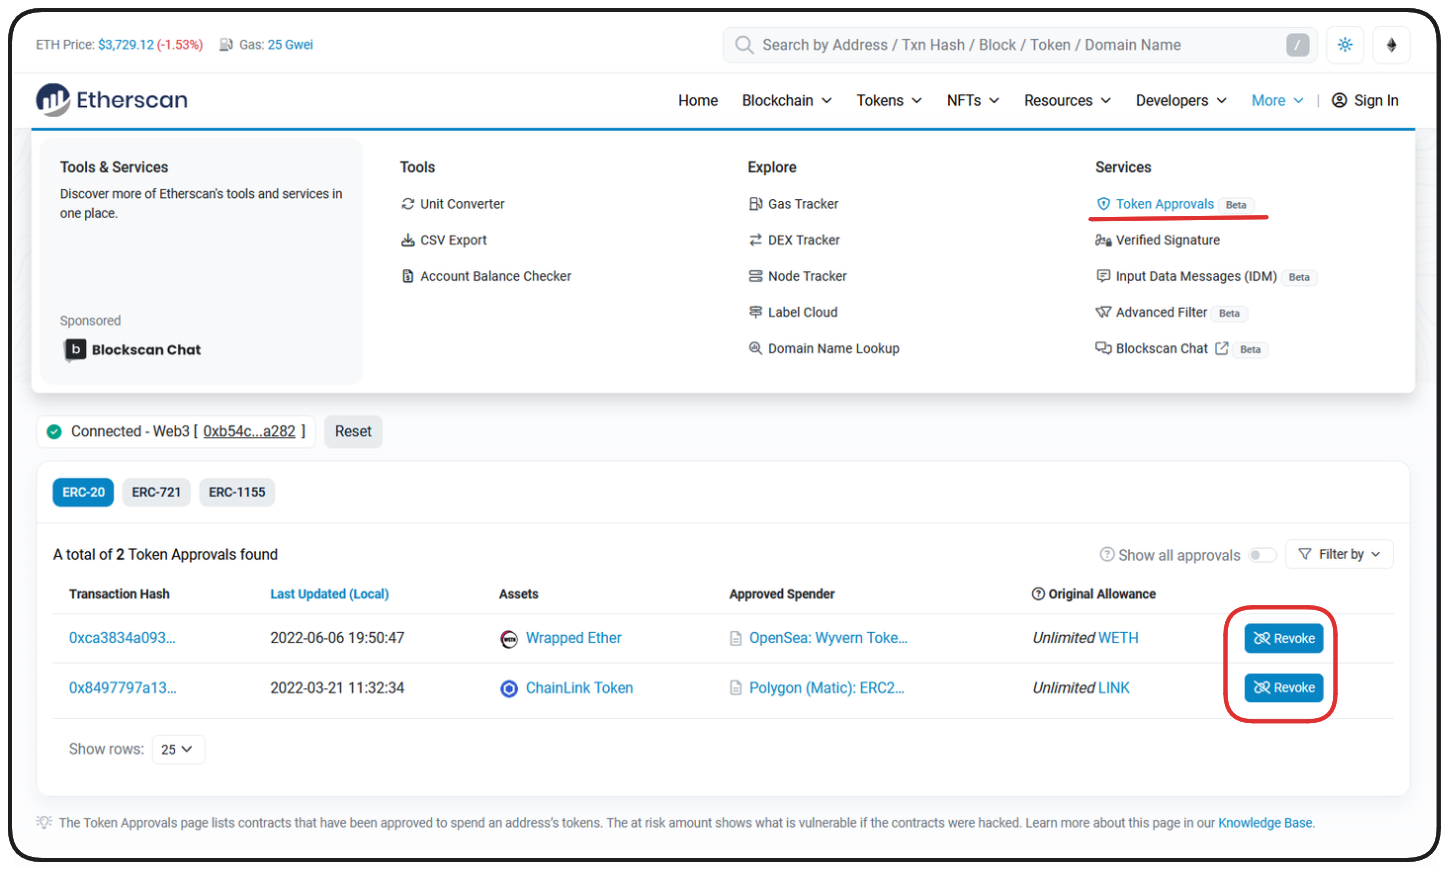
To get a better sense of this flow, let's review a brief explanation from Cyfrin's "Advanced Foundry" course. While the examples are in Foundry/Solidity, the concepts are universal to the ERC-20 standard.
Test your ERC20 using AI - Advanced Foundry
This resource explains the role of approve and transferFrom in enabling smart contracts to act on behalf of users.
Read the section titled "Approvals and transferFrom". Focus on the core idea that transferFrom is what allows a protocol to transfer tokens "on behalf of a user" and how approve is used to grant this permission.
2. Testing the "Happy Path": A Successful Delegated Transfer
Now, let's write the tests for a successful approve and transferFrom sequence. Our test will simulate three parties:
owner: The initial token holder.addr1: The account that will be approved as a spender.addr2: The final recipient of the tokens.
The test should follow these steps:
- The
ownertransfers some tokens toaddr1to make the scenario more realistic (so the spender is not the owner). addr1callsapprove, authorizing theownerto spend some of its tokens.- We verify that the
Approvalevent was emitted correctly. - We check that the allowance was set correctly using the
allowance()function. - The
owner(now acting as the spender) callstransferFromto move tokens fromaddr1toaddr2. - We verify that the balances of
addr1andaddr2have changed correctly.
A tutorial by Cyrille on Medium provides a very clear example of how to structure this test using Hardhat and ethers.js.
Solidity Tutorial: Create an ERC20 Token - Medium
This article provides excellent, concise Hardhat test examples for an ERC-20 contract. We will focus on the tests for transferFrom and the Approval event.
First, find the describe("transfer", ...) block and examine the test case "should transfer amount from a specific account". Notice the three-step logic: an initial transfer to set up the scenario, the connect(account0).approve(...) call, and finally the transferFrom call with a changeTokenBalances assertion. Next, look at the describe("events", ...) block and read the test case "should emit Approval event". This shows the standard way to test for event emissions with specific arguments, which is a crucial part of verifying the approve function.
Let's integrate these patterns into our MyToken.test.js file. We'll add a new describe block for "Allowances" to keep our tests organized.
Here are the tests for the "happy path":
// Inside your MyToken.test.js file, after the "Transactions" describe block

describe("Allowances", function () {
    it("Should approve a spender and emit an Approval event", async function () {
        const approveAmount = ethers.parseEther("100");

        // Owner approves addr1 to spend 100 tokens
        await expect(myToken.approve(addr1.address, approveAmount))
            .to.emit(myToken, "Approval")
            .withArgs(owner.address, addr1.address, approveAmount);

        // Check the allowance
        const allowance = await myToken.allowance(owner.address, addr1.address);
        expect(allowance).to.equal(approveAmount);
    });

    it("Should handle a delegated transfer via transferFrom", async function () {
        const approveAmount = ethers.parseEther("100");
        const transferAmount = ethers.parseEther("50");

        // Owner approves addr1 to spend 100 tokens
        await myToken.approve(addr1.address, approveAmount);

        // addr1 uses its allowance to transfer 50 tokens from owner to addr2
        await expect(myToken.connect(addr1).transferFrom(owner.address, addr2.address, transferAmount))
            .to.changeTokenBalances(myToken, [owner, addr2], [-transferAmount, transferAmount]);

        // Check the remaining allowance
        const remainingAllowance = await myToken.allowance(owner.address, addr1.address);
        expect(remainingAllowance).to.equal(approveAmount - transferAmount);
    });
});
The first test confirms that calling approve both sets the state correctly (the allowance amount) and logs the action on-chain (the Approval event). The second test verifies the core transferFrom logic: balances change as expected, and the spender's allowance is correctly reduced.
3. Testing Failure Scenarios
Just as important is ensuring the system prevents unauthorized or invalid actions. What happens if a spender tries to take more tokens than they were approved for? The transaction must fail.
The OpenZeppelin ERC-20 contract will revert the transaction with the error message ERC20: insufficient allowance. Our test must confirm this exact behavior.
Let's write a test for this case:
ownerapprovesaddr1for 100 tokens.addr1attempts totransferFrom101 tokens.- We assert that the transaction is
revertedWiththe specific error message.
// Add this test case inside the "Allowances" describe block

it("Should fail a transferFrom if the spender has insufficient allowance", async function () {
    const approveAmount = ethers.parseEther("100");
    const transferAmount = ethers.parseEther("101"); // 1 more than approved

    // Owner approves addr1 for 100 tokens
    await myToken.approve(addr1.address, approveAmount);

    // addr1 attempts to transfer 101 tokens from owner to addr2
    await expect(myToken.connect(addr1).transferFrom(owner.address, addr2.address, transferAmount))
        .to.be.revertedWith("ERC20: insufficient allowance");
});
This test ensures that the limits set by approve are strictly enforced. The same error would occur if an account with zero allowance attempted to call transferFrom.
The image below shows output from hardhat-tracer, a powerful debugging tool. It visualizes the call stack of a transaction. You can see a call to transferFrom that fails with the exact ERC20: insufficient allowance error we are testing for. This is what happens on the EVM level when our test assertion passes.

4. Putting It All Together
Now, let's update your full MyToken.test.js file to include this new suite of tests for the allowance mechanism.
const { expect } = require("chai");
const { ethers } = require("hardhat");

describe("MyToken", function () {
  let MyToken;
  let myToken;
  let owner;
  let addr1;
  let addr2;
  const initialSupply = ethers.parseEther("1000000"); // 1 million tokens

  beforeEach(async function () {
    [owner, addr1, addr2] = await ethers.getSigners();
    MyToken = await ethers.getContractFactory("MyToken");
    myToken = await MyToken.deploy(initialSupply);
  });

  describe("Deployment", function () {
    // ... (tests from lesson 3)
    it("Should have the correct name", async function () {
      expect(await myToken.name()).to.equal("MyToken");
    });

    it("Should have the correct symbol", async function () {
      expect(await myToken.symbol()).to.equal("MTK");
    });

    it("Should have the correct total supply", async function () {
      expect(await myToken.totalSupply()).to.equal(initialSupply);
    });

    it("Should assign the total supply to the deployer", async function () {
      expect(await myToken.balanceOf(owner.address)).to.equal(initialSupply);
    });
  });

  describe("Transactions", function () {
    // ... (tests from lesson 4)
    it("Should transfer tokens between accounts", async function () {
        const transferAmount = ethers.parseEther("50");
        await expect(myToken.transfer(addr1.address, transferAmount))
            .to.changeTokenBalances(myToken, [owner, addr1], [-transferAmount, transferAmount]);
    });

    it("Should emit Transfer events", async function () {
        const transferAmount = ethers.parseEther("50");
        await expect(myToken.transfer(addr1.address, transferAmount))
            .to.emit(myToken, "Transfer")
            .withArgs(owner.address, addr1.address, transferAmount);
    });

    it("Should fail if sender doesn’t have enough tokens", async function () {
        const initialOwnerBalance = await myToken.balanceOf(owner.address);
        const transferAmount = ethers.parseEther("1");
        await expect(myToken.connect(addr1).transfer(owner.address, transferAmount))
            .to.be.revertedWith("ERC20: transfer amount exceeds balance");
        expect(await myToken.balanceOf(owner.address)).to.equal(initialOwnerBalance);
    });
  });

  describe("Allowances", function () {
    it("Should approve a spender and emit an Approval event", async function () {
        const approveAmount = ethers.parseEther("100");
        await expect(myToken.approve(addr1.address, approveAmount))
            .to.emit(myToken, "Approval")
            .withArgs(owner.address, addr1.address, approveAmount);
        const allowance = await myToken.allowance(owner.address, addr1.address);
        expect(allowance).to.equal(approveAmount);
    });

    it("Should handle a delegated transfer via transferFrom", async function () {
        const approveAmount = ethers.parseEther("100");
        const transferAmount = ethers.parseEther("50");
        await myToken.approve(addr1.address, approveAmount);
        await expect(myToken.connect(addr1).transferFrom(owner.address, addr2.address, transferAmount))
            .to.changeTokenBalances(myToken, [owner, addr2], [-transferAmount, transferAmount]);
        const remainingAllowance = await myToken.allowance(owner.address, addr1.address);
        expect(remainingAllowance).to.equal(ethers.parseEther("50"));
    });

    it("Should fail a transferFrom if the spender has insufficient allowance", async function () {
        const approveAmount = ethers.parseEther("100");
        const transferAmount = ethers.parseEther("101");
        await myToken.approve(addr1.address, approveAmount);
        await expect(myToken.connect(addr1).transferFrom(owner.address, addr2.address, transferAmount))
            .to.be.revertedWith("ERC20: insufficient allowance");
    });
  });
});
Copy this complete code into your test/MyToken.test.js file and run npx hardhat test. All your tests should pass, confirming that both the direct transfer and delegated transfer functionalities of your token are working correctly and securely.
Conclusion
You have now written tests for the complete core functionality of the ERC-20 standard. By mastering the tests for approve and transferFrom, you have validated the mechanism that enables smart contracts to build complex financial systems on top of simple tokens.
Key Takeaways:
- The Approve/TransferFrom Flow:
approvegrants permission, andtransferFromexecutes a transfer using that permission. - Testing Approvals: Verify that calling
approveemits anApprovalevent and correctly sets the state in theallowancemapping. - Testing Delegated Transfers: Use
connect()to have the approved spender calltransferFromand usechangeTokenBalancesto assert the financial outcome. - Checking Remaining Allowance: After a
transferFrom, always assert that the spender's allowance has been reduced by the correct amount. - Testing Failure: Ensure that any attempt to
transferFroman amount greater than the allowance is reverted with the specific error messageERC20: insufficient allowance.
With your token contract fully built and tested locally, the next logical step is to see it in a more realistic environment. In the next lesson, you will deploy your MyToken contract to an Ethereum testnet and interact with it using your MetaMask wallet.