
Welcome. This course will take you from zero programming experience to a simple task-tracker app built with React Native. You will write one shared app that can run on Android and, later, can also be prepared for iPhone and iPad. For now, your Moto G is both your development device and your Android test device.
In this first module, you will set up the two tools that make phone-only development possible:
- Expo Go runs and previews React Native projects on your Android phone.
- Expo Snack is a code editor that works in your phone’s web browser.
By the end of this lesson, Expo Go will be installed and you will be able to open the Snack editor. You do not need to understand the code on screen yet; the objective is simply to get a reliable workspace ready for the next lesson.
The two tools and how they work together
Think of Snack as the place where you edit the app’s files, and Expo Go as the app that displays and runs the project on your phone. Snack can also show a browser preview, but Expo Go is the important Android preview for this course.
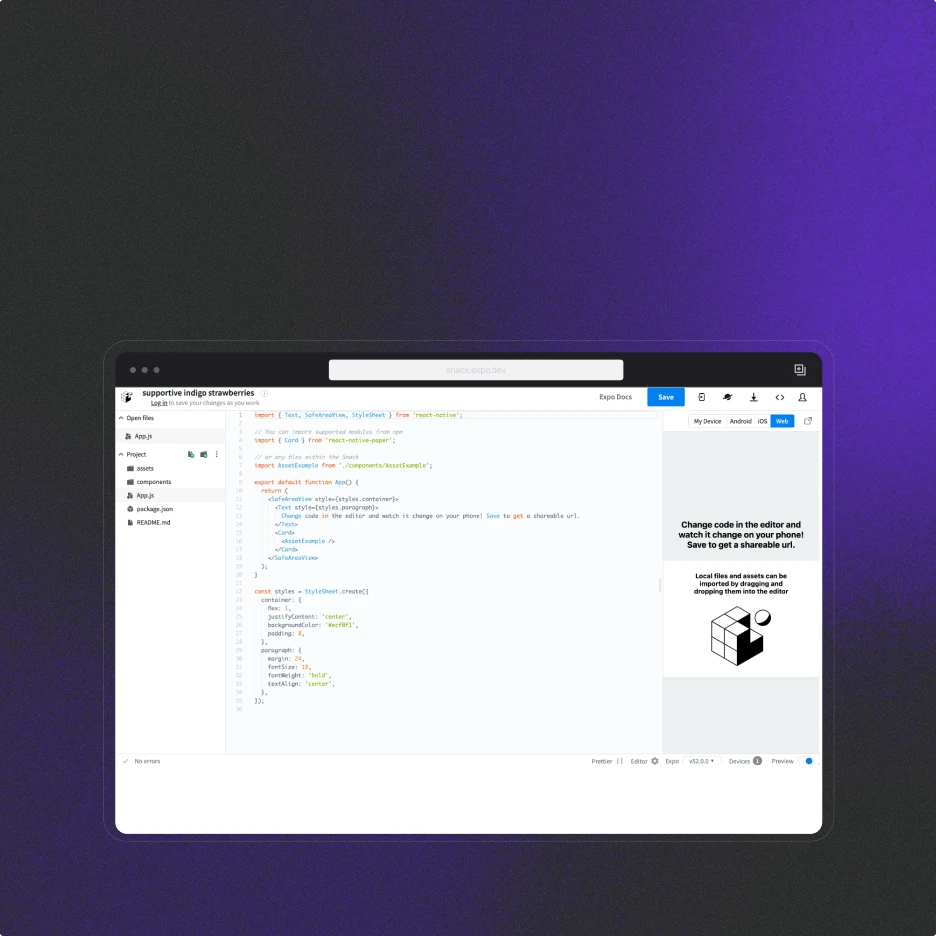
The screenshot shows three areas that you will gradually learn to use:
- File explorer: a list of project files, including
App.js. - Code editor: the area where you will write and change code.
- Preview controls: options for viewing the project on web, Android, or iOS.
For your workflow, you will edit in Snack through the browser and run the app in Expo Go on the same Moto G. Because you have an Android phone, you can test Android behavior directly. The code you write will still be cross-platform React Native code, although testing an iPhone version would require access to Apple hardware and services later.
Expo describes Snack as a browser-based environment for experimenting with React Native, while Expo Go is its free learner-oriented app for Android and iOS.
Read Expo’s short “Test prototypes with Snack and Expo Go” guidance to confirm the roles of the two tools you are setting up.
In the “Test prototypes with Snack and Expo Go” section, read the “Snack” and “Expo Go” subsections. Start at the Snack explanation, then continue through the paragraph beginning “Expo Go is a free”. Focus on the distinction: Snack is where edits happen; Expo Go is where a project runs on a device.
A useful boundary for this course: Expo Go is excellent for learning and quickly testing a project. It is not the complete toolchain used for every production app. That is fine here—we are using it deliberately because it lets you learn and build a working task tracker using only your phone.
Install Expo Go safely
Use the Google Play Store already installed on your Moto G. Avoid downloading an APK from a web search, an advertisement, or a third-party app site. Installing from Google Play helps ensure you receive the official application and its updates.
Open the official Google Play listing for Expo Go. Use it to verify the app name and publisher before installing.
On the Google Play listing, verify that the app is named Expo Go and that its developer is Expo Project. Near the top of the page, find the app identity. Then use the Install button in Google Play; its exact location can vary slightly with your Android version and screen size.
Installation steps
- Open the Play Store on your phone.
- Search for Expo Go if you are not already on its official listing.
- Check that the publisher shown is Expo Project.
- Tap Install and wait for Android to finish.
- Tap Open.
When Expo Go opens for the first time, Android may request permissions or display introductory screens. Read each prompt before accepting it. It is normal for Expo Go to ask for camera access eventually, because scanning a project QR code is one way to open a project. You may allow it when Android asks; we will use that capability in the next lesson.
For this lesson, you only need to confirm that Expo Go reaches its main screen without crashing. You do not need to sign in, scan anything, or create a project inside Expo Go yet.
If installation fails:
- Check that you have a working Wi-Fi or mobile-data connection.
- Confirm that your phone has some free storage.
- Close and reopen the Play Store, then try again.
- If the Play Store says the app is unavailable or incompatible, do not install an unofficial copy. Note the exact message so it can be investigated safely.
Open Snack in your mobile browser
Now open Chrome or your preferred browser. In the address bar, type:
snack.expo.dev
Be careful that the address ends in .dev, not .com or another variation. Once the page loads, you should see the Snack editor with a starter project.
On a phone, an editor is necessarily more compact than it is on a computer. You may need to scroll, rotate the phone to landscape, or tap a panel name to move between the files, editor, and preview. This is expected.
What to look for
Your screen may not match the screenshot exactly because Snack changes over time, but find these essential parts:
| What to find | Why it matters later |
|---|---|
| A project name near the top | Identifies the current project |
| A file list or file icon | Lets you open project files |
A file named App.js or App.tsx | Usually the main screen file |
| A central editor area with colored text | Where you will edit code |
| Android, iOS, or Web preview choices | Controls where Snack tries to preview the app |
You may see unfamiliar words such as import, function, View, and Text. Leave the code unchanged today. The editor is loading a sample project, not asking you to understand it immediately.
If the editor feels too narrow in portrait orientation, try rotating your Moto G sideways. If that does not improve it, open Chrome’s menu and try Desktop site. Use whichever view lets you reliably tap the file list and read the code. The next lessons will use short, carefully chosen edits so you do not need to type large amounts of code at once.
A small but important habit: wait for the page to settle
Snack may take a little time to load its files and preview tools, especially on a mobile connection. Before deciding something is broken:
- Wait for the editor to finish loading.
- Check whether the page has an error banner or an error message.
- Refresh the browser page once if it remains blank.
- Make sure you are still connected to the internet.
Do not clear browser data or uninstall Expo Go for a one-time loading delay. Those are last-resort steps and usually do not solve a temporary network issue.
Finish-line checklist
Before ending today’s session, verify these concrete results:
- Expo Go is installed from Google Play, with Expo Project shown as the publisher.
- Expo Go opens to its main screen on your Moto G.
- Your mobile browser opens
snack.expo.dev. - You can see a Snack project with code visible in an editor area.
- You can locate the project’s main file, usually called
App.jsorApp.tsx.
If all five are true, your phone-based workspace is ready. If Snack opens but looks different from the image, that is not a problem; look for the roles of the panels rather than matching the layout exactly.
You have established the foundation for the rest of the course: a browser-based code editor and an Android app that can run your work. The key idea is simple: write in Snack, test on the phone with Expo Go.
Next, you will run a provided React Native starter project through Expo Go. That will connect the two tools you set up today and give you your first live app preview.
Can't find a good explanation? Sign up and we'll make it for you
Sign up