
Hello again. In the previous lesson, you set a deliberate delivery format for your practice project: a vertical , 30 fps promotional timeline, with a stable project folder in Files or on an external SSD. That technical setup matters because importing is not simply getting clips onto the screen; it is establishing an organised relationship between your edit and its source material.
This lesson turns that folder into a usable Resolve project. You will import media from Photos, Files, and an external SSD, then organise the imported assets with bins and a naming system that still makes sense when an agency asks for a revision weeks later.
Two maps for the same project
A reliable Resolve project has two organisation systems:
- Folders in Files organise the actual media files on your iPad, cloud location, or external drive.
- Bins in Resolve’s Media Pool organise the clips, audio, graphics, and timelines inside the Resolve project.
They can look similar, but they do different jobs. A Files folder might be named 01_Source_Media/AI_Generated; a Resolve bin with the same name helps you find the corresponding clips while editing. Changing a bin does not rename or move the actual files in Files. Conversely, moving a file in Files after importing can make Resolve lose track of it.
Folder and Bin Naming Conventions for DaVinci Resolve Projects
Read the opening explanation in Marius Manolachi’s guide to make the folder-versus-bin distinction precise. This prevents a common mistake: treating Media Pool organisation as though it also reorganises the source media on your storage drive.
In the section “What’s the difference between a folder and a bin in DaVinci Resolve?”, read the folder and bin distinction. Focus on why folders are storage locations while bins are Resolve project containers, and why the two systems must be maintained separately.
For the vertical coffee-promotion practice project, a compact structure is enough:
AgencyPromo_Coffee_2025
    01_Source_Media
        Phone
        AI_Generated
    02_Audio
    03_Graphics
    04_Project_Backups
    05_Exports
Inside Resolve, you will build an equivalent set of bins:
Master
    01_Source_Media
        Phone
        AI_Generated
    02_Audio
    03_Graphics
You do not need a bin for every shot before you have reviewed the footage. At this stage, organise by media type and origin, not by editorial decisions such as “best take” or “opening shot.” Those decisions come after you have watched the clips.
Three ways to bring media into Resolve
On iPad, the usual starting point is the Add Media or Import Media control in the Media Pool. The exact icon placement can shift slightly between Resolve versions, but the choices are consistent: import from Photos or open the iPadOS Files picker.
DaVinci Resolve For iPad | What You Need To Know!
Watch “DaVinci Resolve For iPad | What You Need To Know!” by Alex Pettitt for a practical demonstration of the three import routes: Photos, Files, and a USB-C external SSD.
Watch Photos import to see a clip selected from the Apple Photos library and added to Resolve. Then watch Files and SSD import for the iPadOS Files picker, local and cloud locations, and an external SSD appearing through USB-C. Notice that the SSD becomes available only once iPadOS can see it in Files.
Importing from Photos
Use Photos when the material is already in your iPad photo library: phone footage, clips AirDropped to the iPad that were saved to Photos, or quick camera tests recorded directly on the iPad.
After selecting Photos, navigate by album where possible rather than browsing the entire library. For ongoing work, make a Photos album such as Coffee Promo Source so you are not repeatedly searching through personal images and unrelated clips.
When Resolve asks whether to change the timeline frame rate to match the first clip, pause before accepting:
- For the practice project, the intended timeline is 30 fps.
- If the selected clip is also 30 fps, keeping the current 30 fps setting is appropriate.
- If the first clip is 24 fps but your main footage and delivery brief are 30 fps, do not automatically change the timeline simply because Resolve offers. Check the clip and project plan first.
The first file imported should not accidentally redefine a timeline you configured deliberately in the previous lesson.
Importing from Files
Use Files for project folders on On My iPad, iCloud Drive, a shared network location, and many connected cloud services. It is usually the better route for client downloads, music, logo files, AI-generated video, and any project you need to reproduce later.
The Files picker is worth recognising because it is also where an external SSD appears.
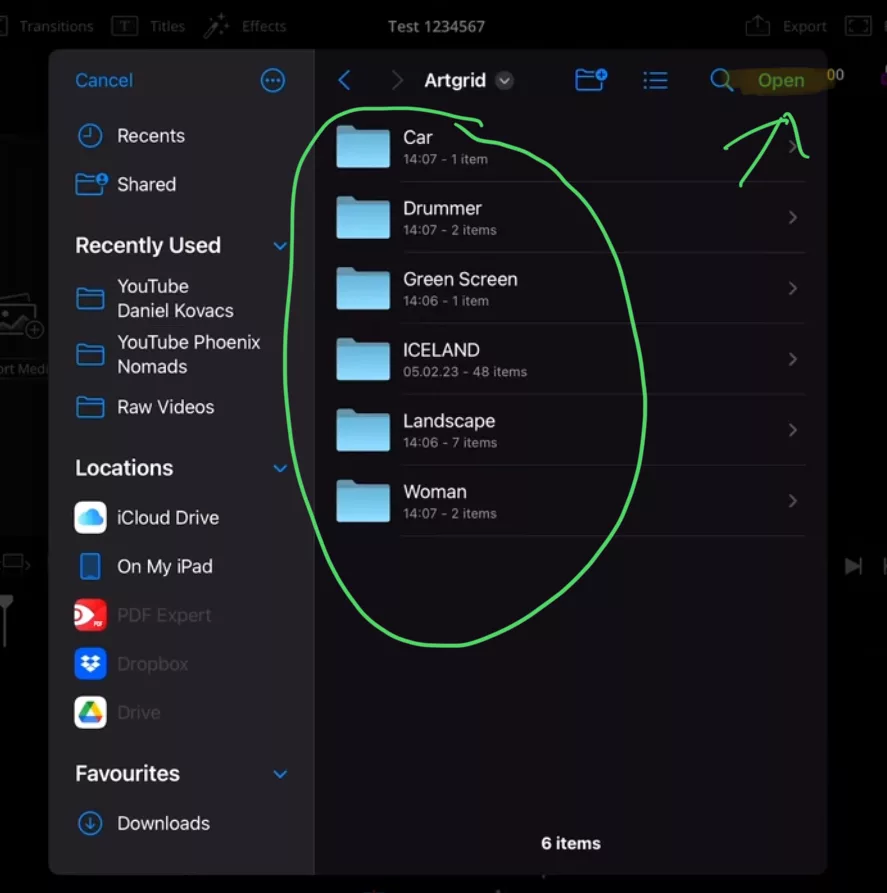
Navigate into the relevant project folder, such as 01_Source_Media/AI_Generated, select only the assets for this job, and tap Open. Avoid importing every test, failed generation, unrelated stock clip, or duplicate download merely because it is nearby.
For cloud-based files, make sure the file has finished downloading and that your iPad has adequate free storage before a serious edit. A cloud folder is useful for receiving assets, but it is not a substitute for a stable working copy and a backup.
Importing from external storage
Your M4 iPad Air has USB-C, so an external SSD is a practical home for larger projects and 4K source footage.
Before opening Resolve:
- Connect the SSD using a reliable USB-C cable or hub.
- Open Files and confirm that the drive appears under Locations.
- Browse into the project folder and confirm the intended clips are visible.
- Open Resolve, choose Import Media, then select the same drive from the Files sidebar.
If the drive does not appear in Files, Resolve cannot import from it yet. Check the physical connection, drive power requirements, and whether the iPad can read the drive before troubleshooting inside Resolve.
Keep the source folder intact after import. Do not move folders, rename files, or casually disconnect the working drive in the middle of an edit. Your project remains much safer when the location of every source asset stays predictable.
Guided intake: bring in a small, purposeful media set
Use your existing AgencyPromo_Coffee_2025 project, or create a similarly named practice project. Aim for five to eight assets, not a huge library. A useful set could include:
- one or two vertical phone clips from Photos;
- two AI-generated product or atmosphere clips from Files;
- one music track from
02_Audio; - one logo or still graphic from
03_Graphics; - optionally, one clip imported from an external SSD.
Begin with Photos:
- Open the Media Pool and choose Add Media.
- Select Photos.
- Open your project-specific album, if you have one.
- Select one or two clips that plausibly belong in the promotion.
- Add them to Resolve.
Then import AI-generated material from Files:
- Choose Add Media again.
- Select the
01_Source_Media/AI_Generatedfolder in Files. - Add two or three clips rather than every generated variation.
- Confirm that thumbnails appear in the Media Pool.
Finally, if you have an SSD available, repeat the Files workflow from the connected drive. Import one short clip as a test. This is enough to prove that the route works without filling the iPad with unnecessary material.
Do not import the same file via both Photos and Files. Duplicate imports are confusing later because the Media Pool may show two visually identical clips with similar names.
Build bins before the Media Pool becomes cluttered
The Master bin is the top-level container for the project’s media. It is not a finished organisation system; think of it as the project’s root.
Create the four main bins shown earlier:
01_Source_Media02_Audio03_Graphics04_Timelines— optional for now, but useful once you create more than one timeline
Then create two sub-bins inside 01_Source_Media:
PhoneAI_Generated
On a touch-first iPad workflow, touch and hold an empty area of the Media Pool or bin panel to reveal the menu for creating a new bin. Some Resolve versions also show a dedicated new-bin button. Name the bin immediately; unnamed “Bin 1” folders rapidly become meaningless.
DaVinci Resolve for iPad Editing Tutorial (Beginners Guide)
Watch this brief segment from “DaVinci Resolve for iPad Editing Tutorial (Beginners Guide)” by Collin Michael to reinforce the iPad import choices and the touch-and-hold method for creating a bin.
Watch the import choices for the Photos and Files routes, then continue through new bin creation. The important action is the touch-and-hold gesture used to reveal organisation controls in the Media Pool.
Once the bins exist, move clips into them. You can generally select a clip and drag it into a bin, or select multiple clips and use the move option offered by your version of Resolve.
Use a simple classification rule:
| Asset | Destination bin |
|---|---|
| Phone camera clips | 01_Source_Media/Phone |
| AI-generated video clips | 01_Source_Media/AI_Generated |
| Music, voice-over, sound effects | 02_Audio |
| Logos, brand stills, client graphics | 03_Graphics |
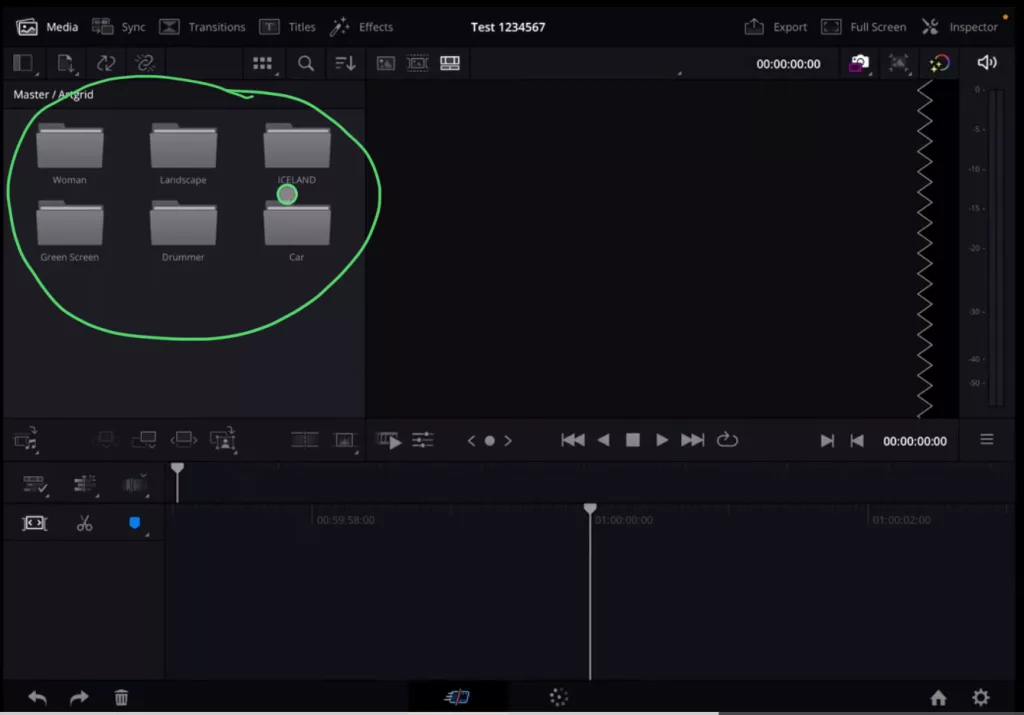
Mirror the Files structure where it genuinely helps. If AI_Generated is a folder in Files and a bin in Resolve, you immediately know both the editorial category and the source location of a clip. But do not overbuild the system. For a 20-second promo, six levels of nested bins would slow you down rather than help you.
File names: make future identification possible
Names have two layers as well:
- File name: the actual name in Files, such as
20250308_CoffeePromo_HeroPour_v01_9x16_30fps.mp4. - Clip name or display name: a label you may adjust within Resolve without necessarily changing the actual file on storage.
Your most important rule is this:
Never rename, move, or delete a source file after Resolve has imported it.
That includes clips on an external SSD, files in On My iPad, and assets received from a client. Resolve may be linking to the file at its current location. A neat-looking rename is not worth a “Media Offline” problem.
Instead, make naming decisions before import. This is especially useful for AI-generated footage and downloadable assets, which commonly arrive with vague names such as video_01.mp4, output-final-3.mp4, or gen_clip_8472.mov.
A practical filename pattern is:
YYYYMMDD_Project_Description_Version_Format.ext
For example:
20250308_CoffeePromo_HeroPour_v01_9x16_30fps.mp4
20250308_CoffeePromo_CafeWide_v02_9x16_30fps.mp4
20250308_CoffeePromo_Logo_White_v01.png
Each part answers a useful question:
| Part | Purpose |
|---|---|
20250308 | Identifies the creation or receipt date and sorts chronologically |
CoffeePromo | Identifies the project without opening the file |
HeroPour or CafeWide | Describes what the asset contains |
v01, v02 | Distinguishes genuine iterations |
9x16_30fps | Identifies format when multiple orientations or frame rates exist |
Use letters, numbers, underscores, and hyphens. Avoid slashes, colons, emoji, and names like FINAL_final_USETHIS.mp4. Also retain the correct extension: .mp4, .mov, .wav, .png, and so on.
A sensible exception for camera originals
Camera-original files sometimes have opaque names such as IMG_1847.MOV. If you have a verified untouched backup, you may create clearly named working copies before importing to Resolve. For a small project, however, the safer beginner approach is to preserve the camera originals as they are, place them in a clearly named folder, and identify them through bins and Resolve clip labels.
For example:
01_Source_Media
    Phone
        IMG_1847.MOV
        IMG_1848.MOV
can still be perfectly understandable when the matching Resolve bin is 01_Source_Media/Phone and its clips are labelled meaningfully within the project.
For AI-generated, downloaded, and client-supplied working assets, use descriptive filenames before you import. This is where consistent names provide the greatest payoff.
A quick organisation check
Before leaving the project, inspect the Media Pool and Files folder rather than beginning to edit immediately. You should be able to confirm all of the following:
- Your planned clips have imported and play when opened in the viewer.
- Phone footage and AI-generated footage sit in separate bins.
- Music and graphics, if imported, are not mixed in with picture clips.
- Each AI-generated or downloaded working asset has a descriptive filename.
- Source files have not been moved or renamed after import.
- The external SSD, if used, is still visible in Files and contains the original project folder.
- There are no obvious duplicate clips in the Media Pool.
This small check is a professional habit. It takes less than a minute now and can prevent much longer searches when you start assembling an edit.
Wrap-up
You now have a dependable intake workflow on your iPad:
- Import phone footage through Photos when it lives in your photo library.
- Import project-managed assets through Files, including
On My iPad, iCloud locations, and external SSDs. - Verify the timeline frame-rate prompt rather than letting the first clip make the decision for you.
- Use Files folders to organise real source files and Resolve bins to organise project media.
- Create clear names before importing AI-generated, downloaded, or working-copy assets.
- Never rename or move a source file after it has been imported into Resolve.
Next, you will begin reviewing this organised media efficiently: scrubbing through footage, using Source Tape, and marking precise in and out ranges for the parts worth placing on the timeline.
Can't find a good explanation? Sign up and we'll make it for you
Sign up