
Welcome back. You can now start a standalone Angular application and trace its bootstrap, providers, routes, and feature folders. The next transition is conceptual: translating the React model you already use into Angular’s component, template, dependency-injection, and lifecycle model.
Angular will feel familiar in its goals—compose UI, pass data down, react to user input, share state, and clean up resources—but it organizes those responsibilities differently. By the end of this lesson, you should be able to look at a React component using props, useState, useEffect, and Context and identify the appropriate Angular design.
Angular is more opinionated than React
React gives you a rendering library and a set of hooks; routing, HTTP clients, interceptors, and application conventions are usually selected separately. Angular supplies these capabilities as part of the framework. For GCB-WMP, that is useful: account data, authentication, authorization, routing, forms, and HTTP behavior can follow consistent team-wide patterns rather than varying feature by feature.
Watch “React for Angular Developers” by Sebastian Persson for a concise framing of Angular as an integrated framework rather than a UI-only library.
Watch the framework overview. Focus on the distinction between React’s package choices and Angular’s built-in routing, HTTP, interceptors, and guards. Standalone components remove much of the older Angular module ceremony mentioned near the end.
The most important shift is this:
- A React component is commonly a function that React calls again to produce JSX during rendering.
- An Angular component is normally a class instance created by Angular. Its template binds to that instance’s fields, signals, and methods.
The Angular instance persists while the component remains on screen. You do not call the component function yourself, and you do not call a generic setter such as setState. Instead, you update a field or signal owned by the component; Angular synchronizes the relevant template bindings.
A practical React-to-Angular translation map
| React concept | Closest Angular concept | Important difference |
|---|---|---|
| Function component | @Component class with a template | Angular instantiates a class; React invokes a function during renders. |
| JSX | Angular HTML template | Templates use Angular binding syntax such as {{ value }}, [property], and (event). |
| Props | @Input() property, or newer input() API | Inputs are declared on the child class and bound by the parent template. |
| Callback prop | @Output() with EventEmitter, or newer output() API | Data still flows down; user intent is emitted upward as an event. |
children prop | Content projection with <ng-content> | Angular projects markup into a component rather than passing a children value. |
useState | A component field or a writable signal() | There is no hook-call ordering rule; the component instance owns the state. |
useMemo | computed() signal | Use it for values derived from signals; it is not a general replacement for every calculation. |
useEffect | Depends on intent: ngOnInit, ngOnChanges, afterNextRender, or an effect() | There is no safe one-for-one mechanical replacement. |
useEffect cleanup | ngOnDestroy or DestroyRef.onDestroy() | Cleanup runs when Angular destroys that component instance. |
useContext | Injectable service plus Angular dependency injection | Provider scope determines which components receive which service instance. |
| Custom hook | Often an injectable service, sometimes a plain utility function | A service can hold shared state and access other injected framework capabilities. |
useRef for DOM access | View query such as viewChild or @ViewChild | DOM access must wait until Angular has initialized and rendered the relevant view. |
Two distinctions are worth keeping in mind throughout the course:
- A TypeScript import is not enough for a template dependency. A standalone parent that renders a child component must import that child in the component decorator’s
importsarray. - Inputs and services solve different problems. Use an input when a parent explicitly owns and supplies data to its child. Use a service when a capability or state is shared across unrelated or deeply nested parts of the application.
Props become inputs; callback props become outputs
Consider a React card that receives an account and tells its parent that the user wants fresh data:
type AccountSummary = {
  id: string;
  nickname: string;
  availableBalance: number;
  currency: string;
};

type AccountCardProps = {
  account: AccountSummary;
  onRefreshRequested: (accountId: string) => void;
};

export function AccountCard({
  account,
  onRefreshRequested
}: AccountCardProps) {
  return (
    <section>
      <h2>{account.nickname}</h2>
      <p>
        {account.currency} {account.availableBalance}
      </p>
      <button onClick={() => onRefreshRequested(account.id)}>
        Refresh
      </button>
    </section>
  );
}
The Angular equivalent keeps the same ownership model. The parent owns AccountSummary; the child receives it as an input. When the child needs something done, it emits an event rather than editing the parent’s state directly.
import { Component, EventEmitter, Input, Output } from '@angular/core';

export interface AccountSummary {
  id: string;
  nickname: string;
  availableBalance: number;
  currency: string;
}

@Component({
  selector: 'app-account-summary-card',
  standalone: true,
  template: `
    <section>
      <h2>{{ account.nickname }}</h2>
      <p>
        {{ account.currency }} {{ account.availableBalance }}
      </p>

      <button type="button" (click)="requestRefresh()">
        Refresh
      </button>
    </section>
  `
})
export class AccountSummaryCardComponent {
  @Input({ required: true }) account!: AccountSummary;

  @Output() refreshRequested = new EventEmitter<string>();

  requestRefresh(): void {
    this.refreshRequested.emit(this.account.id);
  }
}
A parent imports the child as a template dependency and binds to it:
import { Component } from '@angular/core';
import {
  AccountSummary,
  AccountSummaryCardComponent
} from './account-summary-card.component';

@Component({
  selector: 'app-dashboard',
  standalone: true,
  imports: [AccountSummaryCardComponent],
  template: `
    <app-account-summary-card
      [account]="selectedAccount"
      (refreshRequested)="requestAccountRefresh($event)"
    />

    <p aria-live="polite">{{ refreshMessage }}</p>
  `
})
export class DashboardComponent {
  selectedAccount: AccountSummary = {
    id: 'ACC-1042',
    nickname: 'Primary Current Account',
    availableBalance: 12500.75,
    currency: 'GBP'
  };

  refreshMessage = '';

  requestAccountRefresh(accountId: string): void {
    this.refreshMessage = `Refreshing account ${accountId}`;
  }
}
Read the binding syntax as follows:
[account]="selectedAccount"passes the parent’s value into the child input.(refreshRequested)="requestAccountRefresh($event)"listens for the child’s emitted event.$eventis the string payload emitted byrefreshRequested.
This is the same one-way data flow you would aim for in React:
- The parent provides data.
- The child renders that data.
- The child emits user intent.
- The parent decides how its own state changes.
For financial UI, preserve this ownership boundary. A reusable account summary card should not mutate an account input because a user clicked a button. It should emit an intent such as refreshRequested, accountSelected, or transferInitiated. The parent or a service then decides what happens.
Local state: fields first, signals for reactive state
For a simple event-driven value, a normal class field is valid Angular state:
isDetailsOpen = false;

toggleDetails(): void {
  this.isDetailsOpen = !this.isDetailsOpen;
}
Angular updates bindings affected by this event. Unlike React, there is no need to call a state setter merely to make the framework notice the change.
Angular signals are especially useful when local UI state has derived values or when you want explicit, fine-grained reactivity. A signal is read by calling it; it is changed with set or update.
import { Component, computed, signal } from '@angular/core';

@Component({
  selector: 'app-balance-privacy-toggle',
  standalone: true,
  template: `
    <button
      type="button"
      [attr.aria-pressed]="balancesVisible()"
      (click)="toggleBalances()"
    >
      {{ balancesVisible() ? 'Hide balances' : 'Show balances' }}
    </button>

    <p>{{ displayBalance() }}</p>
  `
})
export class BalancePrivacyToggleComponent {
  readonly balancesVisible = signal(true);
  readonly availableBalance = signal(12500.75);

  readonly displayBalance = computed(() =>
    this.balancesVisible()
      ? `GBP ${this.availableBalance().toFixed(2)}`
      : 'Balance hidden'
  );

  toggleBalances(): void {
    this.balancesVisible.update((visible) => !visible);
  }
}
Here, displayBalance is derived state. It should not be separately stored and manually kept in sync, just as you would avoid independently storing both balance and a duplicate formattedBalance in React state.
Understand Angular Signals in 20 Minutes
Watch “Understand Angular Signals in 20 Minutes” by Igor Sedov for the core mechanics of writable and computed signals.
Watch writable signals to see how values are read and changed. Then watch computed signals for the distinction between mutable source state and read-only derived state. Apply that distinction to balance visibility and derived display values, not yet to HTTP or WebSocket streams.
A useful initial decision rule is:
| Need | Start with |
|---|---|
| A simple value changed by a component event | Class field |
| Local state with clear derived values | Signal and computed |
| A time-based, async, or multi-value event stream | RxJS Observable, introduced in the next reactivity module |
| Shared cross-feature state such as session identity | Service that exposes signals or Observables |
Avoid treating effect() as the Angular equivalent of every useEffect. Effects are for reactions with an external side effect, such as synchronizing a non-Angular browser API. They should not be your default way to derive one piece of application state from another; computed is the appropriate primitive for that.
Rendering is template checking, not JSX re-execution
React and Angular both update only the DOM portions that need to change, but the developer model differs.
In React, an interaction schedules a render in which the component function runs again. Hooks recover the state associated with that render position, and JSX is recalculated.
In Angular, a component class instance already exists. Angular checks its template bindings and updates the DOM where bound values differ. In templates:
- Interpolation, such as
{{ account.nickname }}, reads a value. - Property binding, such as
[disabled]="isProcessing", sets a DOM or component property. - Event binding, such as
(click)="submit()", calls a class method. - Signal reads use parentheses, such as
balancesVisible().
Do not put meaningful side effects into template expressions. A template can be checked more than once, so a method used in a binding should be cheap and should not perform HTTP calls, mutate state, or write to browser storage.
A familiar list-rendering concern also carries over: React uses stable key values, while Angular’s modern @for syntax uses a stable track expression. You will implement @for in the next module, but the performance principle is already the same: identity should come from a durable account ID or transaction ID, not an array index.
Lifecycle: replace one useEffect with a specific Angular intent
The temptation is to map useEffect directly to ngOnInit. That works only for the narrow case of initialization that should occur once after inputs receive their initial values.
Angular has named lifecycle phases. They make the intent more explicit:
| What you need to do | Angular choice | React comparison |
|---|---|---|
| Request injected dependencies | Constructor or class-field inject() | No close hook equivalent; this is Angular DI setup |
| Initialize based on initial inputs | ngOnInit | Often useEffect(..., []), but only conceptually |
| React to input value changes | ngOnChanges | Often an effect with a prop dependency |
| Access initialized child view/query | ngAfterViewInit | Ref-based DOM work after rendering |
| Run manual DOM work after rendering | afterNextRender | Post-render effect intent |
| Clean up a timer, subscription, or integration | ngOnDestroy or DestroyRef.onDestroy() | Cleanup returned by useEffect |
Read Angular’s official lifecycle guide to establish the timing guarantees behind inputs, initialization, DOM work, and destruction.
In the guide’s “ngOnInit” and “ngOnChanges” subsections, read initial input timing and input change timing. Note that the first input-change call occurs before initialization. Then, in “ngOnDestroy,” locate destruction timing. Finally, in “afterEveryRender and afterNextRender,” read render callbacks, paying attention to their DOM-specific purpose.
The lifecycle rules that prevent common bugs
Use the constructor for dependency setup, not input-dependent initialization. At construction time, Angular has created the class but has not necessarily assigned its inputs. This is the natural place for:
private readonly accountService = inject(AccountService);
Use ngOnInit when your setup depends on initialized input values:
import { Component, Input, OnInit } from '@angular/core';

@Component({
  selector: 'app-account-title',
  standalone: true,
  template: `<h2>{{ title }}</h2>`
})
export class AccountTitleComponent implements OnInit {
  @Input({ required: true }) accountName = '';
  title = '';

  ngOnInit(): void {
    this.title = `Account: ${this.accountName}`;
  }
}
Use ngOnChanges for an input change, not for arbitrary local state. If a parent changes accountName, ngOnChanges can respond. If the child changes its own local signal or field, that is not an input change.
Use ngOnDestroy for cleanup. Route navigation can destroy a page component. A conditional template can also destroy a component. Resources owned by that instance—timers, imperative listeners, and later explicit RxJS subscriptions—must be released at that point.
Use post-render APIs only for DOM concerns. If a bank dashboard must measure a chart container after it exists in the DOM, afterNextRender is a candidate. It is not the place to derive application state or begin routine data loading. Updating state in the wrong lifecycle phase can produce Angular’s “expression changed after it was checked” error.
React Context becomes services plus dependency injection
In React, a session might be made available with an AuthProvider wrapping application content. Components call useContext(AuthContext) to read it.
In Angular, the typical equivalent is an injectable SessionService. It can be provided at the application root, a route, or a component. Angular’s injector then resolves the appropriate service instance for a component that calls inject(SessionService).
import { Injectable, signal } from '@angular/core';

export interface SessionUser {
  id: string;
  displayName: string;
  role: 'ROLE_BANKER' | 'ROLE_CUSTOMER';
}

@Injectable({
  providedIn: 'root'
})
export class SessionService {
  private readonly sessionState = signal<SessionUser | null>(null);

  readonly session = this.sessionState.asReadonly();

  signIn(user: SessionUser): void {
    this.sessionState.set(user);
  }

  signOut(): void {
    this.sessionState.set(null);
  }
}
A component can consume the service without receiving it through every intermediate parent:
import { Component, inject } from '@angular/core';
import { SessionService } from './session.service';

@Component({
  selector: 'app-session-menu',
  standalone: true,
  template: `
    @if (sessionService.session(); as user) {
      <p>Signed in as {{ user.displayName }}</p>
      <button type="button" (click)="sessionService.signOut()">
        Sign out
      </button>
    } @else {
      <p>Not signed in</p>
    }
  `
})
export class SessionMenuComponent {
  readonly sessionService = inject(SessionService);
}
The service is not automatically “global” simply because it is a service. Its provider location controls scope:
| Provider location | Typical use in GCB-WMP | Instance scope |
|---|---|---|
providedIn: 'root' | Session state, application-wide configuration | One instance for the application root |
Route providers | A temporary transfer workflow state | That route and its child routes |
Component providers | A stateful widget intentionally isolated per instance | That component subtree |
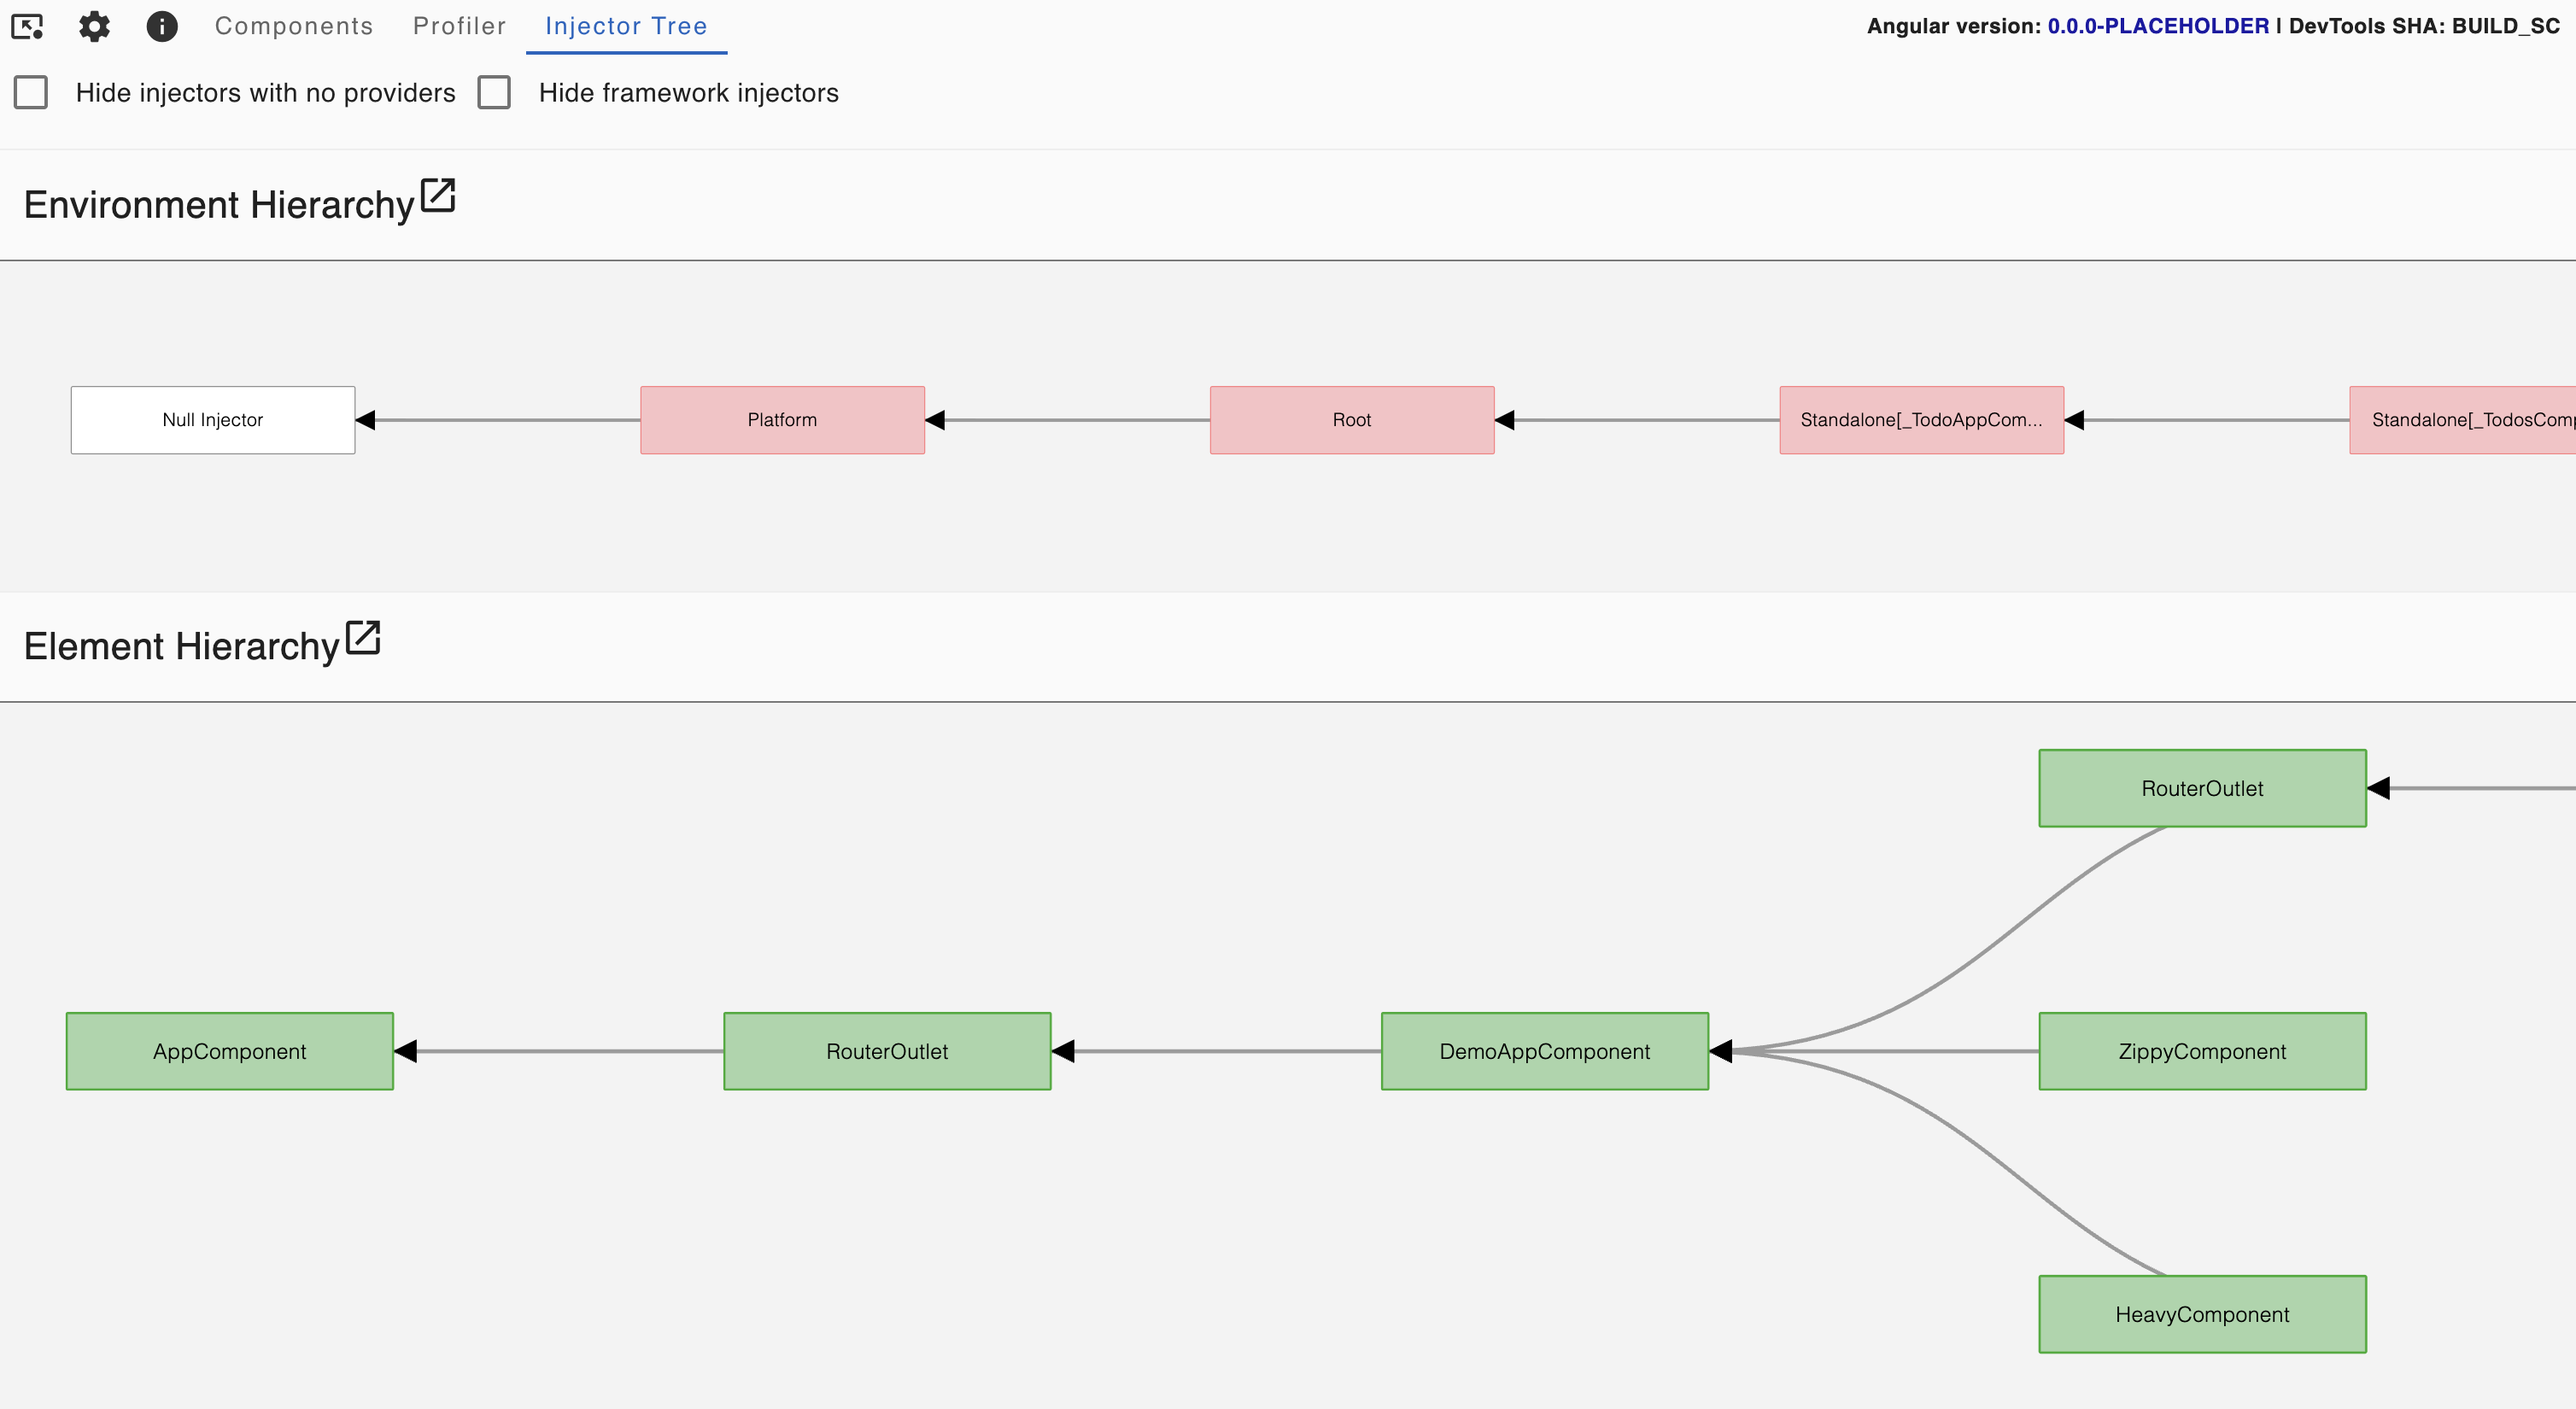
This is more flexible than treating Context as a blanket replacement for props. Use a service for cross-cutting state such as simulated authentication, notification delivery, or account caching. Keep an explicit @Input() when a parent is clearly supplying data to a presentational child. For example, an AccountSummaryCardComponent should receive its displayed account as an input even if an AccountService also exists elsewhere.
A short implementation drill for your lab
Apply the mapping in a small, self-contained dashboard slice:
- Create an
AccountSummarytype and a standaloneAccountSummaryCardComponent. - Give the card a required
accountinput and arefreshRequestedoutput carrying the account ID. - In a parent dashboard component, own the selected account and render the child using
[account]. - Handle
(refreshRequested)in the parent by updating a local confirmation message. - Add a
balancesVisiblesignal and adisplayBalancecomputed signal to the card or parent. Toggle it from a button. - Open Angular DevTools and inspect the Components tree. Then inspect the Injector Tree and identify the root-level injector containing application-wide providers.
This is deliberately UI-only: do not add HTTP calls yet. The point is to make each responsibility visible—parent-owned data, child presentation, upward user events, local signal state, and shared services.
Key takeaways
Angular and React solve many of the same UI problems, but with different defaults:
- React function components correspond most closely to Angular component classes plus templates.
- React props become Angular inputs; callback props become outputs.
- React
useStatebecomes class fields or signals;computedsignals are appropriate for derived local state. - React Context maps most closely to injectable Angular services, with provider scope controlling service lifetime and visibility.
useEffecthas no single Angular replacement. Choose lifecycle APIs based on whether you are initializing from inputs, responding to input changes, doing DOM work, or cleaning up.- Angular templates bind to a persistent component instance. Keep template expressions pure and keep data flow explicit.
Next, you will start working with a local mock banking API: launching it and independently verifying account and transfer endpoints before Angular services begin consuming them.
Can't find a good explanation? Sign up and we'll make it for you
Sign up