
Welcome. Over this intensive Angular track, you will build toward a self-contained GCB-WMP-style banking SPA: dashboard, ledger, transfers, simulated authentication, and real-time notifications. We begin with the toolchain because every later exercise depends on being able to reproduce the project’s Angular 17 environment and inspect what the framework is doing at runtime.
You already have the web, TypeScript, and Git foundations needed for this. The key shift now is to establish a version-controlled Angular development environment and a debugging workflow that exposes Angular’s component structure and, later, signal-driven state.
Plan for roughly 35–40 minutes: read the official setup rationale, install and verify Node/npm/Angular CLI, then configure Angular DevTools.
Setting up the local environment and workspace - Angular
Read Angular’s official setup guidance to distinguish the Node runtime, npm package manager, and Angular CLI before installing anything.
In the “Dependencies” section, read the Node and npm explanation. Then read the “Install the Angular CLI” section. Notice that Angular’s generic command installs the current CLI; for this course, use the project-required major version, Angular CLI 17, in the commands below.
1. What each tool does
These tools form a dependency chain, but they serve distinct purposes:
| Tool | Purpose in this course | Verification |
|---|---|---|
| Node.js 20 | Runs Angular’s build tools and local development server outside the browser. | node --version |
| npm | Installs JavaScript packages, including the Angular CLI and project dependencies. It is bundled with Node. | npm --version |
| Angular CLI 17 | Provides the ng command used to generate, serve, build, and maintain an Angular workspace. | ng version |
| Angular DevTools | A browser extension that reveals Angular components, their inputs and state, and later signal relationships. | Angular tab in browser DevTools |
For this GCB-WMP blueprint, use Node 20.x and Angular CLI 17.x even if your machine or online documentation offers newer major releases. Major-version alignment is important in enterprise work: the repository’s package.json and lockfile eventually define the exact project dependencies, while the global CLI gives you the initial ng command.
A useful distinction:
- The global CLI lets your terminal recognize
ng. - The workspace-local CLI and packages are installed from a specific project’s
package.jsonwhen you runnpm install. - When you later receive the company repository, do not “upgrade Angular” merely because your global CLI is newer. Follow the versions declared by that repository.
2. Install and verify Node.js 20 and npm
Install Node 20
If Node is not installed, or your active version is not version 20, install a current Node.js 20 release using your organization-approved installer or version manager. The Node 20 archive lists platform-specific download options; on a managed work machine, follow company software-installation policy first.
After installation, close and reopen your terminal. This matters because your shell needs to reload its PATH configuration.
Run:
node --version
npm --version
Your Node output should begin with v20., for example:
v20.x.x
The npm version does not need to match a number in this lesson; it should simply print a version and exit successfully. npm is supplied with Node, so do not download npm separately.
Resolve a wrong version deliberately
If node --version prints an older version, you likely have multiple Node installations and your shell is finding the wrong one first.
Locate the executables:
# macOS or Linux
command -v node
command -v npm
# Windows PowerShell
where.exe node
where.exe npm
Then correct the stale installation or your PATH according to the installation method your machine uses. Reopen the terminal and verify again. Do not continue with an unsupported Node major version just because npm happens to work.
3. Install Angular CLI 17
With Node 20 active, install the course-required Angular CLI major version globally:
npm install --global @angular/cli@17
Then verify it:
ng version
Look for output similar to:
Angular CLI: 17.x.x
Node: 20.x.x
The command may also display operating-system and package-manager details. At this point, there is no Angular application yet, so it is normal for the command not to list a local Angular framework version.
Common installation issues
ng is not recognized
Close and reopen the terminal first. If the error remains, npm’s global binary directory is not on your PATH. Check your npm global prefix:
npm config get prefix
Use that result to identify the appropriate npm global bin directory for your operating system, then add it to PATH through the normal system settings or your organization’s approved setup process.
PowerShell blocks npm scripts
On Windows, PowerShell can block execution of the npm-generated script. Angular’s official documentation notes this Current User–scoped command:
Set-ExecutionPolicy -Scope CurrentUser -ExecutionPolicy RemoteSigned
Read the PowerShell confirmation carefully. On a managed device, use the setting only if it conforms to your organization’s policy; otherwise, use an approved terminal or ask the IT team for the permitted configuration.
Permission errors on macOS or Linux
Avoid using sudo npm install as the first response. It can create root-owned global packages and cause later permission problems. Prefer the organization’s approved Node installation method or fix the ownership/prefix configuration that caused the error.
Record your baseline
Create a short local note—such as setup-notes.md outside any future company repository—with:
Node:
npm:
Angular CLI:
Browser used for DevTools:
Paste the actual versions. This small habit makes environment problems easier to diagnose when comparing your machine with CI or a teammate’s setup.
4. Configure Angular DevTools
Angular DevTools is a browser extension integrated into Chrome DevTools. It is not a replacement for the Console, Elements, or Network panels. Instead, it adds Angular-aware inspection: it understands the application’s component tree and framework state.
Watch Angular’s short “Introducing Angular DevTools” overview to see the extension activation signal and the Components inspection workflow.
Watch extension setup to see installation, pinning, and how the extension indicates it has detected an Angular development app. Then watch component inspection for the Angular DevTools tab, component tree, and the metadata shown for a selected component.
Install the official Angular DevTools extension from the Chrome Web Store, then pin it in the browser’s extensions menu. A Chromium-based browser such as Chrome is the most straightforward choice for this course.
The extension does not become useful merely because it is installed. It activates when the browser is visiting a running Angular application in a development context. In the next lesson you will create and run the first Angular 17 app; use that application to complete the activation check.
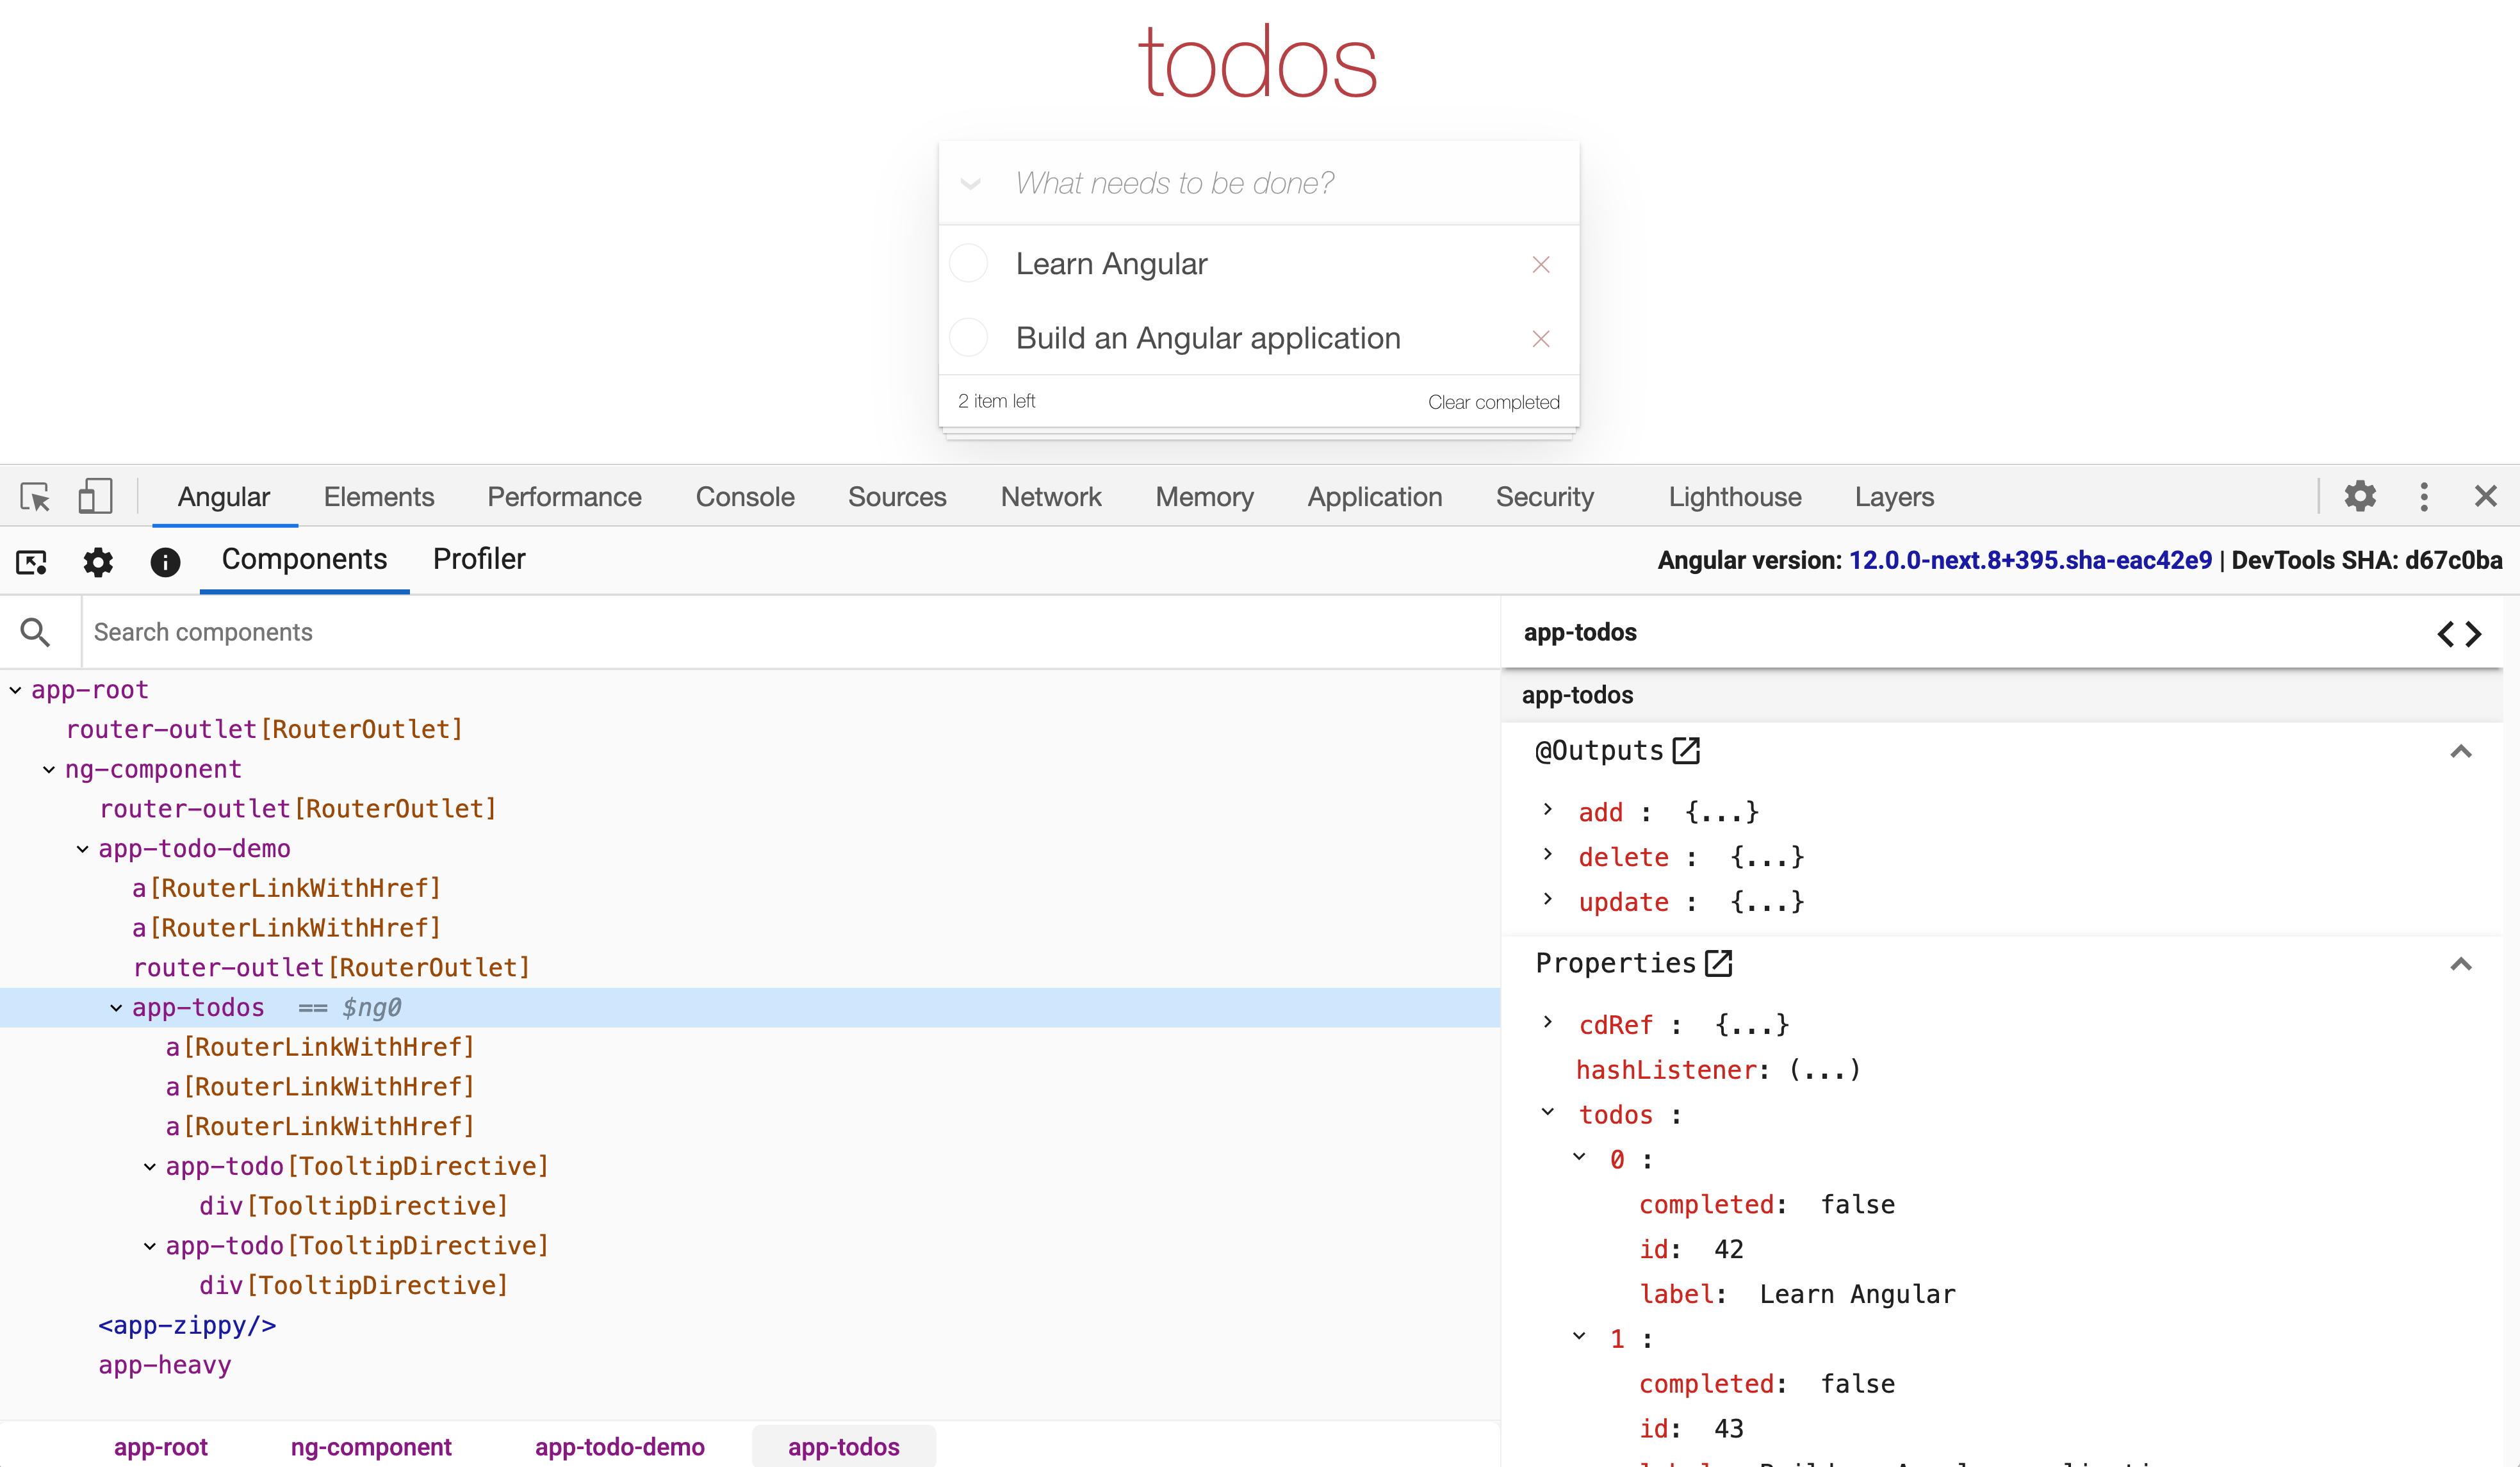
Your first DevTools workflow
Once an Angular development application is running locally:
- Open browser DevTools with
F12or the browser’s Inspect command. - Find the Angular tab. If it is not visible, look under the
>>overflow menu. - Open Components.
- Select a component in the tree, such as the root component.
- Inspect its metadata, properties, inputs, and injected services as displayed by the tool.
- When signals are present, select the relevant component and use Show Signal Graph if that control is available in your DevTools version.
At this stage, treat a signal as Angular-managed reactive UI state. You do not need to understand how to create signals yet. What matters now is the debugging question DevTools will help answer later:
Which component owns this displayed value, and which reactive state causes it to update?
For a banking interface, that question is practical. If an account balance does not refresh after a simulated transfer, inspect the component that renders the balance, its inputs, and eventually its signal or stream-backed state before changing templates at random.
A disciplined financial-application debugging rule
Use DevTools against local mock data during this course. Do not paste bearer tokens, customer data, or sensitive request payloads into the Console. In a real financial environment, browser tools are valuable for diagnosis but must be used under the organization’s data-handling and security policies.
If the Angular tab does not appear after you create the next lesson’s app, check these conditions:
- You are on the local Angular application page, not a static HTML page or a React app.
- The extension is enabled in the active browser profile.
- You opened DevTools after the application loaded; close and reopen DevTools if necessary.
- You are using a development server rather than assuming a production deployment exposes debugging capabilities.
Completion checkpoint
Before moving on, confirm all of the following:
node --versionbegins withv20.npm --versionprints successfully.ng versionreports Angular CLI 17.x.- Angular DevTools is installed and pinned in your chosen Chromium-based browser.
- You understand that its Angular tab appears when a local Angular development application is running.
- You can explain the roles of Node, npm, the global CLI, and project-local dependencies without conflating them.
You now have the controlled toolchain needed to begin actual Angular development. Next, you will create and run a strict Angular 17 application using standalone components, then use it as the local target for the Angular DevTools verification workflow configured here.
Can't find a good explanation? Sign up and we'll make it for you
Sign up