
Hello! Welcome back to our course on Low-Level Design.
In the last lesson, we established the critical first step in any design interview: transforming a vague problem statement into a concrete set of functional requirements and use cases. This process of clarification ensures you're solving the right problem.
Today, we'll take those clarified requirements and begin sketching the blueprint of our system. The learning outcome for this lesson is to identify core domain entities, their attributes, and behaviors. This is where we start translating real-world concepts from our problem description into the fundamental objects that will make up our software.
A Systematic Approach: Noun-Behavior-Relationship (NBR) Analysis
A powerful way to start identifying entities is to analyze the requirements you've gathered. Think of it as a linguistic exercise: you're looking for nouns and verbs.
A great technique for this is the Noun-Behavior-Relationship (NBR) Analysis. It's a straightforward method to break down a problem statement.
Low-Level Design (LLD) :Interview Framework
Let's begin with a structured technique for extracting entities from a problem description. This article introduces the Noun-Behavior-Relationship (NBR) Analysis, a simple yet effective method.
Read the section '2. Identifying Entities, Behaviors, and Relationships', focusing on the 'NBR (Noun-Behavior-Relationship) Analysis'. Pay attention to how it breaks down the problem statement by identifying nouns as potential classes (entities) and verbs as potential methods (behaviors).
As the article explains, the process involves three main steps:
- Extract Nouns (Entities): Read through your requirements and use cases, and list all the nouns. These nouns—like
User,Movie,Theaterin the article's example—are your candidate entities or classes. - Extract Verbs (Behaviors): Identify the actions and verbs in your requirements, such as
book,cancel, orpay. These actions will become the methods of your classes. - Define Relationships: Determine how the entities relate to one another (e.g., a
TheaterHASScreens). We will explore this in detail in our next lesson.
For now, we'll focus on the first two steps: identifying the entities (nouns) and their associated attributes and behaviors (verbs).
Putting it into Practice: The Parking Lot System
Let's apply this technique to the parking lot system we discussed in the previous lesson. Based on our requirement gathering, we have a set of assumptions and features. Let's see how these translate into entities.
Design Parking Lot | Object Oriented System Design Question | Amazon Interview Question
This video walks through the initial design of a parking lot. We'll use it to see how the core entities are identified directly from the problem's assumptions and requirements.
Watch from 00:21 to 03:06. Notice how the presenter first states the assumptions (our requirements) and then immediately identifies the high-level entities: Vehicle (and its specializations), ParkingLot, Level, and ParkingSpot.
From the requirements, the presenter identified several key nouns, which become our initial list of entities:
Vehicle(with specific types likeMotorcycle,Car,Bus)Parking LotLevelParking Spot
These are the core building blocks of our system.
Defining Attributes and Behaviors
Identifying the entities is just the first part. To make them useful, we need to define what they know (their attributes) and what they can do (their behaviors).
- Attributes are the properties or data that an entity holds. For a
Carentity, this could be itslicensePlateorcolor. These will become the fields or member variables in your Java class. - Behaviors are the actions an entity can perform or that can be performed on it. For a
ParkingSpotentity, this could beparkVehicle()orcheckAvailability(). These will become the methods of your class.

Let's continue with our parking lot example and see how we can flesh out the attributes and behaviors for the entities we identified.
Design Parking Lot | Object Oriented System Design Question | Amazon Interview Question
The same video provides a detailed breakdown of the attributes and methods for the key entities. This will show you how to move from a simple list of nouns to fully-fledged class candidates.
Watch from 03:06 to 10:05. You don't need to memorize the code. Instead, focus on the purpose of each class and the responsibilities assigned to it. For each class (Vehicle, ParkingSpot, Level, ParkingLot), try to identify: Attributes: What information does it store? Behaviors: What actions can it perform?
Based on the video, here’s a summary of the entities with their attributes and behaviors:
Vehicle(Abstract Class)- Attributes:
licensePlate,spotsNeeded,size. - Behaviors:
parkInSpot(),clearSpots(),canFitInSpot().
- Attributes:
Car(Concrete Class, extendsVehicle)- Attributes: Inherited from
Vehicle. - Behaviors: Implements
canFitInSpot()to allow parking in compact or large spots.
- Attributes: Inherited from
ParkingSpot- Attributes: a
Vehicleobject (if occupied),spotSize,row,spotNumber, aLevelobject. - Behaviors:
isAvailable(),canFitVehicle(),park(),removeVehicle().
- Attributes: a
Level- Attributes:
floornumber, an array ofParkingSpotobjects,availableSpots. - Behaviors:
parkVehicle(),findAvailableSpots(),spotFreed().
- Attributes:
ParkingLot- Attributes: an array of
Levelobjects. - Behaviors:
parkVehicle()(delegates to levels),removeVehicle().
- Attributes: an array of
To see how these concepts translate directly into Java code, the following article is a useful reference.
How to Design a Parking Lot using Object-Oriented ...
For a different perspective presented in Java code, this GeeksForGeeks article clearly defines the classes for a parking lot system. It's a great way to see how the concepts we just discussed map to actual class structures.
Skim through sections 1 to 6. Notice the class definitions for Vehicle, Bus, Car, Motorcycle, ParkingSpot, Level, ParkingLot, Ticket, and PaymentService. Observe the attributes (member variables) and behaviors (methods) defined in each class.
A Crucial Distinction: Actors vs. Entities
Does every noun in the requirements become a class? Not necessarily. It's important to distinguish between actors—who use or interact with the system—and entities—which are components of the system that need to be modeled.
Let's watch a clip that discusses this important nuance in the context of an elevator system.
Elevator System Design | Grokking the Object Oriented System Design Interview Question
This clip from an 'Elevator System Design' video raises a very important point about deciding which concepts need to become classes in your system.
Watch from 11:38 to 15:34. Pay close attention to the discussion around the 'Passenger' class. Why does the presenter argue against implementing a Passenger class for an elevator control system? This is a key insight.
The key takeaway here is subtle but vital for interviews: a Passenger is an actor who interacts with the elevator, but the elevator control system itself doesn't need to know about passengers' personal details. It only cares about requests (e.g., "a request was made on floor 3 to go up"). Therefore, creating a Passenger class is unnecessary for the core control system.
Always ask yourself: "Does the system need to store information about this concept, or does this concept simply interact with the system?" This helps you avoid creating unnecessary classes and keeps your design focused on the problem's core.
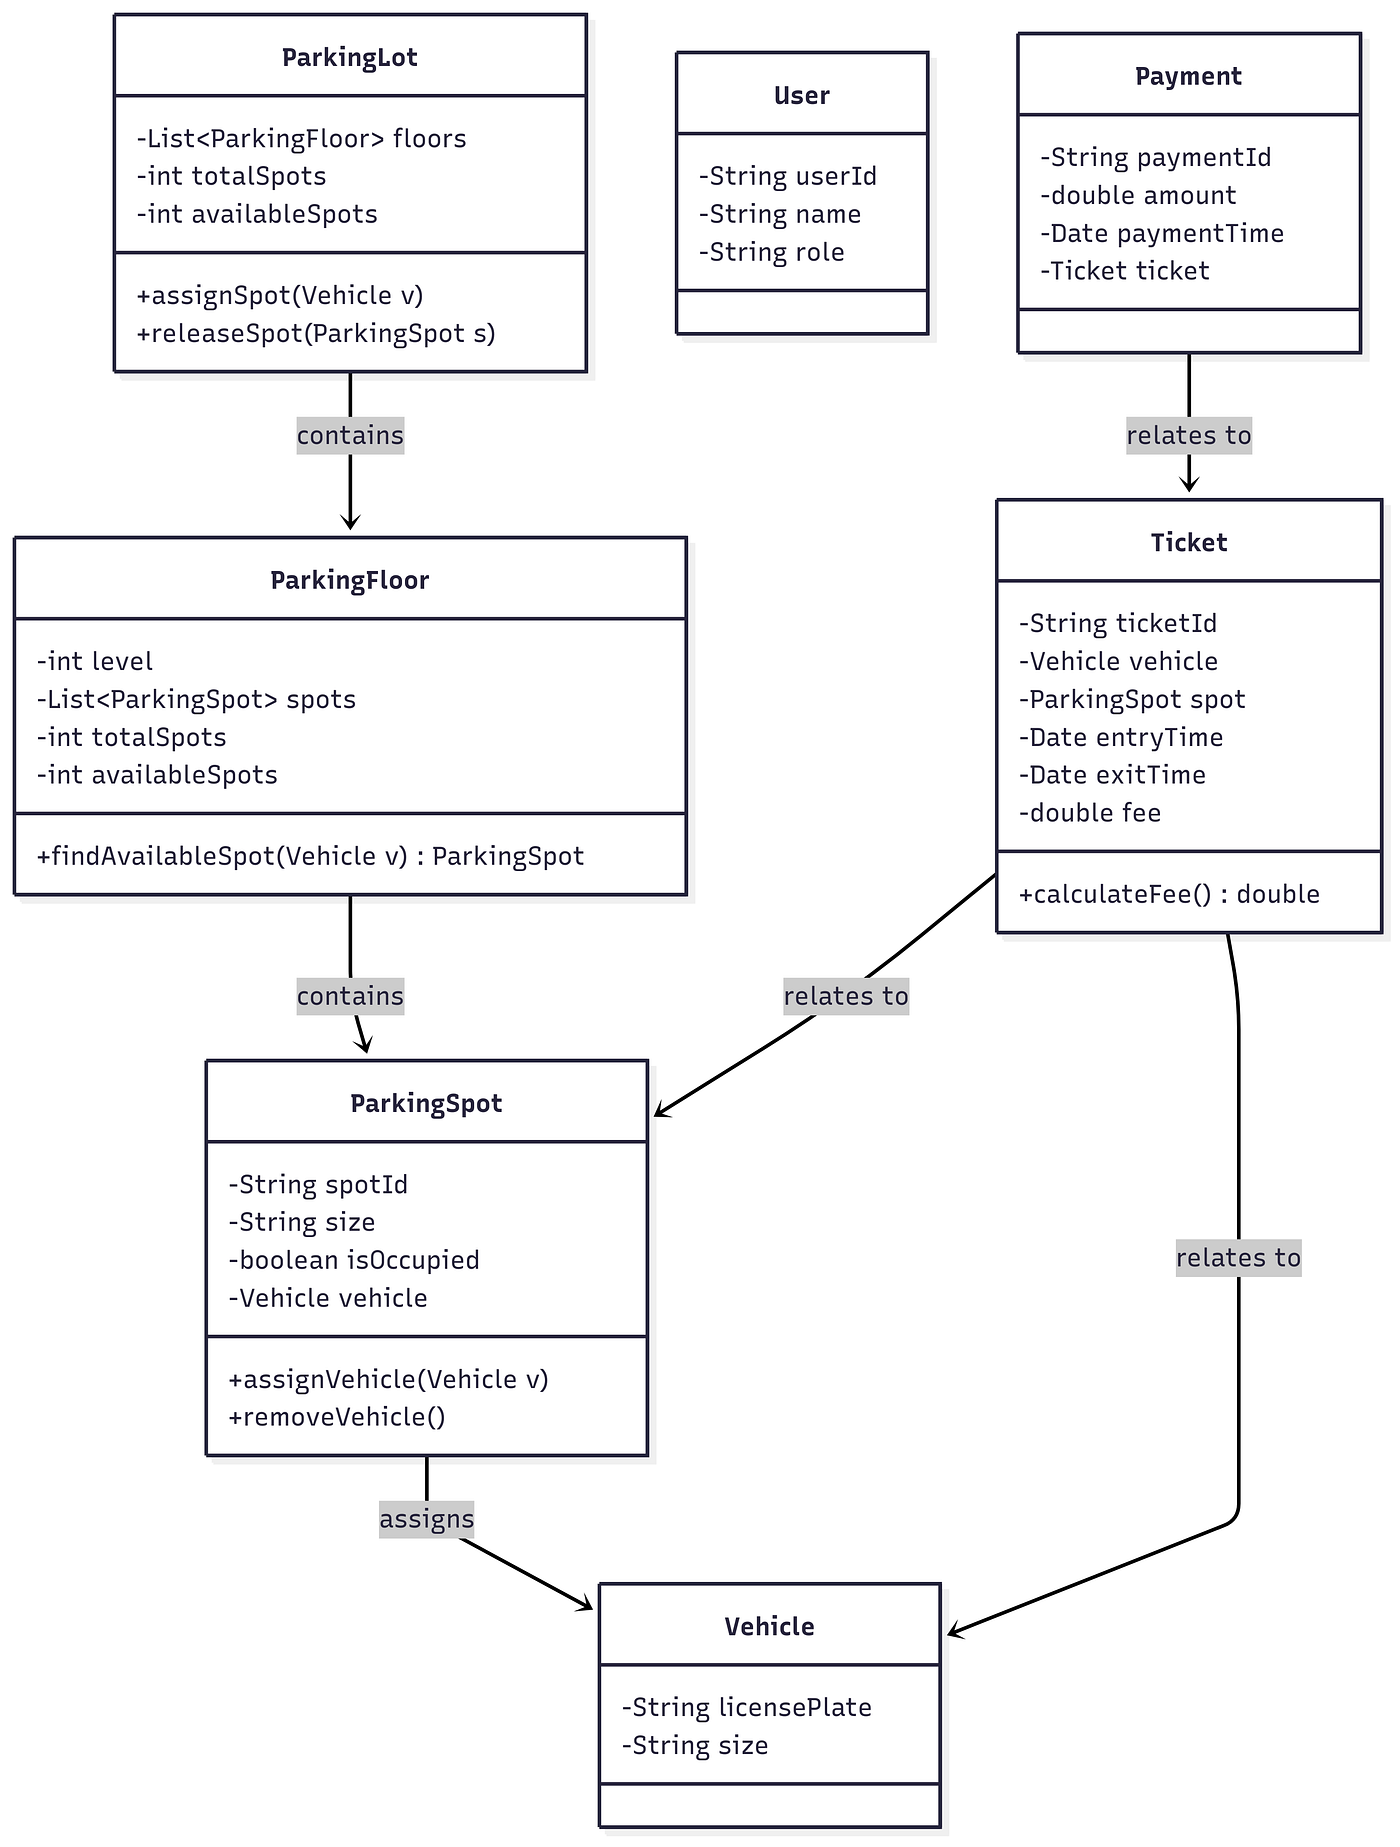
Visualizing the Design
The result of this identification process is a set of candidate classes with their attributes and methods. This is often visualized using a UML Class Diagram to get a high-level overview of the system's structure.
Test your understanding!
Let's apply this to a new problem. Imagine you are asked to "Design a simple vending machine."
Here are the requirements:
- The machine sells different items (e.g., chips, soda), each with a name, price, and stock level.
- A user can select an item via a code.
- The user inserts money.
- The machine dispenses the item and returns change if necessary.
- An operator can restock items and collect the money from the machine.
Based on these requirements, identify 3-4 core entities. For each entity, list its key attributes and behaviors.
Show answer
Here is a possible breakdown of the entities:
-
VendingMachine(The main entity)- Attributes:
inventory(a collection of items),moneyCollected,currentItemSelection. - Behaviors:
selectItem(itemCode),insertMoney(amount),dispenseItem(),returnChange(),collectMoney(),restockItem(itemCode, quantity).
- Attributes:
-
Item- Attributes:
itemCode,name,price. - Behaviors: (Mostly a data-holding class, so methods would be simple getters like
getPrice()).
- Attributes:
-
InventorySlotorItemSlot- Attributes:
item(the type of item in the slot),quantity. - Behaviors:
decreaseQuantity(),increaseQuantity(),getQuantity(),isAvailable().
(Note: You could also combine
ItemandInventorySlotinto a singleItemclass with aquantityattribute. The choice depends on how you want to model the inventory. Both are valid starting points.) - Attributes:
-
UserandOperator- These are actors, not entities within the vending machine system itself. The machine provides interfaces (buttons, slots) for them to interact with, but the machine doesn't need to store a list of
Userobjects.
- These are actors, not entities within the vending machine system itself. The machine provides interfaces (buttons, slots) for them to interact with, but the machine doesn't need to store a list of
Conclusion
Great work! You've now learned how to bridge the gap between abstract requirements and concrete software components. This step is fundamental to object-oriented design and brings structure to your thinking process.
Key Takeaways:
- Use NBR Analysis: Systematically identify nouns as candidate entities and verbs as candidate behaviors from your requirements.
- Define Attributes and Behaviors: For each entity, determine what information it needs to store (attributes) and what actions it can perform (behaviors).
- Distinguish Actors from Entities: Critically evaluate whether a noun represents an external actor interacting with the system or a core component that must be modeled within it. This keeps your design clean and focused.
In our next lesson, we will continue building our design by focusing on the third step of the NBR analysis: "Model class relationships: association, aggregation, and composition." Now that we have our entities, we'll learn how to connect them to build a cohesive and functional system.