
Hello! Welcome back to our course on mastering TanStack Start and modern authentication.
In our previous lesson, we successfully implemented the first half of the Google OAuth flow. We created a server-side route that generates a state value and PKCE parameters, stores them in secure cookies, and redirects the user to Google's authentication page.
Today, we will implement the crucial second half of this process. The learning outcome for this lesson is to create a server endpoint to handle the OAuth callback, validating the state parameter to prevent Cross-Site Request Forgery (CSRF) attacks. This endpoint will be the destination for users returning from Google, and its primary job is to ensure the integrity and security of the authentication flow before we proceed.
1. The Purpose of the Callback Endpoint
After a user successfully authenticates with Google and grants consent, Google redirects their browser back to the redirect_uri we specified in our Google Cloud project and in the authorization URL we constructed. This is our callback endpoint.
The redirect from Google will include two important query parameters:
code: A temporary, one-time authorization code.state: The same unique, random string we generated and sent in the initial request.
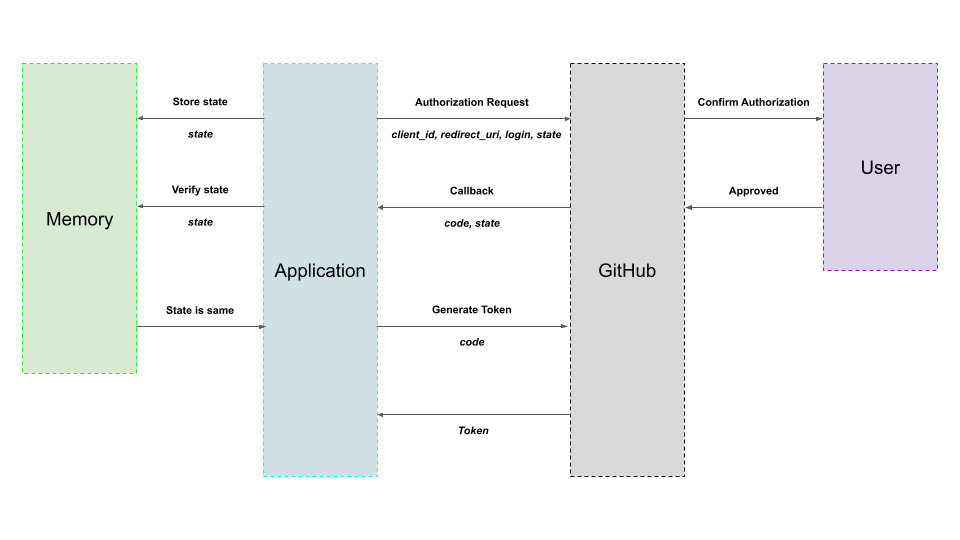
Our callback handler's first and most important job is to verify that the incoming state value matches the one we stored in the user's cookie.
2. Why State Validation is Critical: Preventing CSRF
The state parameter is not just for tracking; it's a vital security measure against Cross-Site Request Forgery (CSRF). In an OAuth context, a CSRF attack could trick a logged-in user into unknowingly linking an attacker's account (e.g., their Google account) to their profile on your application. This could lead to account takeover.
To understand the mechanism and the risk, let's review a few resources.
Prevent Attacks and Redirect Users with OAuth 2.0 State Parameters
First, let's get a clear definition of this attack vector from Auth0's documentation. This will explain how the state parameter acts as a defense mechanism.
Please read the short section titled 'CSRF attacks'. Focus on how the state parameter is used to correlate the authentication request you initiated with the response you receive.
Now, let's see what happens when this validation is missing or flawed.
Flawed CSRF Protection - State Param - Hacking Oauth Pt . 2 | Live Demo on Medium.com
The video 'Flawed CSRF Protection - State Param' by Hacking Simplified provides a powerful demonstration of this vulnerability. It shows how an attacker can exploit a missing or unvalidated state parameter.
Please watch the following two segments: Theoretical Explanation (2:22 - 3:53): This explains the attack flow where an attacker links their own social media account to a victim's application account. Real-world Example: Medium.com (8:53 - 10:48): This part is particularly insightful. It shows the attack failing against Medium.com because Medium correctly implements and validates the state parameter, demonstrating the effectiveness of the defense we are about to build.
As you can see, correctly validating the state is non-negotiable for a secure OAuth implementation.
This diagram provides a clear visual of the step we are about to implement. Notice the "Verify State" check, where the application compares the state from the callback with the one it previously stored.
3. Implementing the Callback Handler
Let's create the server endpoint to handle the callback. In your TanStack Start project, create a new file at src/routes/api/auth/google/callback.ts. This path should match the GOOGLE_REDIRECT_URI you defined in your .env file.
Our implementation will follow the best practices outlined in Google's official documentation.
Using OAuth 2.0 for Web Server Applications | Authorization
Google's documentation provides a concise Node.js example for handling the callback. We will model our code on this pattern.
Review the Node.js code snippet under 'Step 5: Exchange authorization code...'. Focus on how it parses the request URL (req.url), checks for q.error, and most importantly, compares q.state with the value stored in the session (req.session.state).
Here is the implementation in our TanStack Start project, using Vinxi/H3 server utilities.
// src/routes/api/auth/google/callback.ts

import {
  eventHandler,
  getQuery,
  getCookie,
  deleteCookie,
} from "vinxi/http";

export default eventHandler(async (event) => {
  // 1. Get query parameters and the state cookie
  const query = getQuery(event);
  const storedState = getCookie(event, "oauth_state");

  // 2. Validate the state parameter
  if (!query.state || !storedState || query.state !== storedState) {
    // If states don't match, it's a potential CSRF attack.
    // Abort the flow and respond with an error.
    event.node.res.statusCode = 400;
    return { error: "State mismatch", description: "Possible CSRF attack." };
  }

  // 3. Check for an error from Google
  if (query.error) {
    // The user may have denied access or another error occurred.
    event.node.res.statusCode = 401;
    return { error: query.error, description: query.error_description };
  }

  // 4. Clean up the state cookie
  // The state has served its purpose and should be removed.
  deleteCookie(event, "oauth_state", {
    httpOnly: true,
    secure: process.env.NODE_ENV === "production",
    path: "/",
  });

  // 5. Get the authorization code
  const authCode = query.code as string;
  if (!authCode) {
    event.node.res.statusCode = 400;
    return { error: "Missing authorization code" };
  }

  // At this point, validation is successful.
  // We have the authorization code needed for the next step.
  // For now, we will just return it to confirm success.
  return {
    message: "OAuth callback successful. State validated.",
    authorizationCode: authCode,
  };
});
Code Breakdown:
- Get Parameters: We use
getQueryto parse the URL's query string andgetCookieto retrieve theoauth_statecookie we set in the previous lesson. - Validate State: This is the most critical step. We check that both the query
stateand the cookiestateexist and that they are identical. If not, we immediately stop and return a400 Bad Requesterror. - Check for Errors: We check if Google returned an
errorparameter. This happens if the user denies the consent request or if there's a configuration issue. - Clean Up: Once the
stateis successfully validated, it has served its one-time purpose. We delete the cookie to maintain good security hygiene. - Get Code: We extract the
authorization_codefrom the query. This code is the key to getting our access token.
If you run your application now and go through the "Sign in with Google" flow, you should be redirected back to /api/auth/google/callback and see a JSON response confirming that the state was validated and showing you the authorization code.
Conclusion
In this lesson, we completed a critical security component of our OAuth 2.0 implementation. You have successfully built a callback endpoint that securely handles the user's return from Google.
Key Takeaways:
- The OAuth callback endpoint receives the
authorization_codeandstatefrom the provider. - The primary security function of the callback handler is to validate the
stateparameter by comparing the value from the URL query with the value stored from the initial request (e.g., in a cookie). - Failing to validate the
stateparameter exposes your application to Cross-Site Request Forgery (CSRF) attacks, which can lead to account takeover. - Once validated, the
statevalue is a single-use token and its corresponding cookie should be deleted.
Next Lesson Preview:
We have now securely obtained the authorization_code. In our next lesson, we will exchange the received authorization code for access and refresh tokens from Google. This involves making a server-to-server request to Google's token endpoint, using the code, our client secret, and the PKCE code_verifier that is still waiting in its cookie.
Can't find a good explanation? Sign up and we'll make it for you
Sign up