Welcome to the first lesson of Module 6. In the previous module, you successfully deployed your MyToken ERC-20 contract to a live testnet. This was a major step, taking your work from a local simulation to a globally accessible asset. However, your current token has a fixed supply, minted entirely at the moment of creation. This is simple, but most real-world financial applications, such as stablecoins or tokenized securities, require more flexible and ongoing administration.
This brings us to a crucial question: if a contract has powerful functions—like minting new tokens or pausing transfers—who should be allowed to call them? In this lesson, you will learn how to answer that question by implementing role-based access control (RBAC). You will use OpenZeppelin's AccessControl contract, the industry standard for managing granular permissions. Mastering this pattern is essential for building secure and manageable smart contracts, a foundational skill for your goal of developing applications for tokenized money.
1. From Simple Ownership to Granular Roles
In your previous work, you've seen simple access control using function modifiers. A common pattern is Ownable, where a single address (the "owner") has all administrative privileges. While straightforward, this "all-or-nothing" approach is often too rigid for sophisticated systems.
Consider a stablecoin project. You might need:
- An admin account that can grant or revoke permissions.
- A set of minter accounts authorized to issue new tokens against incoming fiat deposits.
- A pauser account that can halt all token transfers in an emergency.
Giving one account all these powers violates the principle of least privilege, a core security tenet you may recognize from managing database permissions. We need a way to assign specific capabilities to different accounts. This is where Role-Based Access Control (RBAC) comes in. In Ethereum, authentication (verifying who is calling, via msg.sender) is handled by the protocol. Our job as developers is authorization: deciding what an authenticated user is allowed to do.
The video below from OpenZeppelin provides a great conceptual overview of why granular access control is necessary for more complex systems like the stablecoin example we just discussed.
Setting Up Access Control for Smart Contracts
This video explains the limitations of simple ownership and introduces the need for granular roles using a DeFi stablecoin example.
Please watch the segment from Granular Access Control. Pay close attention to how the speaker identifies different functional requirements (setting a fee vs. an emergency shutdown) that map to different actors (a DAO vs. a team multisig), making a single "owner" impractical.
2. How Access Control Works Under the Hood
Before using OpenZeppelin's polished AccessControl contract, it's incredibly helpful to understand how it's built. At its core, it's a clever use of data structures you're already familiar with: mappings and modifiers.
A contract can track which accounts have which roles using a nested mapping:mapping(bytes32 => mapping(address => bool)) public roles;
- The first key (
bytes32) is a unique identifier for a role, typically the hash of a string like "MINTER_ROLE". Hashing is used for gas efficiency. - The second key (
address) is the user's account. - The value (
bool) istrueif the account has the role, andfalseotherwise.
The following video provides a concise, from-scratch implementation of an access control system. Watching this will demystify the OpenZeppelin contract and give you a solid mental model of its mechanics.
The presenter builds a simple AccessControl contract from scratch, explaining each component. This will give you a strong intuition for the data structures and logic involved.
Watch the video from the beginning until the end of the revokeRole implementation. As you watch, focus on these key steps: Defining Roles: See how bytes32 constants are created by hashing strings (keccak256) and how the nested mapping is declared. Granting Roles: Observe how the _grantRole function simply sets the boolean in the nested mapping to true. Restricting Access: Pay close attention to the implementation of the onlyRole modifier, which checks the mapping before allowing a function to execute. Notice how the deployer is granted an ADMIN role in the constructor. Revoking Roles: Understand that revoking a role is as simple as setting the boolean back to false.
3. Implementing RBAC with OpenZeppelin's AccessControl
Now that you've seen the underlying logic, let's use the battle-tested implementation from OpenZeppelin. It provides all the functionality from the video and more, in a secure, gas-optimized package. The following image shows a simple contract using this pattern.
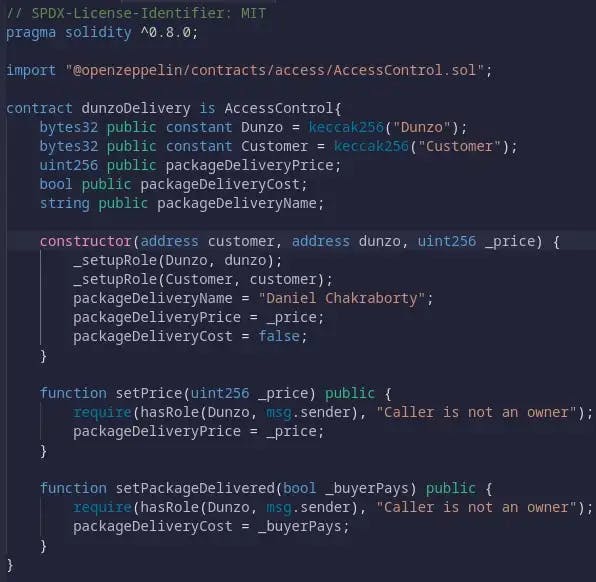
Implementing AccessControl involves three main steps: defining roles, granting them, and protecting functions. The OpenZeppelin documentation provides clear code examples for this process.
This official documentation is your primary reference for using the AccessControl contract. We will walk through the core implementation patterns.
First, read the section "Using AccessControl" and review the first code example. This shows how to inherit from AccessControl, define a MINTER_ROLE constant, and grant it in the constructor using _grantRole. Next, read the following section that augments the example and study the second code block. This introduces the cleaner onlyRole(MINTER_ROLE) modifier, which replaces the manual if (!hasRole(...)) check. This is the preferred method for protecting functions.
4. The Power of Admin Roles
So far, we've only assigned roles inside the constructor. But what if you need to grant a role to a new team member after the contract is already deployed? A role itself doesn't confer the power to grant that same role to others.
This is solved with admin roles. For any given role (e.g., MINTER_ROLE), there is an associated admin role. An account must have the admin role to be able to grant or revoke the MINTER_ROLE.
By default, the admin role for all roles you create is a special, built-in role called the DEFAULT_ADMIN_ROLE. Think of it as the "super admin" for the contract. The standard practice is to assign the DEFAULT_ADMIN_ROLE to the contract deployer. This account can then manage all other roles.
This section explains the crucial concept of role administration.
Please read the section "Granting and Revoking Roles". Focus on understanding the relationship between a role, its admin role, and the special DEFAULT_ADMIN_ROLE. The final code example in this section demonstrates the most common and secure setup: the constructor grants only the DEFAULT_ADMIN_ROLE to the deployer, who can then dynamically assign other roles like MINTER_ROLE and BURNER_ROLE after deployment.
5. Practical Application: Upgrading MyToken
Let's apply these concepts by modifying the MyToken contract you created in the last module. We will change it from having a fixed initial supply to allowing a designated minter to create new tokens on demand.
Here is the plan:
- Inherit from
AccessControl. - Define a
MINTER_ROLE. - In the constructor, grant the
DEFAULT_ADMIN_ROLEto the deployer (msg.sender). - Remove the
initialSupplylogic from the constructor. - Add a new
mintfunction, protected by theonlyRole(MINTER_ROLE)modifier.
Below is the refactored MyToken.sol contract. Create a new file, MyTokenV2.sol, in your contracts directory and use this code.
// SPDX-License-Identifier: MIT
pragma solidity ^0.8.20;

import "@openzeppelin/contracts/token/ERC20/ERC20.sol";
import "@openzeppelin/contracts/access/AccessControl.sol";

contract MyTokenV2 is ERC20, AccessControl {
    bytes32 public constant MINTER_ROLE = keccak256("MINTER_ROLE");

    constructor() ERC20("MyToken", "MTK") {
        // Grant the deployer the default admin role.
        // This allows the deployer to grant and revoke roles.
        _grantRole(DEFAULT_ADMIN_ROLE, msg.sender);
    }

    function mint(address to, uint256 amount) public onlyRole(MINTER_ROLE) {
        _mint(to, amount);
    }
}
With this new contract, the deployment flow changes slightly:
- Deploy
MyTokenV2.sol: The deployer's account is automatically assignedDEFAULT_ADMIN_ROLE. - Grant Minter Role: The deployer (the admin) must call the
grantRole(MINTER_ROLE, newMinterAddress)function to authorize an account to mint. ThisnewMinterAddresscould be the deployer's own address or another one. - Mint Tokens: The account with
MINTER_ROLEcan now successfully call themintfunction. Any account without the role will have its transaction reverted.
Conclusion
In this lesson, you've moved beyond simple ownership to a sophisticated and flexible permissions system. You learned how to implement role-based access control to enforce the principle of least privilege, a practice that is non-negotiable for secure financial contracts. This ability to manage permissions dynamically is analogous to user role management in the enterprise systems you're familiar with, but enforced with cryptographic certainty on the blockchain.
Key Takeaways:
- RBAC vs.
Ownable:AccessControlallows for granular permissions (e.g.,MINTER_ROLE,PAUSER_ROLE) instead of a single, all-powerful owner. - Core Implementation: You define roles as
bytes32constants, grant them with_grantRoleorgrantRole, and protect functions with theonlyRolemodifier. - Admin Hierarchy: The
DEFAULT_ADMIN_ROLEis the key to managing permissions after deployment. The holder of this role can grant and revoke other roles, but cannot directly execute the functions protected by them. - Secure Setup: The standard pattern is to grant
DEFAULT_ADMIN_ROLEto the deployer in the constructor, who then sets up the other operational roles.
You now have a contract with administrative functions and a secure way to manage them. But what happens if you discover a bug in your logic or need to add a completely new feature? The code on the blockchain is immutable. In our next lesson, we will tackle this challenge by exploring the transparent proxy pattern, which allows you to upgrade smart contracts while preserving their state and address.