
Hello! Welcome back to your course on DJing DnB on Pioneer CDJs.
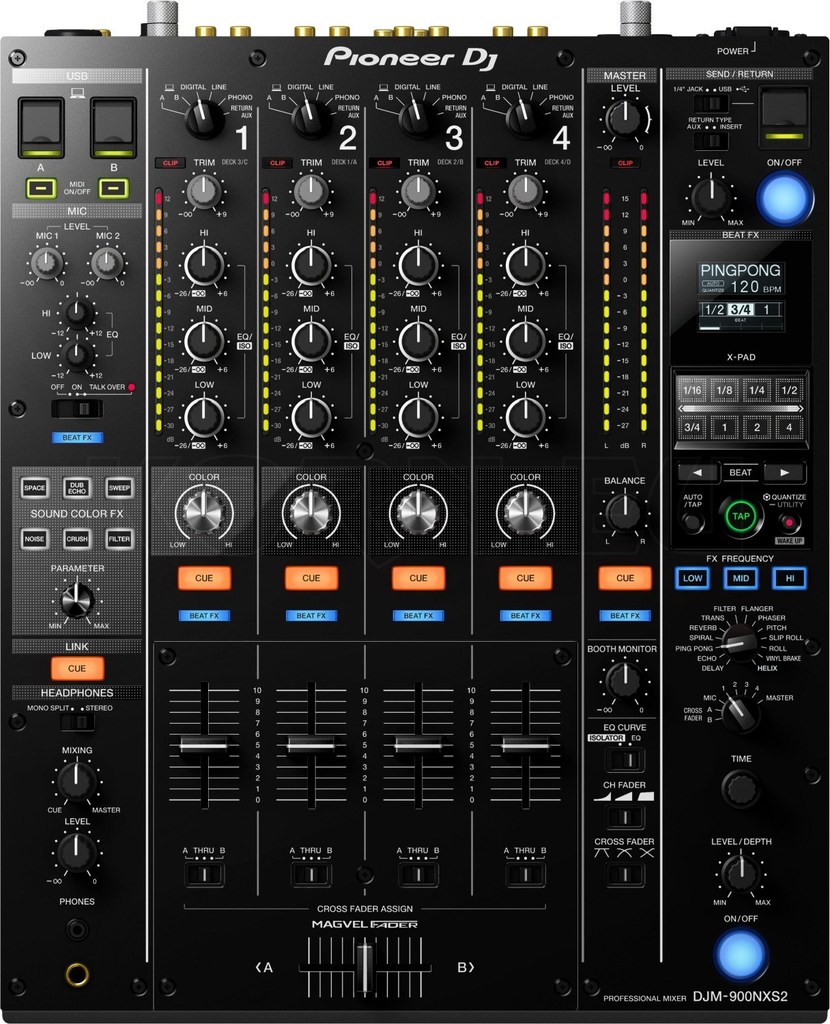
In our last lesson, we identified the five core controls of the Beat FX section on the DJM-900NXS2 mixer: Assign, Select, Time, Level/Depth, and On/Off. We established a mental model for this section as a dedicated hardware effects processor, similar to an effects bus in a DAW.
Today, we'll put that knowledge into practice. The goal of this lesson is to apply a time-based Beat FX (like Echo or Delay) in time with a track to enhance a transition. We'll move from theory to a hands-on, creative application that is a cornerstone of modern DJing.
1. Timing is Everything: Syncing the FX Engine
Before we can creatively use effects, we must ensure they are rhythmically locked to our music. In a DAW, this is handled automatically by the project's master clock. On a standalone club setup, the mixer needs to know the correct tempo. While the DJM-900NXS2 has an AUTO BPM detection feature, it's not always fast or reliable, especially during breakdowns or complex passages in a track.
A professional DJ never relies solely on AUTO mode. You must be able to set the BPM manually to guarantee your effects are perfectly in time.
To understand the problem and the solution, let's start with a short article.
3 Mistakes To Avoid On CDJs and Club Setups
This article from We Are Crossfader explains why effects can sound 'off' on club mixers and details the precise method for setting the BPM manually.
Please read the sections 'Mistake #1 – Understanding The DJM Beat FX Settings' and 'The fix'. Focus on the procedure for manually setting the BPM by holding the 'TAP' button and twisting the 'TIME' encoder.
Now, let's see that exact technique demonstrated on video.
Quick Tips for Using Effects with Pioneer DJM Mixers
This DJcityTV video provides a quick, clear demonstration of how to lock in the BPM for your effects.
Watch from 00:28 to 01:39. Pay close attention to how the presenter holds the 'TAP' button while turning the 'TIME' knob to dial in the exact BPM, including decimals.
Key Steps for Setting FX Timing:
- Check the BPM: Look at the BPM of your track on the CDJ display. Let's say it's 174.0.
- Check the Mixer's BPM: Look at the BPM displayed on the Beat FX screen.
- Manually Set the BPM: If the mixer's BPM is incorrect, press and hold the TAP button. While holding it, turn the TIME knob until the display reads
174. For decimal values, hold both TAP and AUTO/TAP while turning the TIME knob. - Set the Beat Fraction: Use the BEAT ← / → buttons to select a musical subdivision. Common choices for transitions are
1/2,3/4, or1beat. Ensure the fraction is solidly selected and not flashing between two values.
With the BPM locked in, you can be confident that your effects will be perfectly synchronized with the track.
2. The "Echo Out": A Fundamental Transition Technique
One of the most common and effective ways to use a time-based effect is the "Echo Out." This technique uses an echo to create a decaying rhythmic tail for the outgoing track, providing a clean space for the incoming track to take over.
Let's walk through the process step-by-step. Assume Track A is playing on Channel 1, and you're ready to mix in Track B on Channel 2.
A. The "Pre-flight Check" (Preparing the Effect)
Before you even start the transition, you need to set up the effect in the background.
- Assign: Turn the Effect Channel Selector knob to
1to assign the Beat FX to Track A. - Select: Turn the Beat Effect Selector knob to choose
ECHO. - Time: Use the BEAT buttons to set the timing to
1 BEAT. This is a great starting point. - Level/Depth: Turn the LEVEL/DEPTH knob fully counter-clockwise to its minimum position. This is crucial; you don't want the effect to be audible yet.
- Activate: Press the large ON/OFF button. It will begin flashing in time with the track's tempo, indicating the effect is armed but not yet heard (since the level is at zero).
B. The Execution (Performing the Transition)
Now you're ready to perform the mix.
- Start Track B: Beatmatch Track B and start it at the beginning of a phrase.
- Begin the Blend: As Track A enters its final 8 or 16 beats, start your transition. You might begin swapping the EQs (e.g., slowly turning down the LOW on Track A while bringing it up on Track B).
- Introduce the Echo: Over the last 4 beats of Track A's phrase, slowly turn the LEVEL/DEPTH knob clockwise. You'll hear the echo of Track A begin to build and blend into the mix.
- Cut Track A: At the downbeat where Track B fully takes over (the "drop"), cut the audio from Track A, typically by pulling down its channel fader or using the crossfader.
- Let the Tail Decay: You will notice that the echo from Track A continues to play for a few moments even after its channel fader is down. This is called an "echo tail."
This "tail" is possible because ECHO on the DJM-900NXS2 is a post-fader effect. This means the effect is applied to the signal before the channel fader, so the echo's feedback loop continues even when the original source is silenced.
The official DJM-900NXS2 manual confirms this behavior. Let's look at the description for the ECHO effect.
Find the description for 'ECHO' on page 16. The manual explicitly states: 'Lowering the channel faders and cutting the input volume leaves an echo sound, producing a fade out.' This confirms the post-fader behavior we rely on for this technique.
Practice Exercise
Now it's your turn.
- Load two DnB tracks.
- Beatmatch them.
- Perform an "Echo Out" transition from the first track to the second using the steps above.
- Experiment with different BEAT settings. Try a
1/2beat echo for a faster, more frantic feel, or a3/4beat echo for a syncopated, galloping rhythm. Notice how changing the timing dramatically alters the character of the transition.
3. Creative FX Application
The "Echo Out" is a utility transition, but effects can also be used as a more expressive, momentary performance tool. Instead of using the ON/OFF button to trigger the effect, you can use the LEVEL/DEPTH knob for more dynamic control.
Let's watch a short clip demonstrating this idea with the DELAY effect.
Quick Tips for Using Effects with Pioneer DJM Mixers
In this final clip from the DJcityTV video, the presenter shows a creative way to 'punch in' a delay effect for a doubling or stuttering sound.
Watch from 02:41 to 04:01. Notice how he leaves the effect 'ON' but keeps the 'LEVEL/DEPTH' at zero. He then quickly turns the knob up and down to create a controlled, rhythmic stutter. This gives you more nuanced control than just pressing the ON/OFF button.
This technique is highly effective for adding emphasis to a vocal snippet, a synth stab, or a drum fill. It's a way of "playing" the effect in real-time, much like you would automate a send level in your DAW to highlight a specific moment in a track.
Conclusion
Today you've bridged the gap between knowing what the Beat FX controls do and how to use them to create a polished, professional transition. This is a fundamental skill that adds dynamics and smoothness to your mixes.
Key Takeaways:
- For time-based effects to work, the mixer's BPM must be accurately set. The most reliable method is to manually set it by holding TAP and turning the TIME knob.
- The "Echo Out" is a classic transition technique that relies on the post-fader nature of the
ECHOeffect to create a smooth "tail." - The standard workflow is: Assign → Select → Time → Level to Zero → Activate → Modulate Level.
- Beyond basic transitions, you can use the
LEVEL/DEPTHknob as a performance control to dynamically punch effects in and out.
Preview of the Next Lesson:
You now have a complete toolkit of core mixing techniques: beatmatching, EQing, and using effects. In the next module, we will shift our focus from individual techniques to the bigger picture. You will learn how to plan a 15-minute, 4-6 track mini-mix, arranging tracks for a clear energy progression. It's time to start thinking like a performer and telling a story with your music.
Can't find a good explanation? Sign up and we'll make it for you
Sign up