
Hello. You have now configured a vertical , 30 fps practice project and brought a small, organised set of media into Resolve. Before you begin reviewing clips and building a sequence, create a recovery system. Editing is exploratory: a cut may become worse, an import may go wrong, or an app problem may interrupt work. A usable backup lets you test ideas without turning every decision into a risk.
This lesson distinguishes the kinds of Resolve backups, then gives you a safe iPad workflow for exporting and restoring both a lightweight project snapshot and a media-inclusive archive. The central rule is simple: restore as a newly named copy, inspect it, and keep the working project untouched.
What exactly are you backing up?
A Resolve project contains editorial information: timelines, edits, bin structure, clip metadata, titles, grades, and many settings. It does not automatically mean that all camera clips, AI-generated video, music, and graphics are stored inside the project itself.
That distinction produces three useful protection levels.
| Protection method | What it saves | What it does not guarantee | Best use |
|---|---|---|---|
| Project Backups | Automatic historical copies of the project data | Source media files | Recovering from an unwanted edit or crash |
Export Project (.drp) | One manually exported project snapshot | Source media files | A small, dated checkpoint before a risky change or app update |
Export Project Archive (.dra) | Project data plus selected media files in an archive package | Small size; archives can be large | Moving, preserving, or fully backing up a finished project |
A rendered video, such as an .mp4 exported for Instagram or YouTube, is not a project backup. It preserves the finished picture and sound, but not the editable timeline, bin structure, titles, or colour work.
A .drp is deliberately small because it stores the project’s instructions, not the footage itself. If the original media has moved or been deleted, the restored project may open with Media Offline clips. That is why the stable folder structure from the previous lesson matters.
A .dra archive is more self-contained. When you include media files, Resolve gathers copies of the media used by the project into the archive package alongside the project data. It takes more storage, but it is the safer choice when you need the project to survive independently of the current media locations.
Managing Projects in DaVinci Resolve – Backups, Exports and Archives | Larry Jordan
Read Larry Jordan’s concise overview to establish the difference between rolling Project Backups, exported project snapshots, and full archives. Its interface examples are from desktop Resolve, but the project-management concepts and command names also apply to the iPad version.
In the article’s PROJECT BACKUPS section, read the backup explanation. Focus on the fact that a loaded backup becomes a separate project. Then read the EXPORT A PROJECT section, from export and import, noting that an exported project links to existing media rather than containing it. Finally, in ARCHIVING A PROJECT, read what an archive contains. Notice why an archive occupies much more storage than a .drp.
Enable Resolve’s rolling Project Backups
Live Save and Project Backups work together, but they are not the same:
- Live Save records the current state as you work. It reduces data loss from a crash, but it can also save a mistake immediately.
- Project Backups create periodic older versions. They are what let you return to a point before a bad change.
On your iPad, open Resolve’s Preferences, then look under User for Project Save and Load. Enable Live Save and Project Backups. Where your Resolve version provides the controls, choose a reasonable automatic interval and retention period rather than relying on a single current version.
If you can choose a backup location, use your 04_Project_Backups folder or another Files location that you can copy to external storage. Backups kept only in the app’s local area can help with an editing mistake, but they are not enough protection against device loss, storage failure, or an app reinstall.
AVOID THIS MISTAKE: I lost all Project Files in DaVinci Resolve iPad!
Watch Daniel Kovacs’ short iPad-specific cautionary example, “AVOID THIS MISTAKE: I lost all Project Files in DaVinci Resolve iPad!” It explains why an export outside the app matters even when a project currently seems safe.
Watch the iPad warning. Treat it as a practical reminder: do not delete or reinstall Resolve until you have exported and verified a project copy outside the app.
Make a lightweight checkpoint: export a .drp
For routine protection, a dated .drp export is the fastest manual checkpoint. Create one before a major restructure, before an app update, and at the end of a session whose loss would be costly.
Use a name that tells you both when and why the checkpoint was made:
AgencyPromo_Coffee_2025_YYYYMMDD_MediaOrganised.drp
AgencyPromo_Coffee_2025_YYYYMMDD_BeforeRoughCut.drp
AgencyPromo_Coffee_2025_YYYYMMDD_ClientChangesApplied.drp
Avoid names such as final.drp, because every project eventually has several “final” versions.
Export the snapshot
Starting from your current AgencyPromo_Coffee_2025 project:
- Open the Project Manager. Depending on the iPad interface version, this may be accessed from the project-management control, the Home screen, or the File menu.
- Find the project card for
AgencyPromo_Coffee_2025. - Touch and hold the project card, or use its context menu or three-dot menu.
- Choose Export Project.
- In the Files picker, navigate to
AgencyPromo_Coffee_2025/04_Project_Backups. - Give the export a dated milestone name, such as
AgencyPromo_Coffee_2025_YYYYMMDD_MediaOrganised.drp. - Confirm the export, then open Files briefly and verify that the
.drpappears where you intended.
Do not save the only copy into an unclear temporary folder such as Downloads. The backup should live in a predictable location that belongs to the project.
At this point you have a useful edit-data checkpoint, but not an independent media backup. Your original clips are still being referenced in their current locations: Photos, Files, or the external SSD.
Restore the snapshot safely: import a copy, never replace
The most important backup habit is not merely exporting a file. It is testing that you can restore it without touching the active project.
Return to the Project Manager and follow this recovery method:
-
Tap an empty area of the project list, or open the Project Manager’s general context menu.
-
Choose Import Project.
-
Select your exported
.drpin04_Project_Backups. -
When Resolve asks for a project name, do not accept the working project’s name. Use a clear restoration label, for example:
AgencyPromo_Coffee_2025_RESTORE_TEST -
Open the restored copy.
-
Check that your bins, imported clips, and any existing timeline are present.
-
Play a few clips to confirm that Resolve can still find the source media.
-
Return to the Project Manager. You should see two separate project cards: the original working project and the restore test.
If the restored project is correct, you have proved that your checkpoint works. You may delete the test copy later to keep the Project Manager tidy, but keep both the working project and the exported .drp.
If you ever restore because a timeline change went badly, use a name such as:
AgencyPromo_Coffee_2025_Recovered_YYYYMMDD
Open that copy, compare it with the original, and decide which version should become the new working edit. The original remains available throughout the decision.
When you need media too: create a Project Archive
A .drp protects the edit instructions. A Project Archive protects the project and the selected media needed to reopen it elsewhere. For an agency project, make an archive at meaningful milestones: when a client approves a version, when a campaign finishes, or before moving the work to another device.
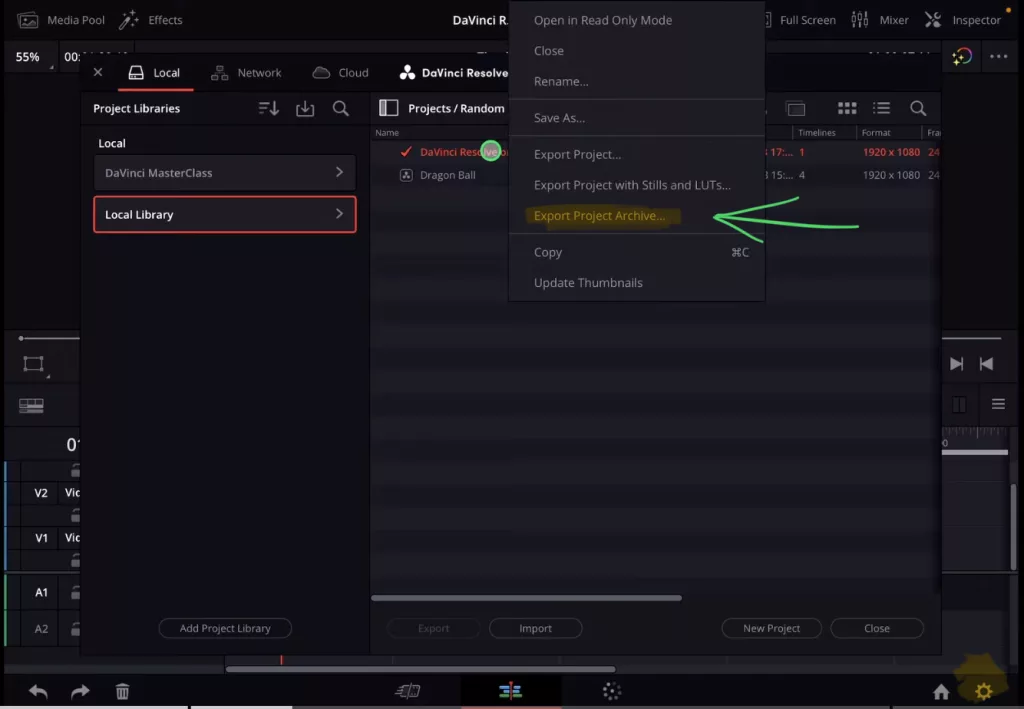
The iPad Project Manager menu includes Export Project Archive, as shown below.
Export Your DaVinci Resolve Project in MINUTES with All Media Files Automatically
Watch “Export Your DaVinci Resolve Project in MINUTES with All Media Files Automatically” by With Sam for a visual walkthrough of archive export and restoration. The demonstration uses desktop Resolve, but the Project Manager commands and archive decisions are directly relevant to the iPad workflow.
Watch archive export to see the archive destination and inclusion choices. Pay particular attention to the distinction between media files, render cache, and proxy media. Then watch archive restore for the restoration process. Notice that the archive is restored under a newly created project name rather than replacing the earlier project.
Export an archive deliberately
In the Project Manager, select the working project—not the restore-test copy—then choose Export Project Archive.
When Resolve presents archive options:
- Include Media Files: select this when the archive must be independently editable. This is the key option for long-term preservation or transfer.
- Render Cache: normally leave it off. Render cache can be regenerated and may make the archive much larger.
- Proxy Media: include it only if you need the existing proxies on another device or if recreating them would be inconvenient.
Save the archive to an external SSD when possible. An archive containing AI-generated footage, phone clips, music, and graphics can grow quickly, and it needs enough free space to duplicate those assets.
Use a folder/package name such as:
AgencyPromo_Coffee_2025_Approved_YYYYMMDD.dra
When Resolve finishes, inspect the destination in Files. Do not rearrange items inside the archive package. Treat it as a sealed, self-contained recovery copy.
Restore the archive as an independent project
To test the archive:
-
Open the Project Manager.
-
Open the general context menu in an empty area rather than selecting the working project.
-
Choose Restore Project Archive.
-
In Files, select the top-level
.draarchive package. -
Give the restored project a distinct name:
AgencyPromo_Coffee_2025_ARCHIVE_TEST -
Open the restored copy and inspect the Media Pool and timeline.
-
Play several clips, including one from each source type you used: phone footage, AI-generated footage, music, and graphics.
Because this is an archive that includes media, Resolve should have the required media within the restored archive structure. The original working project remains intact in the Project Manager, and your ARCHIVE_TEST is simply a proof that the archive can be recovered.
A compact backup policy for this course
For your current iPad projects, use this simple policy:
| Moment | Action |
|---|---|
| While editing | Keep Live Save and Project Backups enabled |
| Before a major change | Export a dated .drp snapshot |
| At the end of an important session | Export another dated .drp and copy it beyond the app’s local storage when possible |
| At approval, handoff, or project completion | Export a .dra archive with media files |
| After creating a backup method for the first time | Restore it as a uniquely named test project |
The final line is the one many editors miss. A backup you have never restored is only a hope; a backup you restored and checked is a recovery plan.
Key takeaways
You now have two complementary ways to protect a Resolve project on your iPad:
- Project Backups provide rolling versions for recovery from editing mistakes.
- A manually exported
.drpis a compact, named project checkpoint, but it does not contain your media. - A
.draProject Archive can include the project and the media needed to reopen it independently. - Restore a backup or archive with a new name such as
_RESTORE_TEST,_Recovered, or_ARCHIVE_TEST. - Verify the restored bins, timeline, and media playback before trusting the backup.
- Never rely solely on a project that exists inside the Resolve app.
With a recoverable project in place, the next lesson moves into footage review: using Source Tape, scrubbing efficiently, and marking in and out ranges for the moments worth editing.
Can't find a good explanation? Sign up and we'll make it for you
Sign up