
Hello! Welcome to your seventh lesson.
In our previous lesson, we built a robust, manifest-driven AssetManager. This was a crucial piece of infrastructure that allows us to cleanly preload all the images and data our game will need. We ended by loading a hero spritesheet and rendering a single, static frame of our character. Today, we'll bring that character to life.
The learning outcome for this lesson is to implement frame-based sprite animation with timing and directional state. This means we will make our character appear to walk by cycling through different images (frames) from their spritesheet, control the speed of that animation, and switch between different animations (like walking up, down, left, or right).
This is a foundational skill for creating the "living" worlds of JRPGs. Your experience with front-end development, particularly managing state changes over time in dynamic UIs, will provide a strong conceptual basis for the animation state machine we're about to build.
The Core Concept: Animation from a Sprite Sheet
At its heart, 2D sprite animation is an illusion, much like a flipbook. We rapidly display a sequence of images, called frames, to create the appearance of motion. To do this efficiently, game developers almost always use sprite sheets (also called sprite maps). A sprite sheet is a single image file that contains all the individual frames for one or more animations.
This technique should be familiar to you from your web development experience, where it's known as CSS sprites, primarily used to reduce HTTP requests. In game development, the motivation is similar: it's more efficient for the graphics hardware and our engine to work with a single, larger texture than many small ones.
A typical JRPG character sprite sheet organizes animations in a grid. Each row represents a different directional animation (e.g., walking down, walking left), and each column represents a single frame in that animation's sequence.
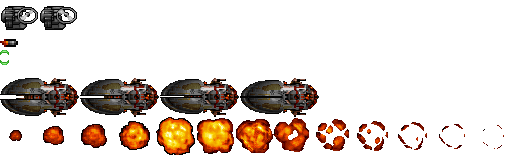
This image from the "Making Sprite-based Games with Canvas" article shows a sprite sheet for a spaceship. Notice how different states of the ship (idle, turning) are laid out in a grid, ready to be selected and drawn.
To get a solid grasp of how we'll implement this, let's start with a video that clearly explains the core mechanics.
How to Make a Game with JavaScript and HTML Canvas | Keyboard Input & Sprite Animation [Vanilla JS]
The video 'How to Make a Game with JavaScript and HTML Canvas' from Franks laboratory provides an excellent, step-by-step guide to sprite animation. We'll focus on the sections that explain how to draw a single frame and then how to cycle through frames to create animation.
First, around 12 minutes in, watch the section on Drawing Sprites with drawImage. This explains the 9-argument version of drawImage, which is the fundamental tool for our task. Pay close attention to the difference between source coordinates (from the sprite sheet) and destination coordinates (on the canvas). Next, at 26 minutes in, watch the section covering Frame-Based Animation Logic. This shows the basic logic of incrementing a frame index to cycle through the columns of the sprite sheet to create a walking animation.
As the video demonstrates, the entire process hinges on two key steps:
- Rendering: Using
ctx.drawImage()with 9 arguments to select and draw a specific rectangular frame from our sprite sheet onto the canvas. - Updating: Changing which frame we draw over time to create the illusion of movement.
Architecting a Reusable Animation System
Before we jump into code, let's design a robust system. Our current Sprite class is too simple; it can only draw one frame. We need to expand it to manage multiple animations, track the current frame, and handle timing.
A good design, inspired by the principles in the provided resources, will be to make our Sprite class a self-contained animator. An instance of this class will manage all the state for a single animated object. This is analogous to a UI component in front-end frameworks, which encapsulates its own state and logic.
Our new Sprite class will need to manage:
- The image asset.
- The dimensions of each frame (
frameWidth,frameHeight). - A dictionary of all possible animations (e.g.,
walkDown,walkLeft). - The currently active animation.
- The current frame index within that animation.
- A timer to control the speed of frame changes, making it independent of the game's overall frame rate.
Implementation: Building the Animator
Let's refactor our Sprite.js file. We'll give it a new constructor and methods for updating and controlling the animation state.
Replace the content of your existing Sprite.js file with this new, more powerful class:
Sprite.js
class Sprite {
  constructor(config) {
    // Set up the image
    this.image = config.image;
    this.frameWidth = config.frameWidth || 32;
    this.frameHeight = config.frameHeight || 32;

    // Configure animations
    this.animations = config.animations || {
      "idle-down": [ [0, 0] ], // Default idle frame [col, row]
    };
    this.currentAnimation = config.currentAnimation || "idle-down";
    this.currentAnimationFrame = 0;

    // Animation timing
    this.animationFrameLimit = config.animationFrameLimit || 8; // Lower is faster
    this.animationFrameProgress = this.animationFrameLimit;

    // Reference to the game object for positioning
    this.gameObject = config.gameObject;
  }

  // Get current animation frames
  get frame() {
    return this.animations[this.currentAnimation][this.currentAnimationFrame];
  }

  // Set a new animation
  setAnimation(key) {
    if (this.currentAnimation !== key) {
      this.currentAnimation = key;
      this.currentAnimationFrame = 0;
      this.animationFrameProgress = this.animationFrameLimit;
    }
  }

  update() {
    // Progress the animation frame
    this.animationFrameProgress -= 1;
    if (this.animationFrameProgress <= 0) {
      this.animationFrameProgress = this.animationFrameLimit;
      this.currentAnimationFrame += 1;

      // Reset if we've gone past the last frame
      if (this.frame === undefined) {
        this.currentAnimationFrame = 0;
      }
    }
  }

  draw(ctx) {
    const [frameX, frameY] = this.frame;

    ctx.drawImage(
      this.image,
      frameX * this.frameWidth,      // Source X
      frameY * this.frameHeight,     // Source Y
      this.frameWidth,               // Source Width
      this.frameHeight,              // Source Height
      this.gameObject.x,             // Destination X
      this.gameObject.y,             // Destination Y
      this.frameWidth,               // Destination Width
      this.frameHeight               // Destination Height
    );
  }
}
Let's break down the key changes:
animations: This is a dictionary where each key is an animation name (e.g.,"walk-down") and the value is an array of[column, row]pairs defining the sequence of frames on the spritesheet.currentAnimation¤tAnimationFrame: These two properties track the sprite's current state.animationFrameLimit&animationFrameProgress: This is our timer. In eachupdatecall of the game loop, we'll decrementanimationFrameProgress. When it hits zero, we advance to the next animation frame and reset the timer. This decouples animation speed from the game's render speed.gameObject: The sprite now draws at thexandycoordinates of a "game object" it's attached to. This separates the visual representation (the sprite) from the object's data (position, stats, etc.).setAnimation(key): A public method to change the animation state. This is how we'll tell the character to switch from "idle" to "walking".
Integrating the New Sprite Class
Now, we need to adjust our Engine.js to use this new system. We'll create a simple GameObject class and update our _initializeSprites method to define the character's animations.
First, add a basic GameObject class at the top of engine.js. For now, it will just hold position and a reference to its sprite.
engine.js (add at top)
class GameObject {
  constructor(config) {
    this.x = config.x || 0;
    this.y = config.y || 0;
    this.sprite = null;
  }
}
Next, let's update the Engine class. We'll create a hero game object and attach our newly configured sprite to it.
engine.js (updates to Engine class)
class Engine {
  constructor() {
    // ... (canvas, ctx, assetManager properties are the same)

    this.timeStep = 1000 / 60;
    this.lastTime = 0;
    this.accumulator = 0;

    this.hero = null; // We'll store our hero object here

    this.gameLoop = this.gameLoop.bind(this);
  }

  update(deltaTime) {
    // Update our hero's sprite animation
    if (this.hero) {
      this.hero.sprite.update();
    }
  }

  render() {
    this.ctx.clearRect(0, 0, this.canvas.width, this.canvas.height);

    // Draw the background (for context)
    const tileset = this.assetManager.get('tileset');
    if (tileset) {
        const TILES_WIDE = 26;
        const TILES_HIGH = 20;
        for (let y = 0; y < TILES_HIGH; y++) {
            for (let x = 0; x < TILES_WIDE; x++) {
                this.ctx.drawImage(tileset, 0, 0, 32, 32, x * 32, y * 32, 32, 32);
            }
        }
    }

    // Draw our hero
    if (this.hero) {
      this.hero.sprite.draw(this.ctx);
    }
  }

  // ... (gameLoop is unchanged)

  async start() {
    // ... (asset loading is unchanged)
    await this.assetManager.loadFromManifest('assets.json');
    console.log('Assets loaded!');

    this._initializeGameObjects();

    requestAnimationFrame(this.gameLoop);
  }

  _initializeGameObjects() {
    // Create the hero game object
    this.hero = new GameObject({
      x: this.canvas.width / 2 - 16,
      y: this.canvas.height / 2 - 16,
    });

    // Create the hero's sprite
    const heroImage = this.assetManager.get('hero');
    this.hero.sprite = new Sprite({
      gameObject: this.hero,
      image: heroImage,
      frameWidth: 32,
      frameHeight: 32,
      animationFrameLimit: 12, // Slower animation speed for visibility
      animations: {
        "idle-down":  [ [0,0] ],
        "idle-up":    [ [0,2] ],
        "idle-left":  [ [0,3] ],
        "idle-right": [ [0,1] ],
        "walk-down":  [ [1,0], [0,0], [2,0], [0,0] ],
        "walk-up":    [ [1,2], [0,2], [2,2], [0,2] ],
        "walk-left":  [ [1,3], [0,3], [2,3], [0,3] ],
        "walk-right": [ [1,1], [0,1], [2,1], [0,1] ],
      }
    });

    // For testing, let's make the character walk down
    this.hero.sprite.setAnimation("walk-down");
  }
}
If you run your game now, you should see the character in the center of the screen, performing a walking-down animation! The update method in Engine calls this.hero.sprite.update(), which drives the frame-cycling logic. The render method calls this.hero.sprite.draw(), which uses the current animation state to draw the correct frame.
Handling Directional State
The final piece of the puzzle is changing the animation based on player input or game events. Our setAnimation method is the key. While we haven't implemented player movement yet, we can see how this works.
For a deeper dive into managing multiple directional states and tying them to input, the following video is very insightful.
How to Make a Game with JavaScript and HTML Canvas | Keyboard Input & Sprite Animation [Vanilla JS]
Let's return to Franks laboratory. This section connects keyboard input to directional state, which is exactly what we'll be doing in a future lesson. For now, focus on how a change in input (like pressing a key) results in a change to the animation's state (changing the row of the spritesheet).
Watch the section 'Keyboard Input for Movement and Directional State'. The key concept here is modifying a state variable (player.frameY in the video, this.currentAnimation in our code) in response to an event. This is the logic we will use to make our character face different directions.
As you saw, a keydown event simply changes a state variable. The rendering loop then uses that state to select a different row from the sprite sheet. In our engine, this would translate to calling this.hero.sprite.setAnimation("walk-left") when the left arrow key is pressed.
Test your understanding!
Let's say your hero-spritesheet.png has a fourth row (index 3) that contains a 3-frame "swing sword" animation. The frames are in columns 0, 1, and 2. How would you modify the animations object in _initializeGameObjects to add this new animation, named "swing-sword"?
Show answer
You would add a new key-value pair to the animations object:
// ... inside the animations object
"swing-sword": [ [0,3], [1,3], [2,3] ],
// ... other animations
Each inner array [column, row] points to a frame on the sprite sheet. This new animation defines a sequence of three frames from the fourth row (index 3). You could then trigger it by calling this.hero.sprite.setAnimation("swing-sword").
Conclusion
Congratulations! You've just implemented one of the most visually important systems in a 2D game engine. We've gone from a static image to a character that can express multiple states through animation.
Here are the key takeaways from today's lesson:
- Sprite Animation is an Illusion: We create it by cycling through frames from a sprite sheet using the
drawImagemethod. - State Management is Key: A robust animation system relies on managing state, including the current animation, the current frame, and a timer for pacing. Our
Spriteclass now acts as a self-contained state machine for this purpose. - Decoupling Logic: We separated the sprite's visual representation and animation logic from the
GameObject's positional data. This is a clean architectural pattern that will make our code easier to manage. - Timing Control: Using a frame-based timer (
animationFrameProgress) ensures our animation speed is consistent and not tied to the monitor's refresh rate.
Preview of the next lesson:
Our character can now animate, but they're stuck in the middle of the screen. In our next lesson, we will begin Module 2, "World Navigation and Interaction," by tackling the environment itself. We will start by learning how to design a multi-layered tile map data structure, the digital blueprint for the towns, dungeons, and worlds your character will explore.
Can't find a good explanation? Sign up and we'll make it for you
Sign up