
Bun: Setting Up the Anthropic SDK
Welcome to the final project module of our course! Over the past several lessons, you've built a solid foundation: you're comfortable with Bun.js, you can wrangle the Telegram Bot API using grammY, and you've even implemented robust error handling for external services. Now, it's time to bring all those skills together to build something truly impressive: an AI-powered assistant integrated directly into our Telegram bot.
This module will guide you through building a bot that uses the powerful Anthropic Claude AI. We'll start today with the essential first step: setting up your development environment. This involves obtaining API credentials from Anthropic, installing their official TypeScript SDK, and securely configuring it within our Bun project. While the SDK will handle the low-level HTTP requests for us, the principles of secure and robust integration we covered in the last lesson remain paramount.
The Big Picture: From Bot to AI
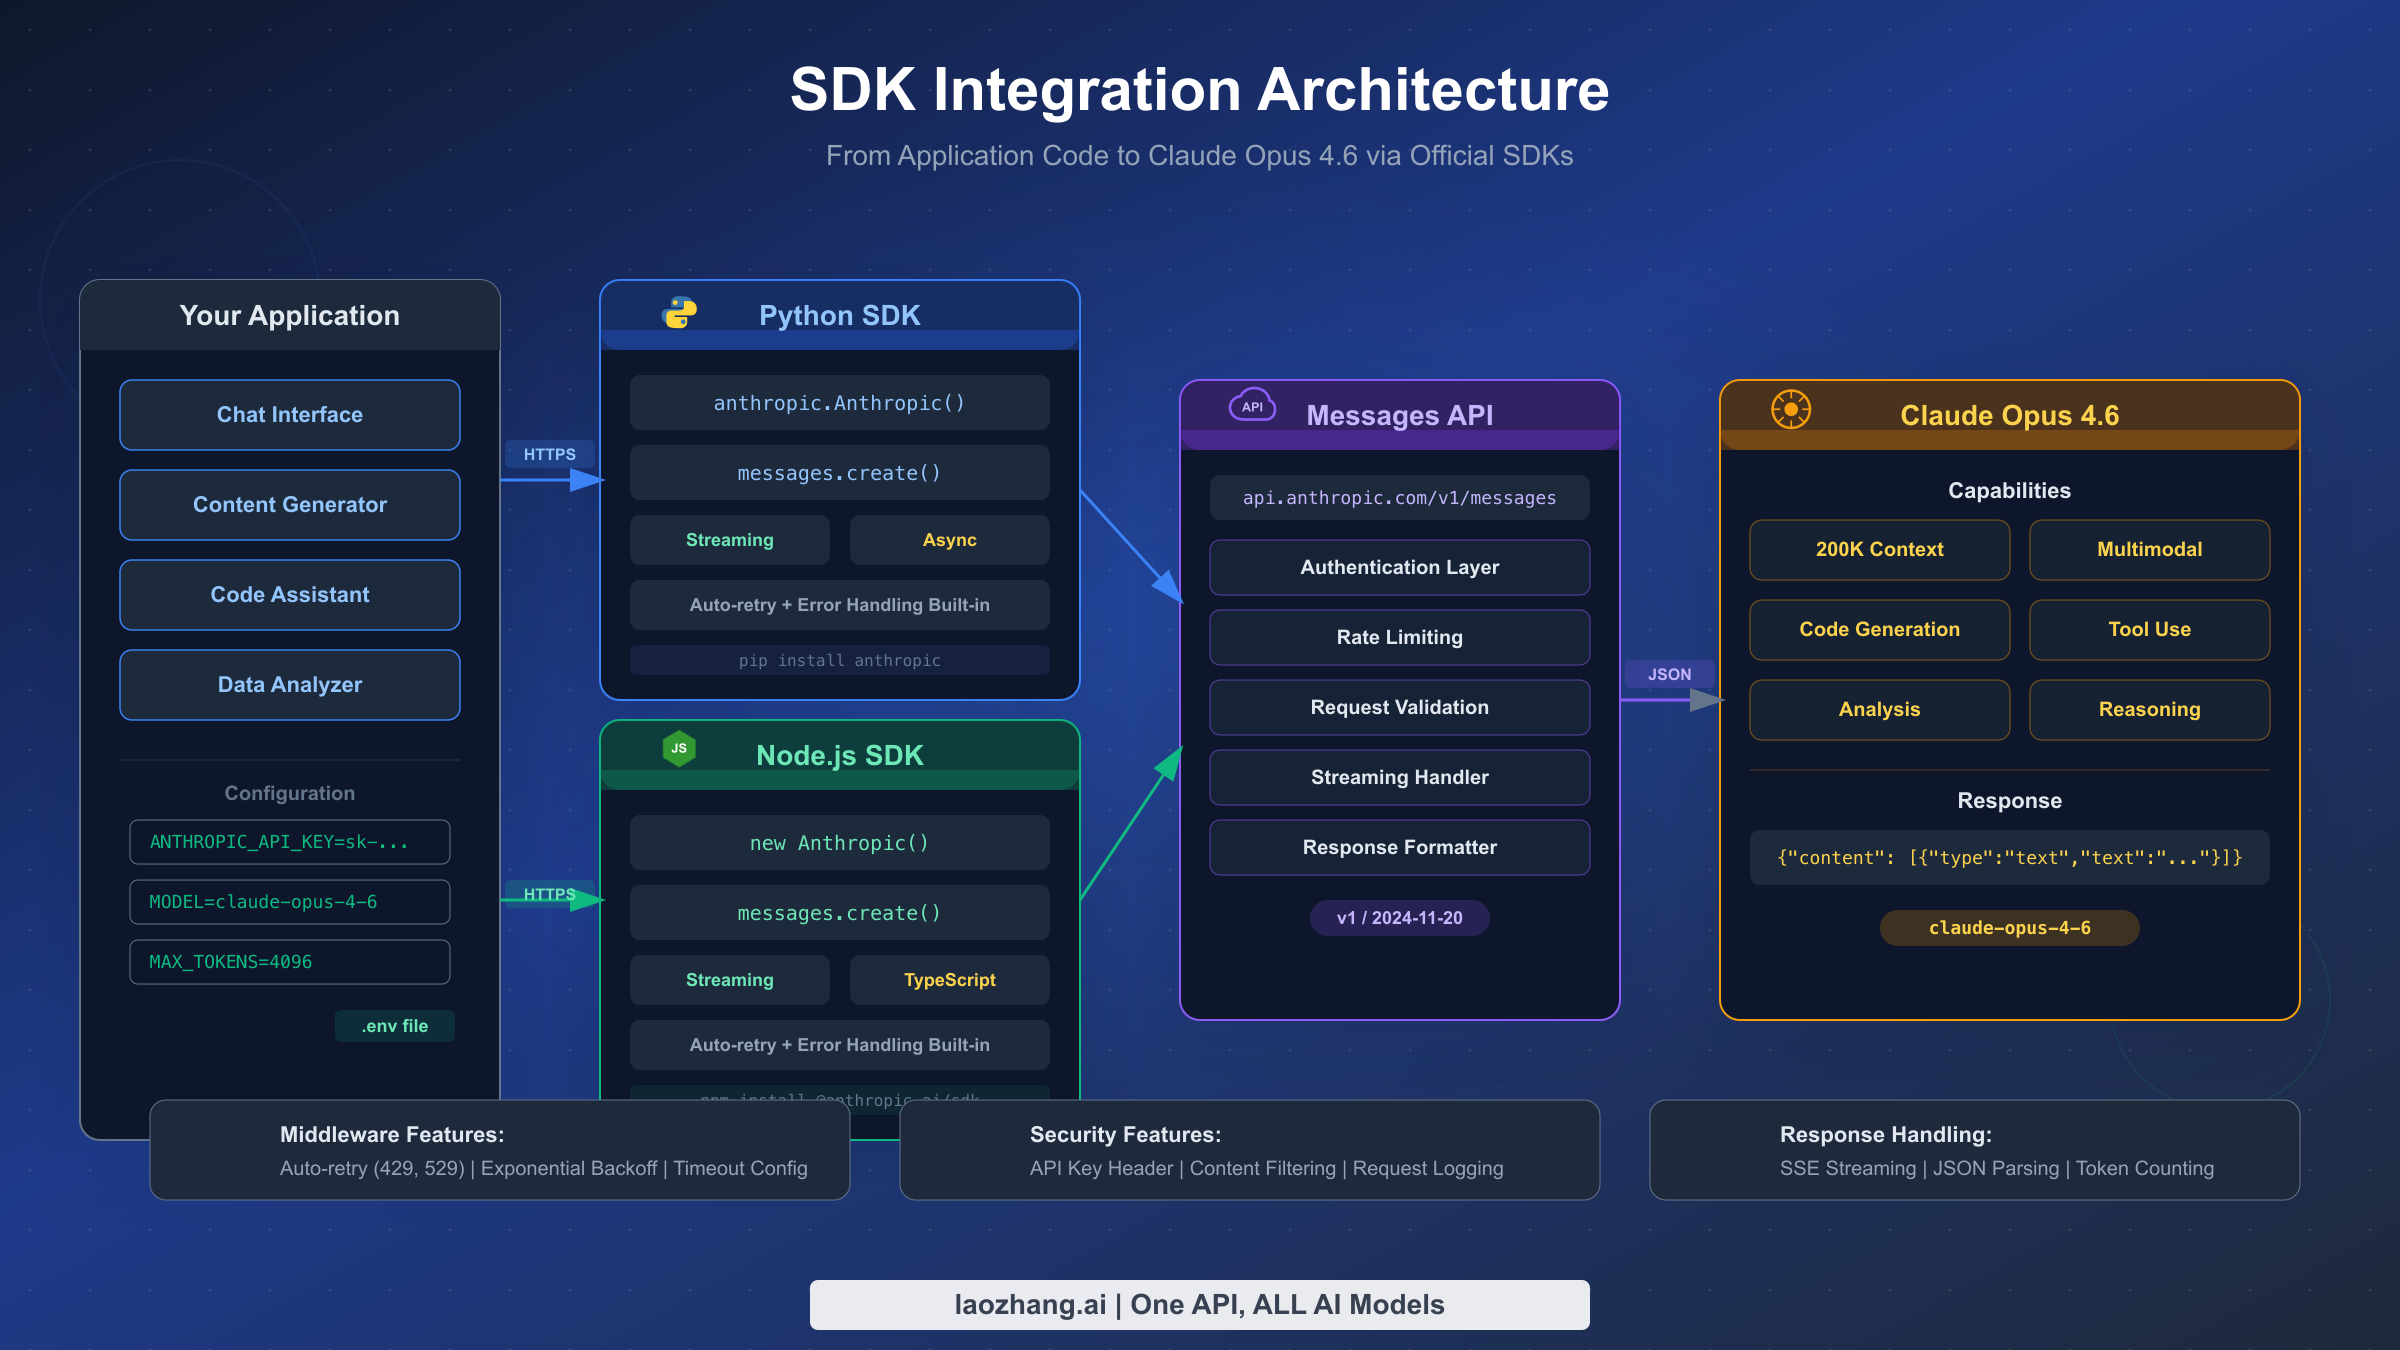
Before we dive into the code, let's look at the architecture of what we're building. Your bot will act as the user interface, receiving messages from a user in Telegram. It will then use the Anthropic SDK to pass those messages to the Claude API. The SDK acts as a specialized client, simplifying communication by handling authentication and providing strongly-typed methods for us to call. Claude processes the request and sends a response back through the SDK to our bot, which then formats it and relays it to the user.
The diagram below illustrates this flow. Our application on the left will communicate via the Node.js SDK (which works perfectly in Bun) to the Messages API, which in turn interacts with the Claude model.
Step 1: Obtain Your Anthropic API Key
Like the Telegram Bot API, the Claude API requires an API key for authentication. This key identifies your application and is used to track usage and enforce rate limits.
First, you'll need to create an account on the Anthropic platform. Once you're signed in, navigate to the API keys section in your account settings.
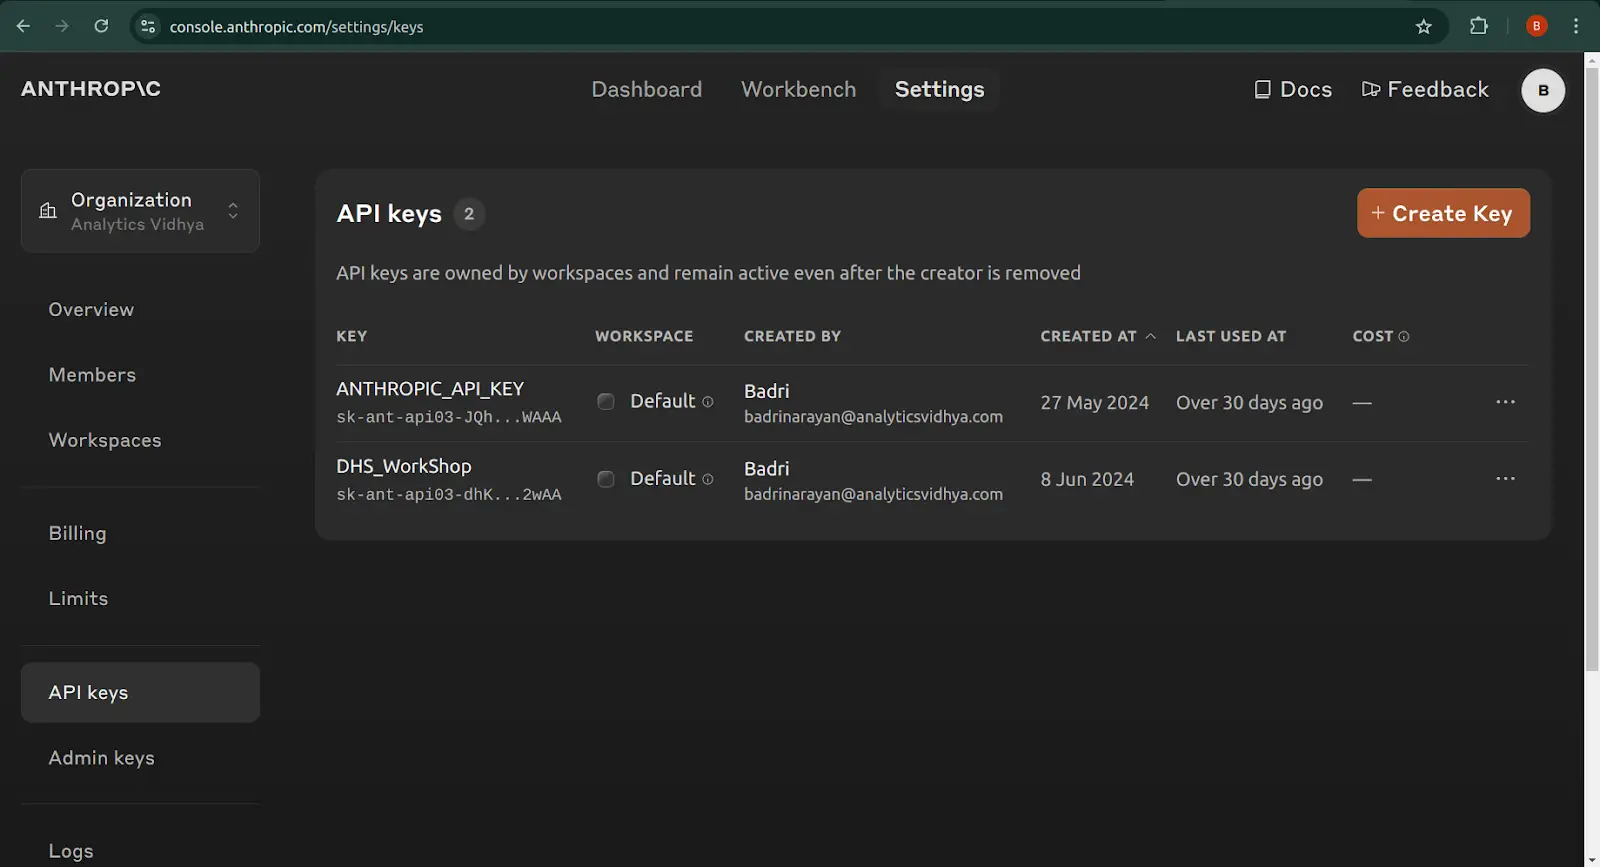
The following short video clip demonstrates how to generate a new key. A crucial point to remember is that you will only see the full key once, immediately after creation. You must copy it and store it somewhere safe.
Build with Claude as a JavaScript developer - Anthropic API
This clip from a Supabase tutorial shows the exact process of creating a new API key in the Anthropic console.
Watch from the start to see how to navigate the console, name, and create your key. Be sure to copy your new key as soon as it's generated.
Treat this key as a password. It should never be committed to version control or exposed in client-side code.
Step 2: Configure Your Bun Project
Now that you have your key, let's set up our project to use it securely.
Install the SDK
The Anthropic team provides an official TypeScript SDK that makes interacting with the API a breeze. Since you're using Bun, you can install it directly from npm using the bun add command.
bun add @anthropic-ai/sdk
The official documentation provides more details on the SDK's features, which we will explore in the upcoming lessons.
TypeScript SDK - Claude API Docs
This is the official documentation for the Anthropic TypeScript SDK. It's a useful reference for installation and basic usage patterns.
Briefly review the Installation and Requirements sections. The command is all you need for now, but it's good to be familiar with the official source.
Store the API Key in .env
As you learned in our first module, Bun has built-in support for environment variables using .env files. This is the perfect mechanism for storing our secret API key.
- Create a file named
.envin the root of your project if it doesn't already exist. - Add your Anthropic API key to this file. The SDK is configured by default to look for a specific variable name:
ANTHROPIC_API_KEY.
# .env file
TELEGRAM_BOT_TOKEN="your-telegram-token-here"
ANTHROPIC_API_KEY="your-anthropic-api-key-here"
This ensures your key is loaded into the environment when you run your bot, without being hard-coded in your source files. For a quick refresher on how Bun handles these files, you can refer to the official documentation.
This is the official Bun documentation for environment variables.
You can skim this for a refresher. Pay attention to the automatic loading of .env files and the section on reading variables using process.env. The section on TypeScript integration is also a nice touch for adding type safety, which you might appreciate.
Step 3: Initialize the API Client
With the SDK installed and the API key configured, the final step is to initialize the Anthropic client in our code. A good practice for managing external services is to encapsulate their initialization and logic in a dedicated module.
Let's create a new file: src/services/claude.ts.
Inside this file, we will import the SDK, read the API key from the environment, and export an initialized client instance. We'll also add a crucial check: if the API key is missing, we'll throw an error and prevent the bot from starting. This "fail-fast" approach is much better than discovering the misconfiguration only when a user tries to run a command.
src/services/claude.ts
import Anthropic from '@anthropic-ai/sdk';

// 1. Read the API key from environment variables
const anthropicApiKey = process.env.ANTHROPIC_API_KEY;

// 2. Fail-fast if the key is not configured
if (!anthropicApiKey) {
  console.error("ANTHROPIC_API_KEY is not set in the environment.");
  throw new Error("Missing Anthropic API Key configuration.");
}

// 3. Initialize and export the client instance
export const claude = new Anthropic({
  apiKey: anthropicApiKey,
});

console.log("Anthropic client initialized successfully.");
By default, the Anthropic constructor will look for process.env.ANTHROPIC_API_KEY, so you can even simplify the instantiation:export const claude = new Anthropic();
However, explicitly passing the key after a manual check makes the dependency clearer and allows for the robust startup validation.
Now, to ensure this initialization runs when your bot starts, you can simply import this new module in your main bot.ts file. You don't need to use the claude object just yet; the act of importing the module will execute its top-level code.
src/bot.ts
// ... other imports
import { claude } from './services/claude'; // This line triggers the initialization

// ... your bot setup
console.log("Starting Telegram bot...");

// ... bot.catch() and bot.start()
Now, run your bot using bun start.
- If your
.envfile is set up correctly, you should see "Anthropic client initialized successfully." in your console before the bot starts polling. - If you forget to add the key or misname the variable, the application will crash immediately with the error we defined, which is exactly what we want.
Conclusion
Congratulations! You have successfully laid the groundwork for our AI assistant. While it may seem like a simple setup, getting configuration and initialization right is a critical part of building reliable software.
Key Takeaways:
- SDKs provide a convenient, high-level abstraction over raw API calls.
- API keys are secrets and must be managed securely using environment variables, never hard-coded in source files.
- Bun's automatic loading of
.envfiles simplifies configuration. - A "fail-fast" approach, where the application checks for critical configuration on startup, prevents runtime errors and aids in debugging.
- Encapsulating external service clients in their own modules (
src/services/claude.ts) is a clean architectural pattern.
With the Anthropic client initialized and ready, we are poised to bring our bot to life. In the next lesson, we will implement our first AI-powered command, sending user input to the Claude API and displaying the generated response.
Can't find a good explanation? Sign up and we'll make it for you
Sign up