
Hello! Welcome to the first lesson of your Tidal Cycles course.
Over the next four weeks, we'll build the skills you need to start live coding electronic music. Our goal is to get you from the fundamentals to composing evolving techno and trance patterns, culminating in a short performance piece.
In this first lesson, we'll focus on the foundational setup. The objective is to install and configure a complete, working Tidal Cycles environment on your computer. This is a crucial first step that everything else will build upon.
The Tidal Cycles Architecture
Before we begin the installation, it's helpful to understand the different software components you'll be setting up and how they interact. The structure is often called the "Tidal Lasagna" because of its layered architecture, a concept that will be familiar from your work with software systems.
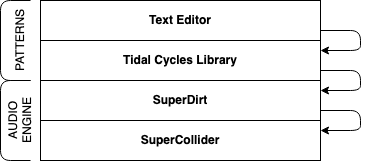
As the diagram illustrates, there are two main layers:
-
The Pattern Layer (The 'Brain'):
- Text Editor: This is where you write your code. The installation script will set up the Pulsar editor with a special Tidal Cycles plugin, but other editors like Atom or VS Code are also options.
- Tidal Cycles: This is a library written in the Haskell programming language. It runs in the background, interpreting the code you write in your editor and translating your patterns into musical control messages.
-
The Audio Engine (The 'Voice'):
- SuperCollider: A powerful open-source platform for audio synthesis and algorithmic composition. In our setup, it acts as the sound server that generates audio.
- SuperDirt: A framework running within SuperCollider that receives messages from Tidal Cycles and tells SuperCollider what sounds to play. It comes with a default library of drum machine samples, synths, and effects.
The two layers communicate using a protocol called Open Sound Control (OSC). Tidal Cycles sends OSC messages to SuperDirt, which then triggers sounds in SuperCollider. Your main interaction will be with the text editor, but understanding this underlying structure is key to troubleshooting and grasping how the system works.
Installing the Environment
We will now proceed with the installation. The official Tidal Cycles documentation provides the most current and detailed instructions. The recommended approach, especially for a new setup, is to use an automated script that handles all the components.
The instructions differ slightly depending on your operating system. The guide below is for macOS, as it's a common environment for developers. If you are using Windows, the principles are the same, but you will need to follow the Windows-specific guide instead.
This is the official installation guide for macOS from the Tidal Cycles documentation. We will use the 'Automatic installation (script)' method, which is the most straightforward approach.
Please follow the instructions in the section titled 'Automatic installation (script)'. This involves two main commands to run in your terminal: one for the Xcode command line tools and one for the tidal-bootstrap script. Note that the script can take 20-30 minutes to complete as it downloads and compiles Haskell, SuperCollider, and all other dependencies. Afterwards, use the commands in the 'Verify install' subsection (part of step 3, 'post installation') to confirm that all components were installed correctly.
Note for Windows Users:
If you are on Windows, please use the automatic installation guide for that platform instead. It uses the Chocolatey package manager.
This is the official Windows installation guide. It uses the Chocolatey package manager to automate the setup.
Follow the steps under 'Automatic installation - Chocolatey'. You will first need to install Chocolatey itself (if you don't have it) and then use it to install the tidalcycles package. This resource also contains extensive troubleshooting tips specific to Windows.
Installation processes for complex software stacks can occasionally encounter issues. If the script fails or the verification steps don't produce the expected output, the documentation pages contain manual installation instructions and troubleshooting guides. The Tidal Club forum and Discord are also excellent resources for community support.
System Check: Your First Run
Once the installation is complete and you've verified it using the command-line tools, the final step is to launch the components and ensure they can communicate. This involves a two-step startup sequence that you will use every time you start a Tidal session.
Step 1: Start the Audio Engine
- Open the SuperCollider application.
- You will see a window with a text editor. Paste the following line of code into the editor:
SuperDirt.start - Ensure your cursor is on that line, and then execute it by pressing Cmd+Return (on macOS) or Ctrl+Return (on Windows).
- The "Post window" (on the right-hand side of the SuperCollider interface) will print a lot of messages. After a few moments, you should see output indicating that
SuperDirtis listening for OSC messages. This confirms the audio engine is running and ready.
Step 2: Start the Pattern Engine
- Open the Pulsar application (which was installed by the script).
- Create a new file and save it with a
.tidalextension (e.g.,test.tidal). - The
tidalcyclesplugin you installed should automatically detect the file type and attempt to launch the Tidal Cycles environment in the background. You should see a message at the bottom of the Pulsar window indicating that Tidal has started successfully.
If both steps complete without errors, your environment is correctly configured and ready for making music.
Conclusion
In this lesson, we've laid the essential groundwork for your journey into Tidal Cycles.
Key Takeaways:
- Tidal Cycles operates on a layered architecture: a pattern layer (your editor and the Tidal/Haskell interpreter) and an audio engine (SuperCollider and SuperDirt).
- The recommended installation method uses an automated script that sets up all necessary components, including Haskell, SuperCollider, and an editor plugin.
- The standard workflow involves starting the audio engine (
SuperDirt.startin SuperCollider) before starting the pattern engine (by opening a.tidalfile in your editor).
You now have a fully functional live coding environment.
In our next lesson, we will dive straight into making sounds. You'll learn how to create your first rhythmic patterns using drum samples and explore Tidal's powerful "mini-notation" to write complex sequences with very little code. This will also be your first practical introduction to the Haskell syntax that powers Tidal Cycles.
Can't find a good explanation? Sign up and we'll make it for you
Sign up