
Configuring a Demand Plan in Demand Management
Hello. The previous module established that planning data must be proven in the Planning Data Repository before it can be trusted in a plan. You used Plan Inputs, collection parameters, and child-process logs to trace missing master and transactional data back to its source.
This module begins the Demand Management configuration labs. In this lesson, you will create a controlled demand-plan shell in the Redwood Supply Chain Planning work area and make the scope decisions that determine what data the plan can use: source system, organizations, products, calendar, time buckets, horizon, and baseline demand options. The plan will not be useful merely because it is created; it must be scoped deliberately and validated against the collected data you confirmed in Module 1.
Use a small but realistic test scope in the 26B student pod: one source system, one or a few related organizations, and a manageable product group. This makes later forecast troubleshooting explainable.
Start with the design decisions, not the Create Plan button
A demand plan definition brings together four distinct decisions:
| Decision | Question | Typical controlled-lab choice |
|---|---|---|
| Data source | Which collected planning source supplies the dimensions and demand history? | Your active Oracle Fusion source system |
| Scope | Which organizations and items can participate? | One inventory organization or a small organization hierarchy branch; selected item/category members |
| Time design | Which calendar and time bucket organize the plan? | A valid planning calendar and Month, unless the business needs weekly planning |
| Forecasting design | At which time level will forecasting operate, and which profile applies? | Use a compatible forecasting time level; select an existing approved profile if one is available |
Do not confuse these related concepts:
- Plan scope decides which organization-item combinations are eligible for the plan.
- Planning time level controls the time buckets used to store and analyze planning measures.
- Forecasting time level controls the temporal grain at which the forecasting process operates.
- Forecast level, configured later in the forecasting profile, controls the dimensional grain of the forecast, such as item-organization or product category-organization.
For example, a plan can be scoped to all items in two organizations, use monthly planning buckets, and forecast at a particular product-organization level defined by its forecasting profile. These are separate settings; changing one does not automatically repair another.
Before configuring, record your intended baseline.
| Configuration decision | Your lab value | Validate against |
|---|---|---|
| Plan name | DM_LAB_<your initials>_V1 | Unique plan name |
| Fusion source system | Manage Planning Source Systems and prior collection request | |
| Organization hierarchy / level / members | Plan Inputs: Organizations | |
| Product hierarchy / level / members | Plan Inputs: Items and your dimension hierarchy | |
| Planning calendar | Dimension catalog and available calendar dates | |
| Planning time level | Month / Week / Day | Business reporting and calendar design |
| Demand plan horizon days | Forecasting and planning design | |
| Demand history display days | Amount of history you need visible in analysis | |
| Forecasting time level | Compatible calendar time levels | |
| Existing forecasting profile, if applicable | Approved profile list or lab documentation |
A strong implementation explanation begins with this design sheet rather than with screen navigation: “I first confirm that the source, organization hierarchy, product hierarchy, and planning calendar are collected and available in the dimension catalog. Then I define the smallest scope that satisfies the forecasting use case and expand only after validating output and performance.”
Oracle’s Redwood guided process is the reference for the navigation and sequence you will use.
Create Demand Plans and Edit Demand Plan Options using a New ...
Read Oracle Help Center’s 25C readiness note on the Redwood guided process. The 26B screens in your pod may have minor presentation differences, but the plan-definition sequence and key choices remain the useful reference.
Read the opening section through the guided-process overview. In the section describing the Plans page, use the Plans entry point to confirm the expected navigation behavior. Then read the sections beginning with the Scope and Plan Horizons tabs. Follow the progression from Scope to Plan Horizons, then read the Demand, Access control, and Technical options portions. Focus on the distinction between the plan-definition settings, the Demand-step forecasting time level and profiles, and the final technical control settings. Do not attempt to design a new forecasting profile yet; that is the next lab.
Scope is a functional boundary and a performance boundary
The most consequential configuration in an initial demand plan is Scope. A plan does not automatically include every organization and item collected into Planning. It includes only the combinations admitted by its organization and product filters.
Oracle lets you filter organizations using a source system, an organization hierarchy, a level, and one or more level members. If you select a parent level, the organizations belonging beneath that parent can be included. This is useful when a regional, business-unit, or distribution-network hierarchy represents a legitimate demand-planning unit.
Product filtering works in the same way: select the relevant product hierarchy, level, and level members. It is optional, but leaving it blank means the plan can include all planned items in the scoped organizations. That may be appropriate for a mature production design, but it is rarely the right first configuration in a student environment or controlled implementation test.
Read Oracle Help Center’s “Define Scope Plan Options” as the design reference for organization filters, product filters, calendars, time levels, and horizon length.
In Plan Organizations, read organization scope. Note that source system and organization choices are required. In Plan Items, read product filtering. The key implementation point is that an omitted product filter can broaden the plan substantially. In Plan Parameters, read horizon guidance. Then read time-level rules, especially if your configuration uses a hybrid calendar or feature-based forecasting.
A scope example
Suppose the business wants an initial forecast for a retail distribution organization and one product family:
- The selected Fusion source system identifies the correct collected data set.
- The organization hierarchy is set to the hierarchy that contains the retail distribution organization.
- The selected organization level and member admit only that organization or its intended descendants.
- The product hierarchy is set to the approved product hierarchy.
- The product level and member limit the initial plan to the selected family.
The effective plan scope is the intersection of the organization selection and the product selection. If an item is collected but outside the product members, it will not be in this plan. If the item is in the product group but assigned only to an organization outside the organization scope, it will not be in this plan either.
That distinction becomes important when someone reports, “The item is in Plan Inputs but missing from the demand plan.” First verify plan scope before reopening a collection incident.
Lab: create the demand-plan definition
The guided process opens in a new browser tab. Keep your scope-design sheet open while you configure, and take screenshots at the General, Scope, Plan Horizons, Demand, and Technical options steps.
1. Navigate to the Plans page
- Open the Supply Chain Planning work area.
- Select More Actions, then Plans.
- On the Plans page, confirm that you can see plans you own or have permission to access.
- Select Create Plan.
If Create Plan is unavailable, do not treat it as a plan-definition defect. Confirm that your assigned job role has Demand Management access and that Demand Management capability is enabled, as verified in the first lab of Module 1.
2. Complete the General plan-definition tab
On the General tab, enter a meaningful, traceable plan name, such as:
DM_LAB_AB_V1
Use the naming convention required by your implementation if one exists. A useful name identifies the plan purpose and version without embedding volatile technical details such as request IDs.
Select Demand Plan as the plan type. Enter a concise description that makes the scope understandable, for example:
Initial demand-planning lab for selected retail organization and product group; monthly planning calendar.
Then review the supporting configuration fields. Their names can vary slightly by release and environment, but the General tab typically contains the following decisions.
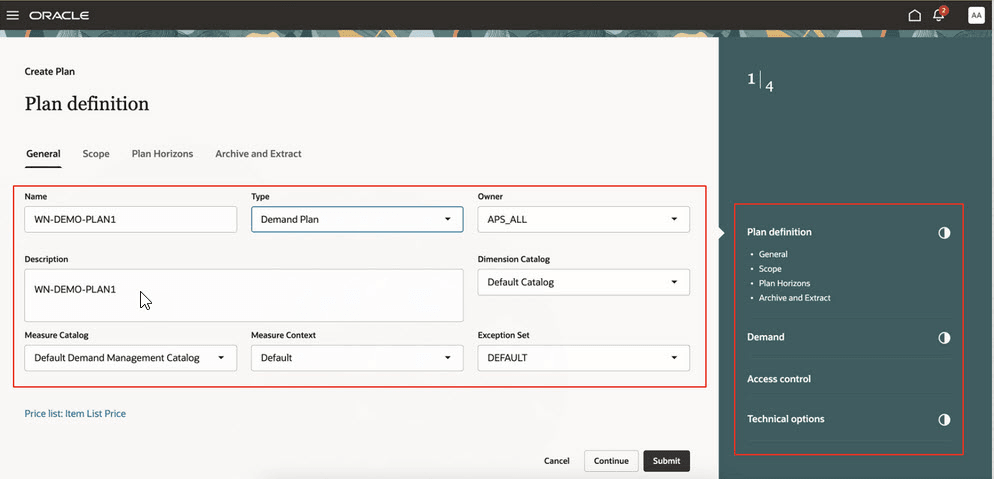
| General setting | What to do in this lab | Why it matters |
|---|---|---|
| Owner | Confirm the correct planner or implementation owner. | Ownership influences who can maintain and administer the plan. |
| Dimension Catalog | Select the catalog containing the organization, product, and time hierarchies you intend to use. | The planning calendar and scope hierarchies must be available through this catalog. |
| Measure Catalog | Use the approved Demand Management measure catalog or the delivered default for the lab. | The catalog determines the measures available for plan analysis. |
| Measure Context | Retain the appropriate default unless the design specifies another context. | It establishes the measure configuration context used by the plan. |
| Exception Set | Select the intended default or project exception set. | It controls which exceptions the plan can calculate; detailed configuration comes later. |
For a controlled first plan, avoid creating new catalogs, measure contexts, or exception sets solely to get through the screen. Those are shared configuration objects and should be changed only with a design reason.
3. Define Scope
Select Continue or open the Scope tab.
Plan organizations
- Select the correct Source System. It must be the same Fusion source system from which your master and transactional data were collected.
- Select the Organization dimension hierarchy used by the business.
- Select the appropriate Organization dimension level.
- Select the required Level Members.
- Confirm that the selected parent member does not unintentionally include organizations outside the lab scope.
Use one organization for the first test unless you specifically need hierarchy aggregation. A narrow scope makes it easier to reconcile forecast history and identify a misconfigured hierarchy.
Plan items
- Select the appropriate Product hierarchy.
- Select the Product dimension level that matches your initial forecasting scope.
- Select the intended Level Members.
- If you intentionally leave product filtering blank, document that all planned items in the selected organizations can be included.
For an initial lab, selecting a known product category or small item group is safer than leaving the item filter open. It reduces plan run time and limits the number of demand-history combinations you must validate later.
4. Configure Plan Horizons
Open the Plan Horizons tab.
- Select a Planning Calendar available in your dimension catalog.
- Select a Planning Time Level compatible with that calendar.
- Enter Demand Plan Horizon Days.
- Enter Demand History Display Days based on the history window you need to inspect during analysis.
Use these guidelines:
| Setting | Functional interpretation | Controlled-lab guidance |
|---|---|---|
| Planning Calendar | Defines the plan’s time hierarchy and available time buckets. | Use the calendar aligned with the selected business scope and catalog. |
| Planning Time Level | Determines the bucket at which you view and plan measures. | Use Month for a standard monthly forecasting lab unless weekly responsiveness is required. |
| Demand Plan Horizon Days | Determines how far into the future the plan extends. | Start with a modest but meaningful horizon, such as the delivered 180-day baseline if it fits your test calendar. |
| Demand History Display Days | Determines how much historical measure data is displayed. | Set enough days to inspect the available sales history and seasonal pattern. |
Do not set a long horizon merely because the system accepts it. Oracle explicitly notes that excessive horizon days can increase run time. Horizon length should be driven by the decision horizon, replenishment or supply lead time, and the business forecast cycle.
Important calendar check: If the calendar you expect is absent from the list, do not choose a substitute blindly. First confirm that it belongs to the selected dimension catalog. Also confirm that its dates can cover the plan horizon. A wrong calendar can produce misleading time buckets even when the plan submits successfully.
5. Handle Archive and Extract options deliberately
The guided process includes an Archive and Extract tab before the Demand step.
For this lab:
- Review the delivered settings.
- Leave archive and extract options at the project-approved or environment default unless you have a defined retention or integration requirement.
- Record any nondefault choice in your evidence sheet.
Archive and extract configuration is not the subject of this lesson. The key point is to avoid changing it accidentally while moving through the guided process.
6. Configure the Demand step
Select Continue to open the Demand step.
- Select the Forecasting Time Level compatible with the planning calendar and your intended forecast cadence.
- Review the list of forecasting profiles available to the plan.
- If an approved profile already exists in the pod, add or select it for the plan and record its name.
- If the lab environment has no approved profile, do not invent a profile design at this stage. Complete the plan shell if the page permits it, record the dependency, and create the profile in the next lesson.
A practical baseline is often monthly planning and monthly forecasting. It is not universally correct: high-volume, short-cycle businesses may forecast weekly or daily. The correct setting is the one that matches the business decision and the available history, not simply the most detailed time level.
If the plan uses a hybrid calendar, Oracle notes that the planning time level can be defaulted to its corresponding hybrid time level and cannot be changed. Treat that as a design constraint, not as a screen error.
7. Review Access control and Technical options
On the Access control step:
- Use the project access model.
- For a personal lab, retain the environment’s appropriate default only if that is permitted.
- Do not mark an implementation plan broadly accessible merely for convenience.
On the Technical options step:
- Review Demand Control parameters.
- Review Demand Parameter overrides.
- Review Forecasting control parameters.
- Retain defaults unless you have an approved requirement and can document the intended result of the override.
- Capture screenshots of any nondefault technical setting.
This is a senior-consultant discipline point: technical options are not fields to change until a plan “looks right.” They are controlled design decisions. In later troubleshooting, you will compare a forecast result against these settings, the forecasting profile, collected history, and causal-factor inputs.
8. Submit and confirm plan creation
- Select Submit.
- Wait for the success confirmation.
- Close the guided-process browser tab only after capturing the confirmation.
- Return to the Plans page and refresh it if necessary.
- Search for
DM_LAB_<your initials>_V1. - Confirm the plan appears with Demand Plan as its type.
At this point, you have created a plan definition. You have not yet proven forecast output. Oracle’s process requires a plan run before you can open the plan and analyze its results.
Validate configuration before running the plan
Open the plan row and use Edit to revisit the plan options. Validate the values against your original design sheet rather than relying on memory.
Use this configuration evidence pack:
| Evidence | What proves it |
|---|---|
| Plans-page screenshot | The demand plan exists and has the intended name and type. |
| General-tab screenshot | Catalogs, owner, and exception set are correct. |
| Scope screenshot | Correct source system, organization hierarchy and members, product hierarchy and members. |
| Plan Horizons screenshot | Correct calendar, time level, future horizon, and history display period. |
| Demand-step screenshot | Forecasting time level and selected profile status are understood. |
| Technical-options screenshot | Defaults or approved overrides are recorded. |
| Design-sheet comparison | The submitted configuration matches the intended business scope. |
A particularly useful validation is to compare the scope members with records already proven in Plan Inputs:
- Confirm that the intended organization exists under the selected source system.
- Confirm that a test item belongs to the product hierarchy member you selected.
- Confirm that the selected planning calendar is available in the plan’s dimension catalog.
- Confirm that the history period is plausible for your collected demand history.
This keeps collection validation and plan configuration connected. An item can be correctly collected yet excluded by the plan’s product filter. Conversely, a perfectly defined product filter cannot include data that was never collected.
Root-cause guide for common creation and scope problems
| Symptom | Likely root cause | Investigation and correction |
|---|---|---|
| Create Plan is missing or unavailable | Role, privilege, or capability issue | Reconfirm Demand Management access and the enabled capabilities from Module 1. |
| Required organization members are unavailable | Wrong source system, missing hierarchy membership, insufficient data access, or collection issue | Confirm source system, hierarchy setup, Planning data access, and the organization in Plan Inputs. |
| Intended items are absent from product scope | Product hierarchy or member selection does not contain the item | Check the item’s hierarchy membership and select the correct hierarchy, level, and member. |
| Plan scope is unexpectedly huge | Product filter was omitted or a high-level parent member was selected | Add a product filter or select a narrower hierarchy member; revalidate organization descendants. |
| Planning calendar is unavailable | Calendar is not associated with the selected dimension catalog or does not meet configuration conditions | Verify the dimension catalog first; do not substitute another calendar without understanding the reporting impact. |
| Desired planning or forecasting time level is unavailable | It is incompatible with the selected calendar or constrained by hybrid-calendar rules | Verify calendar design and select a compatible level; assess whether the business requirement needs another calendar design. |
| No appropriate forecasting profile is available | Profile has not been created, is not approved for use, or is not available to this plan | Document the dependency and address profile configuration in the next lesson. |
| Submit fails or Continue is disabled | A required General or Scope field is incomplete | Review name, type, source system, organization hierarchy, level, and members before changing unrelated options. |
When explaining a scope defect in an interview, avoid saying only, “I changed the plan options.” State the reasoning:
“I confirmed the item had been collected and was present in Plan Inputs. I then compared its organization and product-hierarchy membership with the demand plan scope. The item was excluded because the selected product level member did not contain it. I corrected the product scope, saved the plan options, and documented the revised scope before running the plan.”
Key takeaways
- A demand plan begins with scope design, not forecasting logic. The source system, organization selection, and product selection determine which collected data can participate.
- The dimension catalog must support the hierarchies and planning calendar used by the plan.
- Planning time level, forecasting time level, and a profile’s forecast level are distinct settings with different purposes.
- Use a narrow, auditable initial scope to make plan results, performance, and later troubleshooting manageable.
- A successful plan creation confirms only the definition was saved. Run and output validation come afterward.
- Preserve screenshots and a concise configuration sheet; they provide the baseline for forecast troubleshooting and system-integration testing.
Next, you will create and assign a forecasting profile: selecting forecasting methods, forecast horizon, forecast level, and parameters appropriate to a chosen demand pattern.
Can't find a good explanation? Sign up and we'll make it for you
Sign up