
Hello, and welcome to the first module of your ML-engineering pathway. Before models, datasets, and training loops, you need a dependable way to run Python code. This lesson establishes that foundation: each project will have its own isolated Python environment, an exact dependency record, and a notebook kernel that demonstrably uses that environment.
This is the Python equivalent of keeping a project’s dependency declaration under version control rather than relying on whatever happens to be installed globally. For ML work, that discipline matters early: a notebook that “works on my machine” is not a reproducible experiment.
By the end, you will have a small project that can be recreated from its repository and whose notebook runs against the intended Python interpreter.
What a reproducible environment contains
A reproducible Python setup has four connected pieces:
- A project directory holds source code, notebooks, dependency files, and documentation.
- A virtual environment holds an isolated Python interpreter and installed packages for that project.
- Pinned dependencies record exact package versions, including indirect dependencies installed by those packages.
- A Jupyter kernel tells a notebook frontend which Python executable should run its cells.
The distinction between the last two is important. A notebook file is not itself an execution environment. It stores cells and metadata; its kernel executes the cells. If a notebook selects the wrong kernel, an import may succeed on one machine and fail in a clean environment, even when the code is unchanged.
A virtual environment is similar in purpose to a per-project node_modules installation, but it also establishes which Python executable and Python package site are in use. The environment folder is reproducible output, not project source: do not commit it. The dependency record is the durable input that belongs in Git.
For a concise visual explanation of why isolation and dependency records matter, watch the following sections.
Python Virtual Environments - Full Tutorial for Beginners
Watch “Python Virtual Environments - Full Tutorial for Beginners” by Tech With Tim for a practical overview of creating, activating, and recreating virtual environments.
Watch the motivation for isolated environments. Then watch creation and activation, noting the operating-system-specific activation commands. Continue with package installation, then requirements files to see how exact installed versions can be exported and restored.
Build the project environment
Create one directory for this course’s hands-on work. The exact name is not important; use a name that is clear in a portfolio or repository.
ml-foundations/
├── notebooks/
├── src/
├── requirements.txt
├── .gitignore
└── README.md
From a terminal, create the directory and enter it:
mkdir ml-foundations
cd ml-foundations
mkdir notebooks src
git init
Before creating the environment, check the interpreter that will create it:
python --version
On some macOS/Linux systems, use python3 --version; on Windows, py -3 --version is often reliable. Record the exact version displayed in README.md. Dependency pins alone do not reproduce an environment if two people use materially different Python versions.
Now create the virtual environment in the project root, conventionally named .venv.
macOS/Linux
python3 -m venv .venv
source .venv/bin/activate
Windows PowerShell
py -3 -m venv .venv
.venv\Scripts\Activate.ps1
Windows Command Prompt
py -3 -m venv .venv
.venv\Scripts\activate.bat
After activation, your prompt normally begins with (.venv). That is useful, but do not treat it as the only verification. Ask the active interpreter directly:
python -c "import sys; print(sys.executable)"
The printed path should contain .venv. From now on, prefer python -m pip rather than plain pip. It makes the target interpreter explicit: the pip module launched by this particular python installs into that Python environment.
python -m pip install --upgrade pip
The Python Packaging User Guide provides the reference explanation of this workflow.
Install packages in a virtual environment using pip and venv - Python Packaging User Guide
Read the Python Packaging User Guide’s sections on virtual environments and requirements files. It explains why the environment belongs inside the project but outside version control, and why a requirements file is the portable record of installed packages.
In “Create and Use Virtual Environments,” read from the explanation of creating a local .venv folder through activation, deactivation, and reactivation. Focus on how activation changes which Python and pip commands your shell finds. In “Using a requirements file” and “Freezing dependencies,” read through the explanation that explains freeze output. The important operational point is that pip freeze records exact installed package versions so another clean environment can install them.
Add a .gitignore file now:
.venv/
__pycache__/
.ipynb_checkpoints/
Commit requirements.txt, notebooks, source files, and documentation. Never commit .venv/: it is platform-specific, potentially large, and regenerated from the dependency file.
Install packages and pin them
For this module, install the numerical and tabular libraries you will use shortly, along with ipykernel, which makes this environment available to notebooks:
python -m pip install numpy pandas ipykernel
At this moment, you requested unpinned package names. Pip resolved them into a concrete environment: a particular NumPy version, a particular pandas version, and every package those libraries require. Capture that resolved state:
python -m pip freeze > requirements.txt
Open requirements.txt. Its content will resemble:
numpy==...
pandas==...
ipykernel==...
The actual file will contain real version numbers and additional packages. Those additions are not clutter: they are transitive dependencies. Pandas depends on other packages, and those packages can have dependencies of their own. Pinning all installed packages reduces the chance that a future installation silently resolves to a newer, incompatible combination.
A version specifier has different reproducibility implications:
| Specifier | Meaning | Reproducibility |
|---|---|---|
pandas | Any version pip considers suitable | Low |
pandas>=2.0 | Any sufficiently recent version | Low |
pandas>=2.0,<3.0 | Any compatible major release | Moderate |
pandas==2.x.y | One exact release | High |
For this course, requirements.txt is an environment snapshot: it captures exactly what worked when you ran the lesson. Whenever you intentionally add, upgrade, or remove a package, regenerate it after verifying that the project still works:
python -m pip freeze > requirements.txt
This does not make reproducibility magically universal. Exact pins still rely on compatible Python versions, operating systems, and package distributions remaining available. But for a standard application or ML experiment, a pinned requirements file plus a recorded Python version is a strong, practical baseline.
Register the environment as a notebook kernel
Installing a package into .venv does not automatically guarantee that a notebook will execute in .venv. The notebook needs a registered kernel.
Run this while .venv is active:
python -m ipykernel install --user \
  --name ml-foundations \
  --display-name "Python (ml-foundations)"
On Windows PowerShell or Command Prompt, place that command on one line:
python -m ipykernel install --user --name ml-foundations --display-name "Python (ml-foundations)"
The two names serve different purposes:
--name ml-foundationsis the stable internal identifier. Keep it simple, lowercase, and without spaces.--display-name "Python (ml-foundations)"is the human-readable label you select in notebook interfaces.
The kernel registration records the path to the .venv Python executable. Therefore, it must be created from within the target environment. If you later delete and recreate .venv, run the kernel-install command again; the old kernel may still point at a deleted interpreter.
The IPython documentation gives the underlying reason and clarifies the naming behavior.
Installing the IPython kernel — IPython 9.17.1 documentation
Read “Installing the IPython kernel” from the IPython documentation. It distinguishes the Jupyter interface from the Python process that actually executes a notebook.
In “Kernels for different Python versions,” begin with the kernel explanation, then read the guidance on installing and registering a kernel from a chosen environment. In “Kernels for different environments,” read the discussion of unique kernel names, especially internal and display names. Notice that identical internal names overwrite an existing kernelspec.
In VS Code, open or create notebooks/environment_check.ipynb. Use the Select Kernel control in the top-right corner and select Python (ml-foundations).
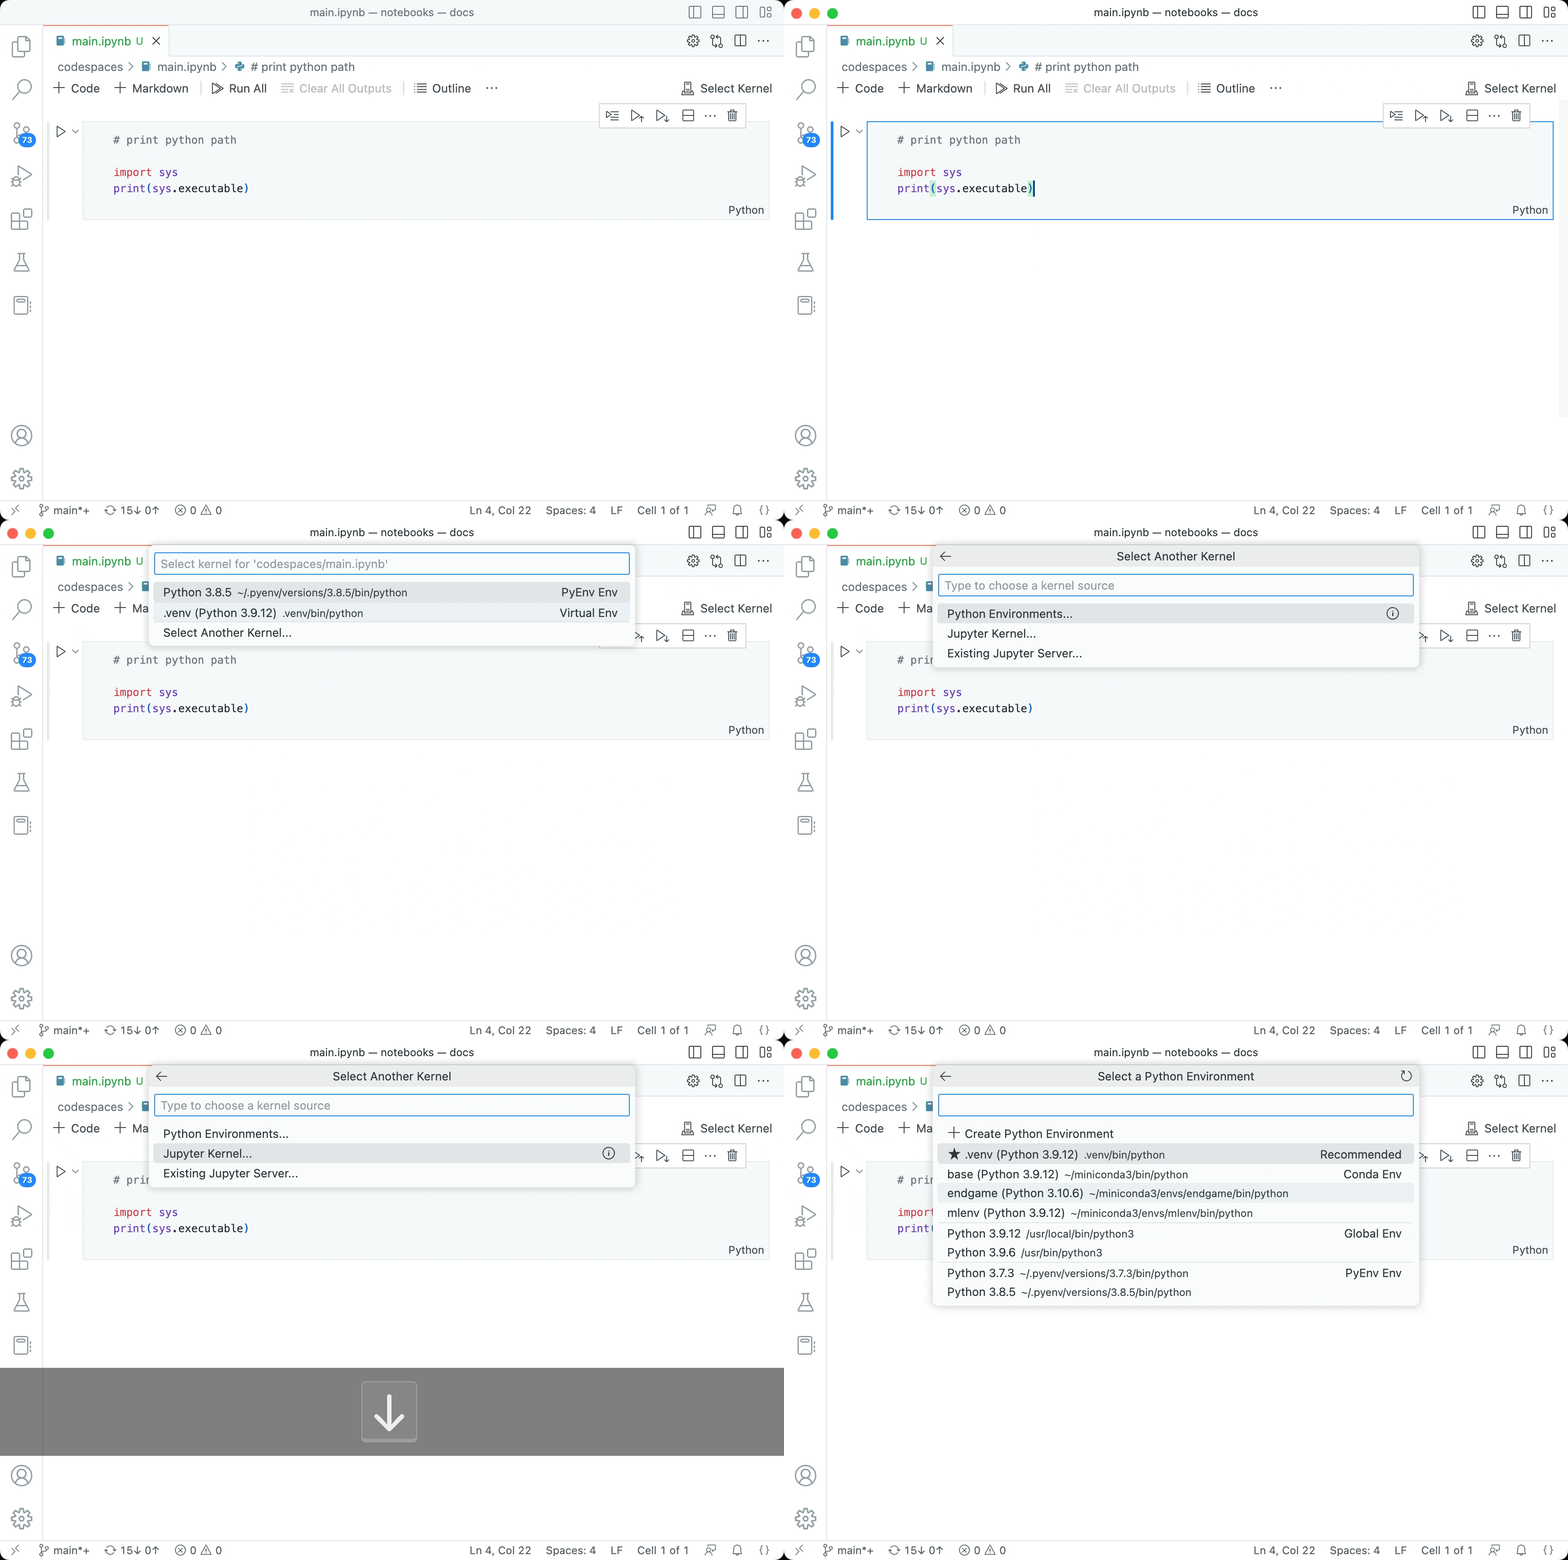
Add and run this first notebook cell:
import sys
import numpy as np
import pandas as pd

print("Python executable:", sys.executable)
print("NumPy:", np.__version__)
print("pandas:", pd.__version__)
Successful output establishes three facts at once:
- The notebook can execute Python code.
- NumPy and pandas are installed in its active environment.
- The printed executable path contains
.venv, proving that the notebook did not fall back to a global interpreter.
This is a small but valuable engineering habit: verify the runtime, not merely the UI label. Kernel labels can be duplicated or stale; sys.executable is the observable execution contract.
The clean-machine test
A reproducible project should have a setup sequence that another developer can follow without guessing. Add this minimal setup section to README.md:
Python version: [paste the output of python --version]

Setup:
1. Create and activate a virtual environment named .venv.
2. Install dependencies with: python -m pip install -r requirements.txt
3. Register the notebook kernel with:
   python -m ipykernel install --user --name ml-foundations --display-name "Python (ml-foundations)"
4. Open notebooks/environment_check.ipynb and select Python (ml-foundations).
The installation command for a fresh clone is:
python -m pip install -r requirements.txt
That sequence should work even if the machine has no globally installed NumPy or pandas. In a later project, you can validate reproducibility by creating a second clean environment, installing only from requirements.txt, registering a new kernel if needed, and running the environment-check notebook.
Your final project state for this lesson should include:
ml-foundations/
├── .venv/                  # local only; ignored by Git
├── notebooks/
│   └── environment_check.ipynb
├── src/
├── .gitignore
├── README.md
└── requirements.txt        # committed; exact package versions
Key takeaways
A virtual environment isolates a project’s interpreter and packages from your system installation and other projects. A requirements.txt created with python -m pip freeze pins the full installed package set, while a recorded Python version completes the practical setup specification. Finally, installing and selecting an ipykernel makes the notebook’s execution environment explicit and verifiable.
Next, you will use this environment to replace slow element-by-element Python loops with vectorized NumPy array operations—the computational style underlying much of numerical ML work.
Can't find a good explanation? Sign up and we'll make it for you
Sign up