
Welcome back. You have now built a room-by-room damage matrix and learned how to close its most important evidence gaps with targeted requests. The matrix is an evidence record; a preliminary scope is the controlled work plan that follows from it.
This final lesson in Evidence-Led Photo Scoping shows how to convert matrix rows into proposed work without presenting unknown conditions as facts. By the end, you should be able to draft a preliminary scope that states what is included, the evidence and quantity basis, the assumptions required to price it, what is excluded, and what must be verified before work expands. This is a core habit for moving from preliminary estimating support toward independently defensible files.
From a damage matrix to a scope
A damage matrix answers questions such as:
- What condition is documented?
- Where is it located?
- What evidence supports it?
- What action appears appropriate?
- What remains uncertain?
A preliminary scope answers a different set of questions:
- What work is proposed now?
- What is the physical boundary of that work?
- What must be true before that work can proceed?
- What is specifically not included?
- What condition would require review, added documentation, and authorization?
The key distinction is this:
A matrix may contain observations, reports, inferences, and unknowns. A scope may include only work that is supported, clearly limited, and honestly qualified.
Do not mechanically turn every matrix row into a replacement item.
| Matrix status | Appropriate scope treatment |
|---|---|
| Observed and supported | Include a defined work activity with location, extent, and method. |
| Reported but not verified | Identify it as reported; request confirmation or make it a prerequisite rather than treating it as established damage. |
| Inferred from evidence | State the inference and its basis as an assumption, or use a limited investigation/opening scope. |
| Unknown | Do not include full repair as though it were known. Create a verification need, exclusion, allowance boundary, or hold point. |
| No loss-related damage observed | Usually no repair work. Retain the documentation where it helps define the boundary of the affected area. |
For example, “Dining room wall may be affected because it shares a wall with the kitchen” is not yet a reconstruction scope. It may justify a moisture-reading request, a limited investigation, or a statement that no dining-room repair is included pending documentation. It does not justify pricing drywall replacement in that room merely because it is nearby.
The anatomy of a useful preliminary scope
A professional estimate or bid contains commercial terms, pricing, and signature requirements in addition to scope. At the preliminary-scoping stage, concentrate on the scope and protections portions first: defined work, assumptions, exclusions, and control of changed conditions.
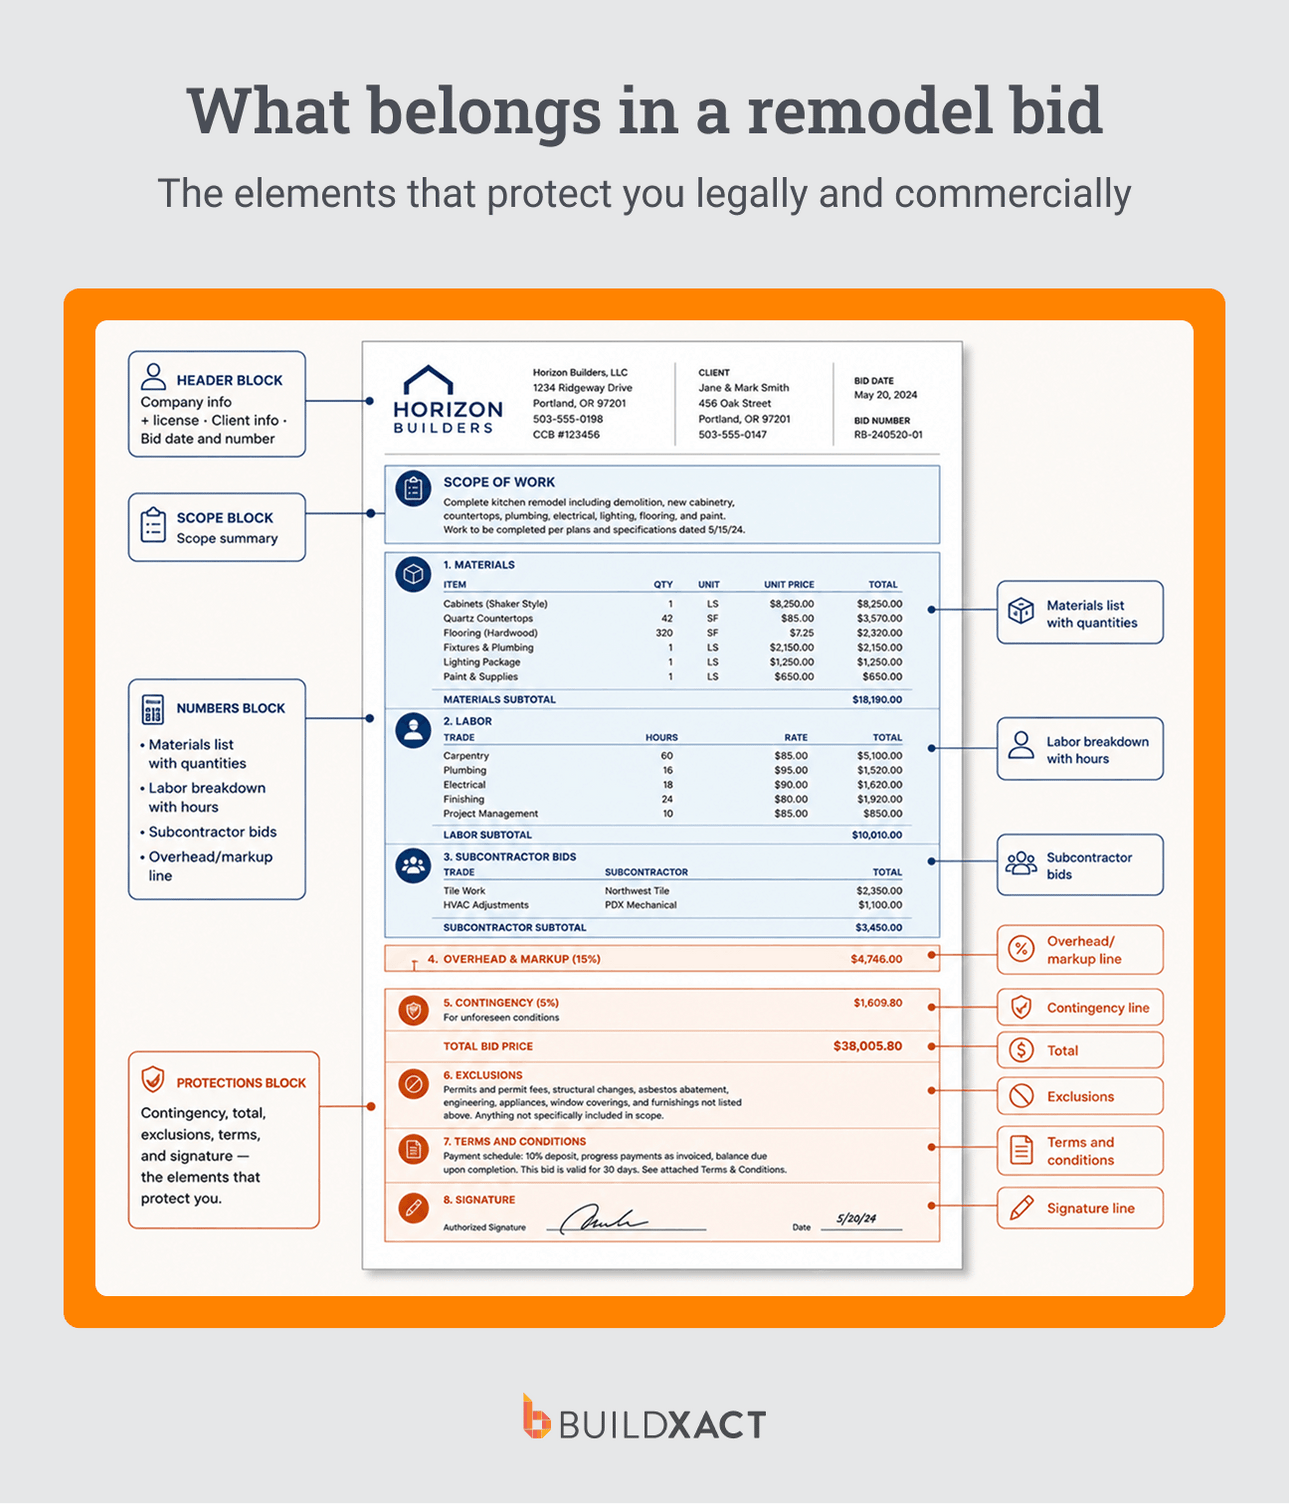
A preliminary scope normally has six parts:
-
Basis and inspection boundary
Identify the loss location, information reviewed, inspection date if applicable, and important limits of the available information. -
Prerequisites
State conditions that must be satisfied before reconstruction begins, such as source control, drying confirmation, utility make-safe, or required specialist input. -
Included work by location and phase
Organize work in a readable sequence: protection, access or selective demolition, reconstruction, finishes, and cleanup. -
Quantity and method boundaries
Distinguish visible affected area, proposed opening/removal area, replacement quantity, and finish boundary. These are often different quantities. -
Assumptions and verification items
Identify the provisional facts used to establish the preliminary scope and how they will be checked. -
Exclusions and hold points
State what is not included and what conditions require work to stop at a safe boundary until the file is updated.
The following practical reading shows this discipline for water-damaged drywall. It is written as a contractor estimating checklist, so use its structure and boundary-setting approach; do not treat it as a substitute for claim-specific requirements, local rules, or company procedures.
Drywall Water Damage Repair Estimate: Scope Checklist
Read “Drywall Water Damage Repair Estimate: Scope Checklist” from Documentorium. Focus on how it separates known conditions, demolition allowances, reconstruction work, and conditions that require a revised scope.
In “The short estimating sequence,” read the seven-step sequence. Notice especially the warning not to use the visible stain as the demolition quantity. Then read “Divide the project into phases before pricing it,” including the phase boundary. Compare source control, assessment, mitigation, and reconstruction; a preliminary reconstruction scope should not silently absorb the others. In “Define the assessment boundary,” read the inspection limitation example. Pay attention to its distinction between unknown cavity conditions and a defined opening allowance. In “Measure demolition separately from replacement,” review the surface fields and independent activities. The point is not to duplicate every listed item, but to make each quantity match its own purpose. Finally, in “A worked scope example,” read the full ceiling scope. Identify the prerequisites, defined demolition limit, hold point, reconstruction boundary, finish boundary, and exclusions.
Write scope language that can be reviewed
A useful scope sentence usually identifies five things:
Action + component + location + extent + method/boundary
For example:
Protect the kitchen floor and remaining fixed contents adjacent to the east-wall work area before authorized selective wallboard removal.
That sentence tells the reviewer what will be protected, where, and why it is connected to the repair.
Compare the following versions.
| Weak wording | Why it fails | Better preliminary-scope wording |
|---|---|---|
| “Demo damaged drywall.” | No location, quantity, cut boundary, or basis. | “Remove up to SF of visibly stained and softened gypsum wallboard at the lower Kitchen east wall, subject to field verification of wall length and removal height.” |
| “Replace cabinets if needed.” | “If needed” defines no decision rule or work boundary. | “No cabinet replacement is included. Cabinet-box condition remains pending interior, base, and floor-interface documentation.” |
| “Repair water damage.” | Blends source repair, mitigation, demolition, and reconstruction into one undefined promise. | “This preliminary reconstruction scope addresses listed finish repairs only after documented source control and completion of any required drying or remediation activities.” |
| “Paint as necessary.” | Does not identify a finish boundary. | “Prime repaired wallboard and paint the Kitchen east wall from inside corner to patio opening, subject to color and sheen verification.” |
Use standardized construction and Xactimate-aligned terminology where possible. “Remove and replace gypsum wallboard,” “detach and reset dishwasher,” and “apply stain-blocking primer” are clearer than informal phrases such as “take out the wall,” “move appliance,” or “paint it back.”
The wording must also reflect the work status accurately:
- Use proposed, includes, or allowance for when describing planned work.
- Use observed, reported, or documented for evidence.
- Use assumes, subject to verification, or pending for uncertainty.
- Use not included for exclusions.
- Use stop and document for a hold point.
Do not use a completed-work verb such as “removed” or “installed” in a preliminary reconstruction estimate unless you are documenting work that has actually already occurred.
The conversion method: five disciplined passes
Take your damage matrix and work through it in five passes. This prevents a common failure: building line items first and trying to explain them afterward.
1. Group rows into repair packages
Group matrix rows by:
- structure and floor;
- room;
- affected assembly;
- work phase; and
- trade responsibility where known.
For a kitchen water loss, a clean structure may look like this:
- Kitchen: protection and contents access
- Kitchen east wall: selective opening and drywall reconstruction
- Kitchen base cabinet: condition verification only
- Kitchen flooring: transition/continuity verification only
- Dining room shared wall: no reconstruction pending moisture documentation
- Plumbing source: excluded pending plumber findings
This organization makes omissions and unsupported additions easier to spot. It also provides the foundation for later Xactimate room organization and estimate headings.
2. Include only work with a documented basis
For each proposed activity, ask:
- What documented condition requires this activity?
- Which matrix row and evidence reference support it?
- Is the quantity measured, photo-derived, or an explicitly limited allowance?
- Is the work dependent on a prerequisite or field verification?
If you cannot answer these questions, do not turn the activity into firm base work yet.
A scope can include investigation or selective opening where that is what the evidence supports. It should not jump directly from a small visible stain to full-room demolition.
3. Separate four different physical boundaries
One observed condition can produce several different quantities:
| Boundary | What it means | Example |
|---|---|---|
| Visible affected area | What can be seen in photos or during inspection | Approximately – SF of lower-wall staining |
| Opening/removal area | The area proposed for access or demolition | Up to SF of gypsum board, aligned to framing where feasible |
| Replacement area | Material to be installed after verified removal | Actual removed gypsum-board area, measured after opening |
| Finish boundary | The area needed for acceptable texture or coating transition | Prime and paint the defined wall elevation, not automatically the entire room |
Do not apply the same square footage to every activity simply because it is the easiest quantity available. Selective drywall removal, backing, insulation replacement, texture blending, and paint may each have a different basis.
4. State assumptions as testable provisional facts
An assumption is not a vague disclaimer. It is a specific condition you are temporarily relying on so the preliminary scope can be prepared.
A good assumption is:
- specific enough to be verified;
- relevant to a quantity or method;
- visible to the reviewer; and
- paired with a consequence if it proves false.
For example:
This preliminary scope assumes one visible layer of gypsum wallboard at the Kitchen east wall. Additional board layers, wet insulation, damaged framing, or concealed mechanical work are not established by the current record and require documentation before added work is scoped.
That statement does not hide uncertainty. It identifies the working assumption and names the conditions that would change the scope.
5. Write exclusions and hold points precisely
An exclusion identifies work that is not part of the preliminary scope. A hold point identifies a condition that prevents affected work from continuing without review.
Examples of clear exclusions:
- Plumbing leak diagnosis and source repair.
- Water extraction, structural drying, and drying-equipment monitoring.
- Mold assessment, protocol development, remediation, testing, and clearance.
- Hazardous-material testing, abatement, and regulated disposal.
- Repairs to cabinet components, flooring beyond the listed area, structural framing, and electrical systems unless separately documented.
- Contents packing, storage, and manipulation beyond the stated protection activity.
Examples of clear hold points:
If the authorized wall opening reveals wet insulation, visible suspect microbial growth, an additional wallboard layer, unsafe electrical conditions, framing damage, or damage beyond the defined opening, stop affected work, document the condition with photographs and measurements, and obtain required authorization before expanding the scope.
A hold point is better than an unlimited statement such as “remove material as needed.” It protects the integrity of both the estimate and the work plan.
Worked conversion: preliminary kitchen scope
Return to the example developed in the previous lessons.
Selected damage-matrix entries
| Location/component | Evidence and condition | Preliminary action | Uncertainty |
|---|---|---|---|
| Kitchen east-wall lower drywall | P-12 and P-13 show staining and apparent softening; photo-derived visible area approximately – SF | Selective removal and reconstruction considered | Wall length, final cut height, cavity condition, insulation condition |
| Kitchen base cabinet | P-15 shows toe-kick swelling/delamination | Repairability to be evaluated | Cabinet interior, cabinet-box base, connections, and dimensions not documented |
| Dining room shared wall | Field note reports elevated moisture; P-20 has no visible damage | Request moisture documentation and field observation | Exact readings, location, date, meter type, material condition |
| Reported plumbing source | Source repair is reported but no invoice/findings are in file | Obtain plumbing record | Source control status and repair details unknown |
Here is what a defensible preliminary reconstruction scope could look like. It does not decide coverage and does not represent a final repair authorization.
Basis and prerequisites
Basis of preliminary scope: Prepared from the current sketch, field notes, and photographs P-12 through P-20. The scope is limited to documented Kitchen east-wall finish damage and associated controlled access.
Prerequisites: Written confirmation of source control and any project-required drying or remediation completion must be obtained before affected reconstruction begins. The plumbing repair record remains requested and pending.
Included Kitchen work
Protection and access: Protect the Kitchen floor and remaining fixed contents adjacent to the east-wall work area. Coordinate safe access around base cabinets and appliances.
Selective wallboard removal: Remove up to SF of visibly stained and softened gypsum wallboard at the lower Kitchen east wall. Confirm actual wall length, cut height, board layers, and cavity condition at authorized opening. Photograph and measure the opening before reconstruction.
Reconstruction: Replace the verified removed gypsum wallboard area with matching board type and thickness after assembly conditions are confirmed. Provide ordinary backing only where required by the verified repair opening. Tape, finish, and prepare the repaired area for the defined texture and paint transition.
Prime and paint: Prime new gypsum board and joint-compound surfaces. Paint the repaired east-wall finish boundary after color, sheen, and extent are field verified.
Notice the restraint:
- The scope does not say that insulation is wet.
- It does not include cabinet removal or replacement.
- It does not state that the entire wall must be painted.
- It does not use the visible-stain quantity as a guaranteed final reconstruction quantity.
- It defines what will be documented when access occurs.
Assumptions and pending verification
Assumptions: The preliminary demolition allowance is based on the visible affected area shown in P-12 and P-13. It assumes one layer of gypsum wallboard and ordinary non-hazardous construction debris within the defined opening.
Pending verification: Confirm cabinet condition, wallboard removal height, actual opening dimensions, cavity conditions, insulation condition, texture, paint color, and paint sheen. The Dining Room shared wall has no included reconstruction work pending a dated, location-specific moisture record and supporting field observation.
Exclusions and hold point
Not included: Plumbing diagnosis or repair; water extraction; drying equipment; moisture monitoring; mold assessment, remediation, testing, or clearance; hazardous-material testing or abatement; electrical repairs; insulation replacement beyond verified documented conditions; framing repair; cabinet repair or replacement; flooring replacement; and reconstruction in the Dining Room.
Hold point: If authorized opening reveals wet insulation, suspect hazardous material, suspect microbial growth, additional board layers, damaged framing, active moisture, or mechanical/electrical conditions requiring qualified-trade work, stop affected work at the safe boundary. Document the condition and revise the scope only after required review and authorization.
This is not “less complete” because it excludes possible work. It is more complete because it tells the reviewer exactly what is known, what is included now, and how the file will handle changed conditions.
A reusable preliminary-scope template
Use this template in your estimate notes, scope worksheet, or company format before building final line items.
1. Basis of scope
Prepared from [photos, sketch, report, field notes] dated [date]. Scope is limited to [rooms/components] documented in [evidence references]. Inspection/access limitations: [state relevant limitations].
2. Prerequisites
Reconstruction is contingent on [source control, drying documentation, utility make-safe, testing, protocol, specialist finding, or other requirement].
3. Included work
Organize by room and work phase:
[Room — protection]: [defined protection activity].
[Room — selective removal/access]: [component], [maximum or measured extent], [method/boundary], [documentation requirement].
[Room — reconstruction]: [assembly/component], [verified repair extent], [identified finish level or transition].
[Room — finish]: [texture/primer/paint], [specific boundary], [selection or matching verification].
4. Assumptions and pending items
Quantity and method are based on [specific evidence]. This preliminary scope assumes [testable condition]. The following remain pending: [measurements, reports, observations, specialist input].
5. Exclusions
Not included: [specific service, trade, component, room, or work category].
6. Hold point and change control
If [defined changed condition] is encountered, stop affected work, document [photos/measurements/report], and obtain required review and authorization before additional work proceeds.
Keep assumptions, exclusions, and hold points close to the affected work when possible. A single generic disclaimer at the end of an estimate is easy to overlook and rarely explains how a particular uncertain condition affects a particular room.
Final quality check before turning scope into estimate items
Before pricing or building Xactimate line items, perform this short review:
- Does every included scope activity connect to at least one matrix row and evidence reference?
- Have reported facts been kept separate from observed facts?
- Is each included quantity measured, photo-derived, or plainly labeled as a limited allowance?
- Are demolition, replacement, and finish boundaries separated where they differ?
- Does the scope define prerequisites such as source control or required drying/remediation documentation?
- Are assumptions factual, testable, and relevant to the scope?
- Are exclusions specific enough that another estimator knows what is not being priced?
- Does every meaningful hidden-condition risk have a clear hold point?
- Have you avoided using “as necessary,” “repair all damage,” or other wording that creates an undefined obligation?
- Would a reviewer understand what is proposed without making the same inferences you made from the photographs?
For your next practice file, draft the scope from the matrix before entering new estimate items. Then compare every scope sentence with the matrix. If a sentence has no evidence row, no stated assumption, and no clear verification path, it needs revision or removal.
Key takeaways
A preliminary scope is a controlled translation of evidence into proposed work. It should:
- include only work supported by the current file;
- distinguish observed damage from reported, inferred, and unknown conditions;
- separate visible damage, removal, replacement, and finish quantities;
- identify prerequisites before reconstruction;
- state testable assumptions rather than hiding uncertainty;
- use precise exclusions for work not included; and
- establish hold points for concealed or changed conditions.
You have now completed the evidence-led photo-scoping workflow: classify the information, distinguish loss-related conditions, estimate dimensions cautiously, build a room-by-room matrix, request missing evidence, and turn that matrix into a bounded preliminary scope.
Next, the course moves into Residential Assemblies, Repairability, and Trade Sequencing. You will begin by identifying the layers and connections in common wall, ceiling, and floor assemblies, so that your scopes describe not merely a damaged surface but the repairable system behind it.
Can't find a good explanation? Sign up and we'll make it for you
Sign up