Hello! Welcome to our next lesson.
In our previous lessons, we explored the two dominant pre-training objectives that give language models their power: Masked Language Modeling (MLM) for deep contextual understanding (like in BERT) and Causal Language Modeling (CLM) for sequential text generation (like in GPT). These models are trained on vast, general-domain text, making them powerful "generalists."
Today, we'll bridge the gap between these generalist models and real-world applications. Our learning outcome is to fine-tune a pre-trained language model for a downstream text classification task. This process, a form of transfer learning, is one of the most common and effective ways to leverage the power of large language models.
By the end of this lesson, you will understand:
- The concept of fine-tuning and how it adapts a pre-trained model.
- The architectural change of swapping a model's head for a new task.
- How to implement fine-tuning using the high-level Hugging Face
TrainerAPI. - The lower-level implementation details of a fine-tuning loop in PyTorch.
1. From Pre-training to Fine-tuning: Specializing the Generalist
Fine-tuning starts where pre-training ends. We take a model that has already learned the nuances of language—grammar, syntax, semantics, and a great deal of world knowledge—and adapt it to a specific, or "downstream," task.
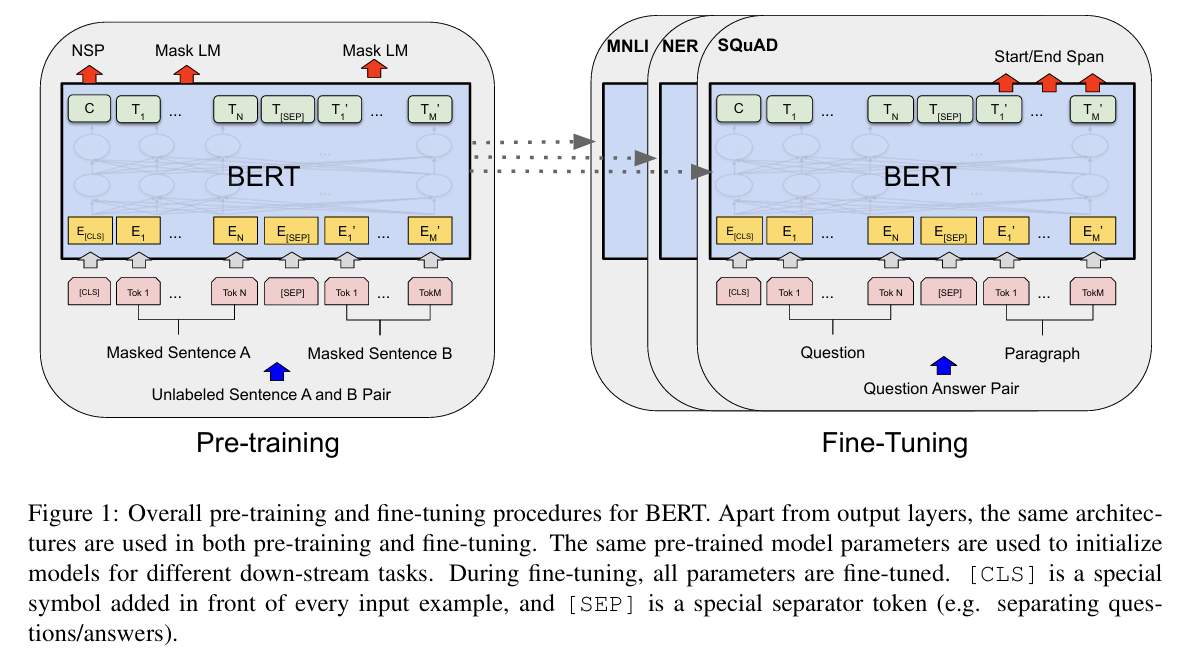
The core idea is to replace the model's original "head"—the final layers used for the pre-training objective—with a new, randomly initialized head designed for our specific task. For text classification, this is typically a simple linear layer that outputs probabilities for each class. We then continue the training process, but on a smaller, labeled dataset specific to our task. During this phase, we update the weights of both the new head and, crucially, the pre-trained body of the model.
This allows the model to adjust its vast, general knowledge to the specifics of our task, which is far more efficient in terms of data and computation than training a model from scratch.
Fine-Tuning BERT for Text Classification (w/ Example Code)
To begin, let's get a clear conceptual overview of fine-tuning and text classification. This video explains the distinction between pre-training and fine-tuning and provides practical examples of text classification tasks.
Watch the first two segments from 00:42 to 09:41. The first part (until 08:30) explains fine-tuning versus pre-training and introduces BERT's training objectives. The second part (from 08:30) defines text classification.
2. The Practical Path: Fine-tuning with the Hugging Face Trainer
The Hugging Face transformers library provides a powerful and convenient abstraction called the Trainer API. It handles the complexities of the training loop, allowing you to focus on the data, model, and hyperparameters.
The workflow is straightforward and consists of a few key steps:
- Load Data, Tokenizer, and Model: Load a task-specific dataset and the corresponding tokenizer and pre-trained model. For classification, we use
AutoModelForSequenceClassification, which automatically loads a pre-trained model like BERT and attaches a classification head. - Preprocess Data: Use the tokenizer to convert the text into numerical IDs, applying padding and truncation to create uniform batches.
- Define Evaluation Metrics: Create a function that the
Trainercan call to compute metrics like accuracy, F1-score, etc., during evaluation. - Configure Training Arguments: Use the
TrainingArgumentsclass to specify all hyperparameters for the training run, such as learning rate, number of epochs, batch size, and where to save model checkpoints. - Instantiate and Run Trainer: Create a
Trainerobject, passing in all the components from the previous steps, and call the.train()method to begin fine-tuning.

The official Hugging Face documentation provides a concise, code-first guide to this process. It's an excellent reference for the Trainer workflow.
Read through the guide from 'Start by loading...' to the end. Focus on the code blocks and how they correspond to the steps outlined above. Notice the AutoModelForSequenceClassification class, the TrainingArguments, the compute_metrics function, and finally the Trainer instantiation.
Now, let's see these steps in action. The following video walks through a complete example of fine-tuning BERT for a classification task using the Trainer API.
Fine-Tuning BERT for Text Classification (w/ Example Code)
This video provides a complete, commented code walkthrough of the process we just read about. It covers everything from loading the data to evaluating the final fine-tuned model.
Watch from 10:54 to 22:08. Follow the code as it implements each step: 10:54 - 13:09: Loading the dataset, tokenizer, and AutoModelForSequenceClassification. 13:09 - 15:38: A discussion on freezing layers. This is an optional but important technique where you only train the top layers to save computation, a method sometimes called 'transfer learning' in a stricter sense. 15:38 - 17:09: Preprocessing the text with the tokenizer. 17:09 - 19:07: Defining the compute_metrics function. 19:07 - 22:08: Setting up TrainingArguments, creating the Trainer, and running the fine-tuning and evaluation.
3. Under the Hood: A Custom PyTorch Fine-tuning Loop
The Trainer API is incredibly convenient, but your background in software engineering and AI warrants a deeper look. What is the Trainer actually doing? Let's build a fine-tuning loop from scratch using PyTorch to understand the mechanics. This gives you maximum flexibility and control.
The core components are:
- Custom Model Class: We define a PyTorch
nn.Modulethat encapsulates the pre-trained BERT model. In itsforwardpass, it sends the input through BERT, takes the output embedding for the[CLS]token, passes it through a dropout layer (for regularization) and one or more linear layers to produce the final class logits. - PyTorch
DataLoader: We wrap our tokenized datasets in PyTorch'sTensorDatasetandDataLoaderto handle batching and sampling efficiently. - Optimizer and Scheduler: We use the
AdamWoptimizer, which is standard for training Transformers, and a learning rate scheduler to decay the learning rate over time for more stable convergence. - The Training and Evaluation Functions:
train_epoch(): Iterates through the trainingDataLoader, performs a forward pass, computes the loss (e.g., Cross-Entropy), performs a backward pass to calculate gradients, and updates the model weights using the optimizer. It often includes gradient clipping to prevent exploding gradients.eval_epoch(): Iterates through the validationDataLoaderwith gradients disabled (torch.no_grad()) to efficiently calculate validation loss and accuracy.
BERT Implementation: A Step-by-Step Guide
This article provides a step-by-step guide to building a custom fine-tuning pipeline in PyTorch. It's a great textual reference for the process.
Skim through the sections starting from 'Split the Dataset into Train/Test' to 'Make Predictions'. Pay attention to these key parts: Model Architecture: See how the BERT_Arch class is defined around the pre-trained bert model. Data Loader: How TensorDataset and DataLoader are set up. Fine-Tune: The structure of the train() and evaluate() functions, which form the core of the training loop. Don't worry about memorizing the code; focus on understanding the flow and the purpose of each component.
The video below provides a hands-on coding session demonstrating this custom loop. Seeing it built live can be very insightful.
Text Classification | Sentiment Analysis with BERT using huggingface, PyTorch and Python Tutorial
This detailed tutorial walks through creating a sentiment classifier from scratch in PyTorch, covering the model definition, training loop, and evaluation.
Focus on these two key segments: Building the Classifier (17:41 - 23:55): Watch how a custom SentimentClassifier class is created as an nn.Module. This is where the pre-trained BERT model is integrated with a new classification head (dropout and linear layers). The Training Loop (23:55 - 32:58): This is the core of the implementation. Observe how the AdamW optimizer and learning rate scheduler are set up. Pay close attention to the train_epoch function, especially the forward pass, loss calculation, loss.backward(), optimizer step, and gradient clipping.
Test your understanding!
What is one key advantage of using the high-level Hugging Face Trainer API compared to writing a custom PyTorch training loop? Conversely, what is a key advantage of the custom loop?
Show answer
-
Advantage of
TrainerAPI: Simplicity and robustness. It abstracts away the boilerplate code for the training loop, evaluation, logging, and saving checkpoints. It also seamlessly integrates advanced features like mixed-precision training and distributed training with minimal configuration. -
Advantage of Custom Loop: Flexibility and control. With a custom loop, you have complete control over every step. This is useful for complex or non-standard training procedures, advanced research, or when you need to integrate the training logic tightly into a larger application. It also provides a deeper understanding of the underlying mechanics.
Conclusion
You have now learned how to bridge the gap from general-purpose pre-trained models to specialized, high-performance models for specific tasks. Fine-tuning is a cornerstone of modern NLP, enabling the practical application of large language models across countless domains.
Key Takeaways:
- Fine-tuning adapts a pre-trained model to a downstream task by training it further on a smaller, task-specific labeled dataset.
- The process involves replacing the model's pre-training head with a new task-specific head (e.g., a classification layer).
- The Hugging Face
TrainerAPI provides a high-level, efficient, and robust way to perform fine-tuning with minimal boilerplate code. - Writing a custom training loop in PyTorch offers maximum flexibility and a deeper understanding of the mechanics, including model definition, optimizers, schedulers, and gradient management.
Preview of the Next Lesson:
Today, we successfully performed transfer learning in practice. In our next lesson, we will take a step back to formalize the principles and benefits of transfer learning in NLP. We'll discuss why it's so effective, explore different strategies beyond simple fine-tuning, and understand its profound impact on the field.